3
ENGLISH
3. UNPACKING
WARNING
Children should not be allowed in reach of the packaging elements (plastic bags and expanded polystyrene) as they are
potential sources of danger.
CAUTION
Do not lift or manoeuvre the carton by using the shipping bands.
When moving the unit by hand, remove the panels and hold the unit frame.
Always wear protective gloves when carrying the unit.
When handling the carton or the unpacked unit, work in pair to prevent injury.
NOTICE
Remove shipping carton, tape(s) and packing. If packing material is left in the icemaker, it will not work properly.
Note: This icemaker needs a storage bin. Hoshizaki recommends the following ice storage bins:
B801SA (Top Kit IMD) -------IM-240D/IM-480D/IM-720D
B700SF -------------------------IM-240D/IM-480D
B800SF (Top Kit 4) ----------IM-480D/IM-720D
B900SF (Top Kit 8) ----------IM-480D/IM-720D
1) After removing the packaging, make sure that the icemaker and the storage bin are in good condition. If in doubt, please do
not use the icemaker but apply to professionally qualified personnel. See the instruction sheet attached to the storage bin for
its unpacking and installation guidelines.
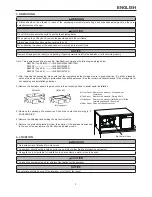
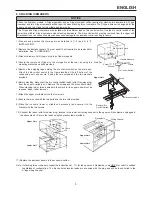
2) Remove the icemaker panels to gain access to the accessory kit and to assist easier installation.
3) Remove the package of accessories. Check the contents according to “2.
ACCESSORIES”.
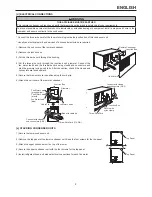
4) Remove the shipping tape holding the bin control switch.
5) Remove the protective plastic film from the exterior. If the icemaker is exposed
to the sun or to heat, remove the film after the icemaker cools.
4. LOCATION
WARNING
This icemaker is not intended for outdoor use.
The icemaker should not be located next to ovens, grills or other high heat producing equipment.
This appliance is not suitable for installation in an area where a water jet could be used.
CAUTION
The location should provide a firm and level foundation for the icemaker.
NOTICE
Do not place anything on top of the icemaker or in front of the louver.
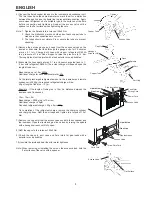
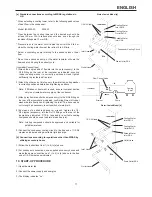
a) Front Cover: Remove the screw(s). Lift up and pull
toward you.
b) Top Panel: Remove the screw(s). Simply lift off.
c) Side Panel: Remove the screw(s) [IM-240X only]. Slide
forward slightly, and then lift off.
d) Rear Panel: Does not require removal.
[IM-240D]
[IM-240X]
(No top panel)
Bin Control Switch

