background image

36

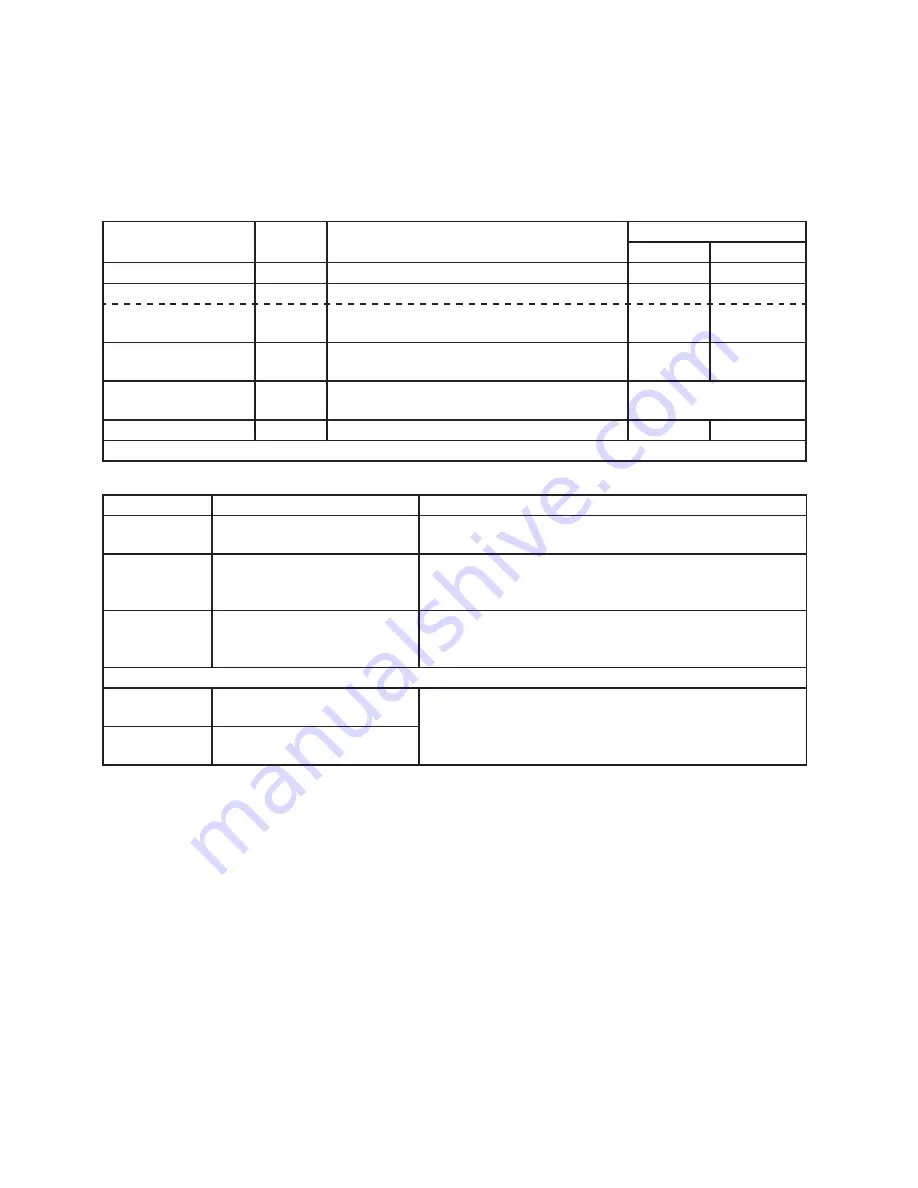
B. LED Lights and Audible Alarm Safeties

Beep occurs and red CB "POWER OK" LED turns on when control switch is moved to 
"ICE" position.

Sequence

Green LEDs 1 through 5 turn on and sequence from initial startup as listed in the table 
below. Order of green LEDs from the outer edge of control board is 1, 4, 5, 3, 2. 

Sequence Step

LED

Energized

Components

Time LEDs are On 

Min.

Max.

1-Minute Fill Cycle

4

WV

Harvest Cycle

1, 4

Comp, FMR, HGV, WV

 1 minute

20 minutes

Harvest Pump Time 
(harvest assist)

1, 3

Comp, FMR, HGV, PM

0 seconds 50 seconds

Freeze Cycle

1, 2, 3

Comp, FM/FMR, PM, LLV

5 minutes

freeze timer
setting

Anti-Slush Control

1, 2

Comp, FM/FMR, LLV

PM off 10 sec. when
thermistor at 36°F (2°C)

Pump-Out Cycle

1, 4

*

, 5, 3 Comp, FMR, HGV, PM, WV*,


DV

10 seconds 20 seconds

*pump-out timer setting

Alarms

Type

Alarm

Notes

Beep

High Evaporator Temp.  
(temperature > 127°F) (53°C)

Check for harvest problem (stuck HGV or relay),  
hot water entering unit, stuck HM, or shorted thermistor. 

Beep

Harvest Backup Timer 
(harvest > 20 min. for two 
cycles in a row)

Check thermistor (open), HGV not opening, TXV or LLV 
leaking by, low charge, inefficient Comp, or WRV leaking 
by.

Beep

Freeze Timer 
(freeze > freeze timer setting 
for two cycles in a row)

Check FS stuck closed (up), WV leaking by, HGV leaking 
by, PM not pumping, TXV defective, LLV not opening, low 
charge, HM not bypassing, or inefficient Comp.

To reset above safeties, press "ALARM RESET" button with power supply on.

6

Low Voltage 
(92Vac±5% or less)

Red LED turns off if voltage protection operates.  
Control voltage safeties automatically reset when voltage 
is corrected.

7

High Voltage 
(147Vac±5% or more)

Legend: 

Comp

–compressor; 

DV

–drain valve; 

FM

–fan motor; 

FMR

–fan motor remote;  

FS

–float switch; 

HGV

–hot gas valve; 

HM

–headmaster (C.P.R.); 

LLV

–liquid line 

valve; 

PM

–pump motor; 

TXV

–thermostatic expansion valve; 

WRV

–water regulating 

valve; 

WV

–inlet water valve

Summary of Contents for KM-350MAJ

Page 1: ...Models KM 350MAJ MWJ KM 520MAJ MWJ MRJ KM 660MAJ MWJ MRJ Modular Crescent Cuber Service Manual Number 73230 Issued 10 29 2018 Revised 8 23 2019 hoshizakiamerica com ...

Page 2: ...improper installation is not covered under warranty Hoshizaki provides this manual primarily to assist qualified service technicians in the service of the appliance Should the reader have any questions or concerns which have not been satisfactorily addressed please call send an e mail message or write to the Hoshizaki Technical Support Department for assistance Phone 1 800 233 1940 770 487 2331 Fa...

Page 3: ...ayout 35 B LED Lights and Audible Alarm Safeties 36 C Settings and Adjustments 37 1 Default Dip Switch Settings 37 2 Harvest Time S4 dip switch 1 2 38 3 Pump Out Time Harvest Time During Pump Out S4 dip switch 3 4 38 4 Pump Out Frequency Control S4 dip switch 5 39 5 Harvest Pump Time Harvest Assist S4 dip switch 6 39 6 Harvest Pump Time Harvest Assist S4 dip switch 7 40 7 Factory Use S4 dip switch...

Page 4: ... Valve Adjustment water cooled model 47 V Maintenance 48 VI Preparing the Appliance for Periods of Non Use 49 VII Disposal 51 VIII Technical Information 52 A Specification and Performance Data Sheets 52 1 KM 350MAJ 52 2 KM 350MWJ 53 3 KM 520MAJ 54 4 KM 520MWJ 55 5 KM 520MRJ with URC 5F 56 6 KM 660MAJ 57 7 KM 660MWJ 58 8 KM 660MRJ with URC 5F 59 B Wiring Diagram 60 ...

Page 5: ...pplicable national state and local codes and regulations Electrical connection must be hard wired and must meet national state and local electrical code requirements Failure to meet these code requirements could result in death electric shock serious injury fire or severe damage to equipment The icemaker requires an independent power supply of proper capacity See the nameplate for electrical speci...

Page 6: ...he icemaker control switch to the OFF position and turn off the power supply to the icemaker before servicing the remote condenser unit Lockout Tagout to prevent the power supply from being turned back on inadvertently NOTICE Follow the instructions in this manual carefully to reduce the risk of costly water damage In areas where water damage is a concern install in a contained area with a floor d...

Page 7: ...n KM 350MAJ Water Supply Inlet Condenser Drier Control Box Spray Tubes Control Switch Water Pump Float Switch Compressor Thermostatic Expansion Valve Fan Motor Hot Gas Valve Cleaning Valve Bin Control Sensor Inlet Water Valve High Pressure Switch Liquid Line Valve Evaporator Stainer Mode Switch Drain Valve ...

Page 8: ...ay Tubes Control Switch Water Pump Float Switch Compressor Thermostatic Expansion Valve Water Regulating Valve Hot Gas Valve Cleaning Valve Model Shown KM 520MWJ Inlet Water Valve Liquid Line Valve High Pressure Switch Bin Control Sensor Evaporator Stainer Mode Switch Drain Valve ...

Page 9: ...ontrol Switch Water Pump Float Switch Compressor Thermostatic Expansion Valve Hot Gas Valve Liquid Line Valve Cleaning Valve Model Shown KM 660MRJ Inlet Water Valve Crankcase Heater Stainer High Pressure Switch Evaporator Bin Control Sensor Control Box Mode Switch Drain Valve ...

Page 10: ...hermostatic Expansion Valve Compressor Hot Gas Valve High Pressure Switch Strainer Fan Drier Condenser Evaporator Discharge Line Suction Line Water Pump Thermistor Spray Tubes Inlet Water Valve Water Tank Refrigeration Circuit Water Circuit Heat Exchanger Liquid Line Valve Cleaning Valve Drain Valve ...

Page 11: ...Compressor Hot Gas Valve High Pressure Switch Strainer Drier Condenser Evaporator Discharge Line Suction Line Water Pump Thermistor Spray Tubes Inlet Water Valve Water Tank Refrigeration Circuit Water Circuit Heat Exchanger Liquid Line Valve Water Regulating Valve Cleaning Valve Drain Valve ...

Page 12: ...Switch Strainer Fan Drier Remote Condenser Evaporator Discharge Line Suction Line Water Pump Thermistor Spray Tubes Inlet Water Valve Water Tank Refrigeration Circuit Water Circuit Liquid Line Valve Receiver Headmaster C P R Thermostatic Expansion Valve Heat Exchanger Cleaning Valve Drain Valve ...

Page 13: ... energized FMR energized HGV energized WV energized Thermistor temperature reaches 48 F 9 C 3 9 kΩ or less Harvest timer starts FS open Comp energized FM energized FMR energized PM energized LLV energized HGV de energized FS closed Comp energized DV energized FMR energized HGV energized PM de energizes for 2 sec then energizes for 10 20 sec FM de energized LLV de energized FS check Startup If FS i...

Page 14: ...therwise at the end of the next harvest cycle Shutdown and Restart BC Operation BC open BC sensor engaged CB Yellow BC OPEN CLOSED LED on BC Controller Green LED1 LED off BC open BC sensor engaged CB Yellow BC OPEN CLOSED LED continues BC Controller Green LED1 LED off All components de energized 2 Icemaker Off All components de energized 3 Ice Level Lowered Icemaker starts at 1 1 Minute Fill Cycle...

Page 15: ...ce The diagnostic procedure is a sequence check that allows you to diagnose the electrical system and components Before proceeding check for correct installation proper voltage per nameplate and adequate water supply Check CB using the steps in II C Control Board Check Check dip switch settings to assure that S4 dip switches and S5 dip switches 1 through 5 are in the factory default position S4 di...

Page 16: ...ot equalized reclaim refrigerant and diagnose refrigeration circuit restriction Check that there are no restrictions in the refrigeration circuit Harvest Cycle HGV strainer or check valve Freeze Cycle FM FMR TXV WRV HM LLV strainer check valve drier and damaged line set or fitting Confirm that the location meets installation requirements The appliance is not intended for outdoor use Normal operati...

Page 17: ...15VAC at CB K1 1 V If 115VAC is not present check wiring for loose connection from CB 10 pin connector pin 1 V to mode switch If 115VAC is present on 1 V and not at 2 Y replace CB If 115VAC is present at 2 Y check for 115VAC at HGV coil and check HGV coil continuity Replace as needed Note LED is off when HGV is energized and on when LLV FM are energized c LLV Diagnosis Confirm that LLV is de energ...

Page 18: ...evaporator is cooling If not confirm WV de energized not leaking by HGV de energized not bypassing LLV and FM energize TXV and HM operate correctly WRV opens Comp is efficient and refrigerant charge is correct See VIII A Specification and Performance Data Sheets b Comp and FMR Diagnosis If Comp and FMR de energize once freeze begins check that appliance has not shut off on HPS CB POWER OK LED off ...

Page 19: ...TXV g WRV Diagnosis WRV is factory set and generally no adjustment is required If WRV fails to open in freeze check for proper refrigerant pressures See VIII A Specification and Performance Data Sheets If refrigerant pressures are correct and WRV does not open adjust or replace as needed See IV C Water Regulating Valve Adjustment water cooled models h Freeze Termination Diagnosis After 5 min in fr...

Page 20: ...ector Check that PM stops and re starts Next check that PM and DV energized water flowing down the drain through DV If PM does not stop and re start check that CB LEDs 1 3 and 5 are on If not replace CB If LEDs 1 3 and 5 are on and PM does not energize check for 115VAC at CB K1 4 R to neutral W If 115VAC is not present replace CB If not check PM motor windings and impeller for binding If energized...

Page 21: ...se a white W neutral wire to establish a good neutral connection when checking voltages For additional checks see II I 1 No Ice Production 3 The OUTPUT TEST button provides a relay sequence test Make sure the control switch is in the ON position and the mode switch is in the ICE position then press the OUTPUT TEST button For the correct lighting sequence see the table below Note that the order of ...

Page 22: ... will not operate properly Failure to properly adjust the bin control setting could result in water leakage ice backup and icemaker damage 1 Bin Control Check Before replacing BC sensor and BC controller that does not show a visible defect and that you suspect is bad always conduct the following check procedure This procedure will help you verify your diagnosis The bin control is factory set for u...

Page 23: ...t 15 sec before the 5 min short cycle protection timer terminates Otherwise at the end of the next harvest cycle Ice Level in Bin Control Board BC OPEN CLOSED LED Bin Control Controller Green LED 1 LED Empty OFF ON Full ON OFF C ALP X1 X4 X3 X2 BC OPEN BC CLOSED 1 2 3 4 5 6 7 8 9 10 ON 1 2 3 4 5 ON S4 1 S3 ALARM RESET OUTPUTTEST K7 K6 K3 K4 K5 K1 K2 S5 POWER OK LED 2 LED 3 LED 4 LED 1 P N 2A3792 0...

Page 24: ...Fill Cycle Control Board K4 Bin Control Connector Bin Full open Pin Wire Color VDC 1 to 2 R to BK 4VDC 1 to 3 R to W 1VDC 2 to 3 BK to W 5VDC C ALP X1 X4 X3 X2 BC OPEN BC CLOSED 1 2 3 4 5 6 7 8 9 10 ON 1 2 3 4 5 ON S4 1 S3 ALARM RESET OUTPUTTEST K7 K6 K3 K4 K5 K1 K2 S5 POWER OK LED 2 LED 3 LED 4 LED 1 P N 2A3792 01 BLACK RED WHITE 10 9 8 7 6 5 4 3 2 1 S2 1 3 3 2 2 1 3 2 1 3 2 CB Bin Control 6 Once...

Page 25: ...d lead to icemaker movement water leakage or ice overflow NOTICE Do not block the bin control lens with top kits or the icemaker will not operate properly Failure to properly adjust the bin control setting could result in water leakage ice backup and icemaker damage The bin control is factory set to 1 for use on Hoshizaki America standard ice storage bins See the table below for adjustments to ice...

Page 26: ...ace the front panel in its correct position then turn on the power supply After 1 min the 1 min fill cycle should end and the initial harvest cycle should begin If the initial harvest cycle begins FS is good and the check is complete If the initial harvest cycle does not begin continue to step 9 9 Turn off the power supply 10 Remove the front panel Move the control switch to the OFF position 11 Re...

Page 27: ...ainer clip excessively when removing it See Fig 6 6 Wipe down the float switch bracket assembly stem and float with a mixture of 1 part Hoshizaki Scale Away and 25 parts warm water Rinse the parts thoroughly with clean water WARNING Do not remove the lock nut on the float switch assembly This is factory sealed and must not be removed 7 Reassemble the float switch assembly and replace it in its cor...

Page 28: ...thermistor in its correct position See IV B Component Service Information 7 Reconnect the thermistor connector to CB K3 connector 8 Replace the right side and top panels in their correct positions 9 Move the control switch to the ICE position 10 Replace the front panel in its correct position 11 Turn on the power supply 12 Once the harvest cycle starts Comp energizes begin timing the harvest cycle...

Page 29: ...y c Defective 8 Mode Switch a In CLEAN position b Defective 9 Water Supply a Water supply off or improper water pressure b External water filters clogged 10 Inlet Water Valve a Screen or orifice clogged b Coil winding open c Water valve open in freeze cycle 11 Float Switch See II E Float Switch Check and Cleaning a Float does not move freely b Defective 12 Compressor a Compressor relay magnetic co...

Page 30: ...osition b Damaged 3 Spray Tubes and or Spray Guides a Dirty b Out of position 4 Water Supply a Low water pressure b External water filters clogged c Insufficient water line size Minimum 1 4 Nominal ID 6 mm Nominal OD in the EU copper water tubing or equivalent 5 Inlet Water Valve a Screen or orifice clogged b Defective 6 Float Switch See II E Float Switch Check and Cleaning a Dirty sticking b Defe...

Page 31: ...te models a Not bypassing 3 Low Ice Production Low Ice Production Possible Cause Long Harvest Cycle 1 Evaporator a Scaled up 2 Spray Tubes and or Spray Guides a Dirty b Out of position 3 Refrigerant Charge a Low 4 Water Supply a Low water pressure b External water filters clogged c Insufficient water line size Minimum 1 4 Nominal ID 6 mm Nominal OD in the EU water tubing or equivalent d Too cold 5...

Page 32: ... Gas Valve a Erratic or open 5 Condenser a Clogged 6 Control Board See II C Control Board Check a Float switch connection loose K5 b Defective 7 Refrigerant Charge a Low 8 Thermostatic Expansion Valve a Bulb loose b Defective 9 Compressor a Inefficient or off 10 Pump Motor a RPM too slow 11 Liquid Line Valve a Erratic or restricted 12 Headmaster C P R remote models a Not bypassing 13 Splash Guard ...

Page 33: ...umber 7 ON harvest pump time harvest assist all models 13 Is the cube guide positioned correctly 14 Are the evaporator separators positioned properly 15 Is the thermistor properly mounted tight and insulated 16 Is the TXV bulb properly mounted tight and insulated 17 Are splash guards in place Appliance Sequence of Operation Fill YES NO 18 Does the water tank fill and overflow 60 90 sec Note Larger...

Page 34: ...le to failure due to static discharge It is especially important to touch the metal part of the icemaker when handling or replacing the control board Do not touch the electronic devices on the control board or the back of the control board Do not change wiring and connections Do not misconnect K3 WHITE K4 RED and K5 BLACK because the same connector is used for the thermistor bin control and float ...

Page 35: ...y LED 2 on K1 Connector Pin 3 LED 3 X3 Relay LED 3 on K1 Connector Pin 4 LED 4 X4 Relay K1 Connector Pin 6 LED 1 X1 Relay K1 Connector Pin 9 K2 Connector Control Transformer 10 5VAC S5 Dip Switch ALARM RESET Button S4 Dip Switch OUTPUT TEST Button used to test relays on control board K3 white Connector 5VDC Thermistor harvest control and high temperature safety K5 black Connector 2VDC Float Switch...

Page 36: ...emp temperature 127 F 53 C Check for harvest problem stuck HGV or relay hot water entering unit stuck HM or shorted thermistor 2 Beep Harvest Backup Timer harvest 20 min for two cycles in a row Check thermistor open HGV not opening TXV or LLV leaking by low charge inefficient Comp or WRV leaking by 3 Beep Freeze Timer freeze freeze timer setting for two cycles in a row Check FS stuck closed up WV ...

Page 37: ...ON KM 520MAJ KM 520MWJ KM 520MRJ OFF OFF OFF OFF OFF OFF ON OFF ON ON KM 660MAJ KM 660MWJ KM 660MRJ OFF OFF OFF OFF OFF OFF ON OFF ON ON S5 Dip Switch Do Not Adjust Dip Switch No 1 2 3 4 5 All Models OFF OFF OFF OFF ON Freeze Timer 9 10 Pump Out Frequency Control 5 Pump Out Time Harvest Time During Pump Out 3 4 Harvest Time 1 2 Factory Use 8 Harvest Pump Time Harvest Assist 7 Do Not Adjust 1 2 3 4...

Page 38: ...e During Pump Out S4 dip switch 3 4 When a pump out is called for the pump motor stops for 2 sec After 2 sec the drain valve and pump motor energize On KM 350M_J models the inlet water valve also energizes Water is removed from the bottom of the water tank and sent down the drain The pump out drains the water tank for the time determined by the pump out timer The pump out timer also acts in place ...

Page 39: ...Every cycle After 2nd freeze cycle 5 Harvest Pump Time Harvest Assist S4 dip switch 6 NOTICE Factory set for proper operation Do not adjust Adjustment outside of the factory default setting may result in damage to the appliance Harvest pump time harvest assist is only active when S4 dip switch 7 is in the ON position In the factory default position the harvest pump time harvest assist starts with ...

Page 40: ... pump time adjusted by S4 dip switch 1 2 and S5 dip switch 4 settings Contact Technical Support before adjusted these settings S4 Dip Switch Setting Harvest Pump Time sec Harvest Assist No 7 OFF 0 ON 50 7 Factory Use S4 dip switch 8 Factory set for proper operation Do not adjust This must be left in the factory default position 8 Freeze Timer S4 dip switch 9 10 NOTICE Adjust to proper specificatio...

Page 41: ...reverse direction and opens check valve for pump out S5 Dip Switch Setting Pump Out Components No 1 OFF Pump Motor Forward Rotation and Drain Valve ON Pump Motor Reverse Rotation and Check Valve 10 Refill Counter S5 dip switch 2 and 3 NOTICE Do not adjust These must be left in the factory default position or the icemaker will not operate correctly S5 Dip Switch Setting Refill Counter No 2 No 3 OFF...

Page 42: ...Ω signal from the thermistor and de energizes the water pump for 10 sec to melt the ice slush and prevent the ice slush from blocking the water supply tubing causing irregular freeze patterns NOTICE Factory set for proper operation Do not adjust Adjustment outside the factory default setting may result in damage to the appliance S5 Dip Switch Setting Anti Slush No 5 OFF Disabled ON Enabled ...

Page 43: ...tem if using an electronic leak detector and then raise the pressure using nitrogen gas 140 PSIG Do not use R 404A as a mixture with pressurized air for leak testing NOTICE Always recover the refrigerant and store it in an approved container Do not discharge the refrigerant into the atmosphere Do not leave the system open for longer than 15 min when replacing or servicing parts The Polyol Ester PO...

Page 44: ... the new drier with the arrow on the drier in the direction of the refrigerant flow When brazing protect the drier by using a wet cloth to prevent the drier from overheating Do not allow the drier to exceed 250 F 121 C 2 Use an electronic leak detector or soap bubbles to check for leaks Add a trace of refrigerant to the system if using an electronic leak detector and then raise the pressure using ...

Page 45: ...inder on the scales if the service cylinder is not equipped with a dip tube invert the service cylinder then place it on the scales Open the high side valve on the gauge manifold 7 Allow the system to charge with liquid until the proper charge weight is met 8 If necessary add any remaining charge to the system through the low side NOTICE To prevent compressor damage use a throttling valve or liqui...

Page 46: ...ace the strainer if applicable Use copper tube of the same diameter and length when replacing valve lines Fan Motors Install a new capacitor Pump Motor Install a new capacitor Thermistor Attach the new thermistor to the suction line in the same location as the previous thermistor The thermistor should be at the 12 o clock position on the tube Smoothly fill the recessed area of the thermistor holde...

Page 47: ...the system 2 5 min after a freeze cycle starts confirm that the thermometer reads 104 F to 115 F 40 C to 46 C If it does not rotate the adjustment screw by using a flat blade screwdriver until the temperature is in the proper range See Fig 7 Next check that the reference pressure is in the range indicated in the Head Pressure table in the Performance Data section If it is not in the proper range v...

Page 48: ...scoop using a neutral cleaner Rinse thoroughly after cleaning Bi Weekly Air Filters Inspect Wash with warm water and neutral cleaner if dirty Monthly External Water Filters Check for proper pressure and change if necessary Icemaker Exterior Wipe down with a clean soft cloth Use a damp cloth containing a neutral cleaner to wipe off oil or dirt build up Clean any chlorine staining rust colored spots...

Page 49: ...ed air or carbon dioxide supply to the icemaker water supply line drain valve 5 Make sure at least 3 min have elapsed since you turned off the power supply Make sure the control switch is in the ICE position Replace the front panel in its correct position then turn on the power supply 6 Blow the icemaker water supply line out using the compressed air or carbon dioxide supply 7 Close the icemaker w...

Page 50: ...ine drain valve If connected to a closed loop system also open the condenser return line drain valve 4 Attach a compressed air or carbon dioxide supply to the condenser water supply line drain valve 5 Open the water regulating valve by using a screwdriver to pry up on the spring retainer underneath the spring While holding the valve open blow out the condenser using the compressed air or carbon di...

Page 51: ...posal The appliance contains refrigerant and must be disposed of in accordance with applicable national state and local codes and regulations Refrigerant must be recovered by properly certified service personnel ...

Page 52: ...176 353 160 70 21 80 27 90 32 watts 100 38 70 21 136 0 52 113 0 43 103 0 39 80 27 119 0 45 82 0 31 85 0 32 90 32 113 0 43 57 0 22 54 0 20 gal day m 3 day 100 38 87 0 33 56 0 21 51 0 19 70 21 80 27 90 32 min 100 38 70 21 80 27 90 32 min 100 38 70 21 233 16 4 249 17 5 278 19 6 80 27 245 17 2 270 19 0 304 21 4 90 32 249 17 5 287 20 2 320 22 5 PSIG kg cm2 G 100 38 257 18 1 295 20 7 350 24 6 70 21 58 4...

Page 53: ...ay m 3 day 100 38 417 1 58 502 1 90 699 2 65 70 21 80 27 90 32 min 100 38 70 21 80 27 90 32 min 100 38 70 21 228 16 0 228 16 0 233 16 4 80 27 228 16 0 228 16 0 235 16 5 90 32 228 16 0 228 16 0 234 16 5 PSIG kg cm 2 G 100 38 231 16 2 229 16 1 240 16 9 70 21 59 4 1 59 4 2 59 4 2 80 27 59 4 2 60 4 2 60 4 2 90 32 59 4 2 60 4 2 60 4 2 PSIG kg cm 2 G 100 38 59 4 2 60 4 2 60 4 2 6 600 BTU h AT 90ºF 32ºC ...

Page 54: ... day m3 day 100 38 112 0 42 69 0 26 59 0 23 70 21 80 27 90 32 min 100 38 70 21 80 27 90 32 min 100 38 70 21 200 14 1 218 15 4 248 17 4 80 27 214 15 1 243 17 1 275 19 3 90 32 218 15 4 263 18 5 295 20 7 PSIG kg cm2 G 100 38 226 15 9 270 19 0 324 22 8 70 21 46 3 2 49 3 4 52 3 6 80 27 48 3 4 52 3 7 55 3 9 90 32 49 3 4 55 3 9 58 4 1 PSIG kg cm2 G 100 38 49 3 5 56 3 9 61 4 3 6 600 BTU h AT 90ºF 32ºC WT ...

Page 55: ...ay m3 day 100 38 371 1 40 418 1 58 552 2 09 70 21 80 27 90 32 min 100 38 70 21 80 27 90 32 min 100 38 70 21 284 20 0 284 19 9 282 19 8 80 27 284 20 0 283 19 9 280 19 7 90 32 284 19 9 283 19 9 280 19 7 PSIG kg cm 2 G 100 38 283 19 9 282 19 9 278 19 5 70 21 54 3 8 54 3 8 55 3 9 80 27 54 3 8 55 3 8 56 3 9 90 32 54 3 8 55 3 9 56 3 9 PSIG kg cm2 G 100 38 55 3 8 55 3 9 57 4 0 6 300 BTU h AT 90ºF 32ºC WT...

Page 56: ...0 24 gal day m3 day 100 38 108 0 41 66 0 25 60 0 23 70 21 80 27 90 32 min 100 38 70 21 80 27 90 32 min 100 38 70 21 207 14 6 223 15 6 249 17 5 80 27 219 15 4 243 17 1 272 19 1 90 32 223 15 6 260 18 3 289 20 3 PSIG kg cm 2 G 100 38 230 16 1 267 18 8 315 22 1 70 21 50 3 5 50 3 5 53 3 7 80 27 50 3 5 51 3 6 55 3 9 90 32 50 3 5 51 3 6 55 3 8 PSIG kg cm2 G 100 38 52 3 6 52 3 6 58 4 1 6 200 BTU h AT 90ºF...

Page 57: ... 3 day 100 38 134 0 51 90 0 34 84 0 32 70 21 80 27 90 32 min 100 38 70 21 80 27 90 32 min 100 38 70 21 212 14 9 232 16 3 264 18 5 80 27 227 16 0 257 18 1 292 20 6 90 32 232 16 3 279 19 6 313 22 0 PSIG kg cm2 G 100 38 240 16 9 287 20 2 345 24 3 70 21 37 2 6 39 2 8 46 3 2 80 27 39 2 7 42 3 0 51 3 6 90 32 39 2 8 45 3 2 53 3 7 PSIG kg cm2 G 100 38 42 2 9 47 3 3 60 4 2 8 000 BTU h AT 90ºF 32ºC WT 70ºF ...

Page 58: ...58 7 KM 660MWJ DATA PENDING ...

Page 59: ...33 85 0 32 gal day m3 day 100 38 136 0 52 87 0 33 82 0 31 70 21 80 27 90 32 min 100 38 70 21 80 27 90 32 min 100 38 70 21 215 15 1 232 16 3 260 18 3 80 27 228 16 0 254 17 9 285 20 0 90 32 232 16 3 273 19 2 303 21 3 PSIG kg cm2 G 100 38 239 16 8 280 19 7 330 23 2 70 21 40 2 8 41 2 9 44 3 1 80 27 41 2 9 43 3 1 46 3 2 90 32 41 2 9 45 3 2 48 3 3 PSIG kg cm2 G 100 38 42 3 0 46 3 2 50 3 5 8 100 BTU h AT...

Page 60: ... W 5 2 1 S R C BK COMPRESSOR RELAY R R W O W W W START CAP SEE TABLE START RELAY RUN CAP SEE TABLE GY R R R R R 7 5 3 1 2 4 6 8 X10 GY GY GY GY V V V ON 1 3 PUMP 2 OFF CONTROL SWITCH W W W BK BR BR W BU R W R W BU V GY S R V BK BK BK BK W BR PUMP GND BK GR R CAP 5 5MFD W DBU R R V P P P P BLACK RED WHITE R BK BK R O O 1 2 3 FLOAT SWITCH THERMISTOR 3 2 1 3 2 1 K5 K3 CONTROL BOARD K4 ULTRA SONIC BIN...

Reviews: