ENGLISH
GB
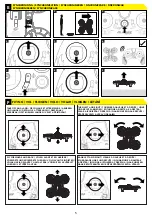
A. ROTOR BLADE POSITION
It is important to install rotor blades in the correct position. Drone
may not perform correctly if the spare rotor blades are not installed
correctly. Refer to page 3 for correct position
B. REPLACING ROTOR BLADES
In the event that a rotor blade requires replacing, ensure the drone is
switched OFF (O)
1.
Turn the rotor blade protective cover anti-clockwise
to unlock and remove.
2.
Remove the rotor blade by gently pulling off
and replace with the new rotor blade.
3.
Return the protective cover
to position and turn clockwise until you hear a click. The cover is now
secure in position.
C. BATTERY INSTALLATION
1.
Remove the screw from the battery cover at the back of the handset.
2.
Place 4x AAA batteries in the battery compartment, as per the
polarity shown inside.
3.
Replace the battery cover and tighten the
screw. Batteries to be replaced by an adult. New non-rechargeable
alkaline batteries are recommended for optimum use and maximum
performance. Drone LED lights will flash when low battery.
D. CHARGING FROM USB
The drone is supplied with an initial charge allowing you to start using
straight away. To prevent overcharging the battery please ensure the
battery is fully discharged before recharging.
1.
Ensure the drone is
switched OFF (O).
2.
Plug the USB into a computer/USB port.
3. DO
NOT plug the USB charger into an AC Adapter.
4.
Insert the
USB cable pin connector in to the drone battery port, located on the
bottom of the drone. Be careful not to force the connectors as it may
cause damage. The RED LED on the USB will turn on, indicating that
the drone is charging.
5.
The drone is charged after approximately
90 minutes. The RED LED on the USB will go out, indicating that the
drone battery is fully charged.
6.
Remove the USB cable pin connector
from the drone battery port once the charging is complete. DO NOT
OVERCHARGE. Flight time 6-7 minutes.
E. SYNCHRONISE - IMPORTANT!
1.
Switch on the drone. The BLUE and WHITE LED lights on the drone
will flash. The drone is now ON (I).
2.
Place the drone on a FLAT
SURFACE with the white LED lights facing towards you. If the drone is
not positioned on a flat surface, this may prevent the rotor blades from
spinning correctly.
3.
Turn the handset ON. The handset will beep.
4
& 5.
Push ‘Control Stick A’ up and then down to pair the handset
with the drone. The LED lights on the drone will stop flashing
6.
The
handset and drone are now synchronised and active.
7.
Press the start/
stop button on the handset to activate the rotor blades
8.
Slowly push
‘Control Stick A’ up.
9.
Your drone will start to take off.
F. FLYING
Take Off and Land:
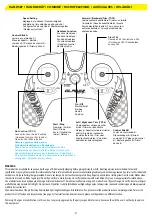
Slowly push the ‘Control Stick A’ up to control
take off and increase the height. Slowly push down to reduce height
and land. ‘Control Stick A’ is extremely sensitive so please move
gently. Move down ‘Control Stick A’ to bring the drone to a landing.
Turn Left and Right:
Whilst holding the drone in a controlled hover,
push ‘Control Stick A’ right to turn clockwise and left to turn anti-
clockwise. Please ensure that you maintain the hover with ‘Control
Stick A’.
Fly Forward and Back:
Whilst holding the drone in a controlled hover, push the ‘Control
Stick B’ slowly forward to fly forwards and back to fly backwards.
Whilst flying forwards/backwards continue to control ‘Control Stick
A’ to adjust left/right turn and maintain height.
Sideways Left and Right:
Whilst holding the drone in a
controlled hover, push ‘Control Stick B’ slowly to the right to fly
the drone sideways to the right, or to the left to fly the drone
sideways to the left. Ensure there is a minimum of 3 metres space
surrounding the drone.
G. TRIM CONTROL
1. If the drone leans undesirably either forwards or backwards
(T1/T2).
Push the trim button the opposite direction to the
undesired movement. For example, if the drone is leaning
forwards while hovering, push the backward trim button (T2) to
correct.
2. If the drone leans undesirably either left or right (T3/T4).
Push the trim button the opposite direction to the undesired
movement. For example, if the drone is leaning left while hovering,
push the right lean trim button (T4) to correct.
H. STABILITY RESET
If the product becomes too unstable, push both left and right
joysticks to the bottom left position and hold for a few seconds.
The LED lights on the drone will flash. Your drone is now reset and
stable.
I. STUNT 360
1.
Fly the drone in a controlled hover at a minimum of 3 metres
from the ground. Ensure there is enough clear space with no objects
nearby.
2.
Press the ‘Stunt 360’ button (top right shoulder) and
move ‘Control Stick B’ in the direction you want to flip 360˚ (forward/
backward/left/right) and the drone will flip in that direction. Repeat
steps 1 - 2 to perform another flip.
J. SPEED SETTING
Press the ‘Speed Setting’ button to adjust the speed level of your
drone.
1.
Press once for normal speed (1 ‘Beep’)
2.
Press again for
expert speed (2 ‘Beeps’).
3.
Press again for pro speed (3 ‘Beeps’).
Stunts and tricks can be performed on all three speed settings.
K. HEADLESS FUNCTION
The Headless Mode feature allows the user to operate the drone
without worrying about the orientation of the drone. This feature is
great for beginners as it reduces the steepness of learning curve.
1.
Place the drone on a FLAT SURFACE with the white LED lights
facing you.
2.
Press the Headless Mode button. The drone will beep
intermittently and the lights will flash on the drone, when in headless
mode.
L. EMERGENCY STOP
1.
In the event of an emergency it may be necessary to bring the
drone to an emergency stop.
2.
Push the control sticks in the correct
direction (see page 7) to activate an emergency stop.
3
. The power will cut from the motors on the drone and the drone will
fall to the ground.
TROUBLESHOOTING
Drone blades will NOT turn
- Turn drone ON / Ensure drone is
fully charged / Check batteries in the handset / Turn drone and
7
IMPORTANT! EMERGENCY STOP / IMPORTANT! ARRÊT D’URGENCE / WICHTIG! NOTBREMSUNG /
IMPORTANTE! ARRESTO DI EMERGENZA / ¡IMPORTANTE! PARADA DE EMERGENCIA / BELANGRIJK!
NOODSTOP / DŮLEŽITÉ! NOUZOVÉ ZASTAVENÍ
J
L
A1
B1
B1
A1
POWER
POWER


