8
1
7
6
2
3
4
5
1.
2.
3.
4.
5.
6.
7.
1.
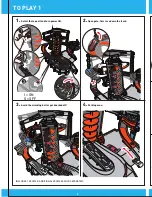
Select the top exit and turn power ON.
1a.
1b.
Cars going to the top track will pile up.
2a.
3.
BACK VIEW
BACK VIEW
2.
Open gate. Cars race down the track.
3.
Avoid the wrecking ball or get knocked off!
4.
Parking zone.
8.
9.
10.
11.
12.
13.
14.
15.
16.
17.
18.
DPD88-0970-G1
1101053449-DOM
5+
service.mattel.com
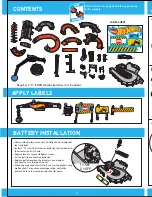
BATTERY INSTALLATION
APPLY LABELS
ASSEMBLY
TO PLAY 1
TO PLAY 2
CONTENTS
©2016 Mattel. Mattel, Inc., 636 Girard Avenue, East Aurora, NY 14052, U.S.A. Consumer Services 1-800-524-8697. Mattel
U.K. Ltd., Vanwall Business Park, Maidenhead SL6 4UB. Helpline 01628 500303. Mattel Australia Pty., Ltd., Richmond,
Victoria. 3121.Consumer Advisory Service - 1300 135 312. Mattel South Africa (PTY) LTD, Office 102 I3, 30 Melrose
Boulevard, Johannesburg 2196. Mattel East Asia Ltd., Room 503-09, North Tower, World Finance Centre, Harbour City,
Tsimshatsui, HK, China. Tel.: (852) 3185-6500. Diimport & Diedarkan Oleh: Mattel Southeast Asia Pte. Ltd. , No 19-1, Tower 3
Avenue 7, Bangsar South City, No 8, Jalan Kerinchi, 59200 Kuala Lumpur, Malaysia. Tel: 03-33419052.
BATTERY SAFETY INFORMATION
In exceptional circumstances batteries may leak fluids that can cause a chemical burn injury or ruin your product. To
avoid battery leakage:
• Non-rechargeable batteries are not to be recharged.
• Rechargeable batteries are to be removed from the product before being charged.
• Rechargeable batteries are only to be charged under adult supervision.
• Do not mix alkaline, standard (carbon-zinc), or rechargeable batteries.
• Do not mix old and new batteries.
• Only batteries of the same or equivalent type as recommended are to be used.
• Batteries are to be inserted with the correct polarity.
• Exhausted batteries are to be removed from the product.
• The supply terminals are not to be short-circuited.
• Dispose of battery(ies) safely.
• Do not dispose of this product in a fire. The batteries inside may explode or leak.
Protect the environment by not disposing of this product or any batteries with household waste. This
symbol indicates that this product shall not be treated as household waste. Check your local authority for
recycling advice and facilities.
Connect to other HOT WHEELS
®
sets (sold separately).
MORE WAYS TO PLAY
4.
Reset track to play again.
WHEN THE TOP TRACK IS FULL, a car going
through the bottom track will...
You can also press the trigger to manually release
the cars from the top track!
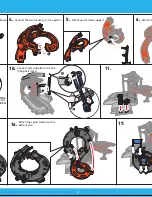
Connect the exit and spiral tracks to the spiral elevator.
Connect arm and attach it to the
tilting exit track.
Attach top spiral track over the
bottom one.
®
™
Select the lower exit. Cars going to the
bottom track will go straight through.
Attach exit ramps to the back
of the elevator by letters as shown.
Connect the two tracks to form a spiral.
Attach spiral track support.
Attach top exit track.
INSTRUCTIONS
CONSTRUCTION ZONE CHAOS
INCLUDES 1 VEHICLE. ADDITIONAL VEHICLES SOLD SEPARATELY.
PLEASE KEEP THESE INSTRUCTIONS FOR FUTURE
REFERENCE AS THEY CONTAIN IMPORTANT INFORMATION.
• Unscrew the battery cover with a Phillips head screwdriver
(not included).
• Install 2 "D" size (LR20) alkaline batteries (not included) in
the orientation (+/-) shown.
• Replace battery cover and tighten screw.
• For longer life use alkaline batteries.
• Replace batteries when the elevator can no longer
transport cars to the top of the set.
• When exposed to an electrostatic source, the product may
malfunction. To resume normal operation, switch the
power OFF for a few seconds, and then ON again.
Requires 2 "D" (LR20) alkaline batteries (not included).
DPD88 DOM I/S SIZE:A5X4 COLOR: 1C+1C
BACK VIEW
2b.
...release all cars!
C
C
D
D
1
I
o
I
o
I = ON
O = OFF
I = ON
O = OFF
Refer to letters on toy parts and this page to help
with assembly.
2
3
A
A
B
B
1
2
I
o
I
o
I = ON
O = OFF
3
4
COLORS AND DECORATIONS MAY VARY.
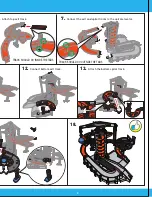
Attach the spiral elevator.
F
F
Attach the bottom spiral track.
NOT FOR USE WITH SOME HOT WHEELS
®
VEHICLES.
LINE UP HOUSING PINS
AND CENTER HEX SLOT
WITH ELEVATOR SCREW
TO CONNECT.
+
-
-
+
G
G
LABEL SHEET
X1
©2016 Mattel DPD88-1100231679
1
4
5
2
3
C
E
E
F
F
D
D
C
A
A
B
G
G
B
E
E
Connect bottom exit track.
Track must be locked
in "up" position.
TRACK SHOULD GO INSIDE THE TABS
TRACK SHOULD GO OUTSIDE THE TABS
1
2
5
4
3

