background image

31

4

20

21

22

2

47

9

9

30

30

47

54

84

54

89

19

55

55

57

57

56

56

29

28

24

1

47

47

3

89

9

9

64

80

85

64

80

85

18

17

74

74

74

74

74

81

63

80

80

65

65

23

60

60 67

67

67

60

60

82

62

80

65

65

80

59

59

87

68

40

88 42

44

88

61

25

27

60

60

60

60

31

67

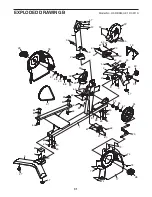
EXPLODED DRAWING B

Model No. HF-RB9800-E.1 R0311A

Summary of Contents for HF-RB9800-E.1

Page 1: ...ep this manual for future reference Serial Number Decal QUESTIONS If you have questions or if parts are damaged or missing please see HOW TO CONTACT CUSTOMER CARE on the back cover of this manual www...

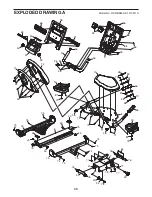
Page 2: ...THE EXERCISE BIKE 8 HOW TO USE THE CONSOLE 10 MAINTENANCE AND TROUBLESHOOTING 26 EXERCISE GUIDELINES 27 PART LIST 28 EXPLODED DRAWING 30 HOW TO CONTACT CUSTOMER CARE Back Cover LIMITED WARRANTY Back...

Page 3: ...ear ance around the exercise bike 6 Inspect and properly tighten all parts regu larly Replace any worn parts immediately 7 Keep children under age 12 and pets away from the exercise bike at all times...

Page 4: ...p you achieve your fitness goals For your benefit read this manual carefully before you use the exercise bike If you have questions after reading this manual please see the back cover of this manual T...

Page 5: ...In addition to the included tool s assembly requires a Phillips screwdriver an adjustable wrench and a rubber mallet See the drawings below to identify the small parts needed for assembly The number...

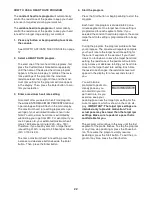
Page 6: ...d four M10 Flat Washers 80 Tighten two Leveling Feet 47 into the under side of the Rear Stabilizer 3 80 65 65 47 47 80 89 3 1 9 9 To make assembly easier read the information on page 5 before you begi...

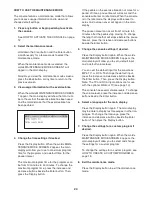
Page 7: ...ire tie upward out of the top of the Upright Tip To prevent the frame wires from falling into the Upright secure the frame wires with the wire tie Tip Avoid pinching the wires Slide the Upright 4 onto...

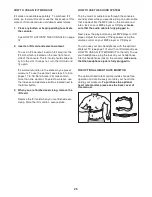
Page 8: ...ile moving the exercise bike Do not attempt to move the exercise bike over uneven surfaces If the exercise bike rocks slightly during use turn the leveling feet under the front and rear of the frame u...

Page 9: ...n nected to the exercise bike Connect a CATV cable from the coaxial output on your equipment usually labeled TV OUT or RF OUT to the cable jack on the exercise bike A VCR or DVD player can also be con...

Page 10: ...ole see the drawings below To learn about the features of the Basic console see page 11 To learn about the features of the Workout TV console see the user s manual included with the Workout TV console...

Page 11: ...you can use the cool down mode to help you recover from your workout The console also provides two heart rate programs that automatically adjust the resistance of the pedals to keep your heart rate n...

Page 12: ...exposed to cold temperatures allow it to warm to room temperature before turning on the console If you do not do this the console displays or other electronic components may become damaged HOW TO TURN...

Page 13: ...instead of the elapsed time The main display will also show your heart rate in beats per minute when you use the handgrip pulse sensor or the optional heart rate monitor see step 5 on page 14 You can...

Page 14: ...in the display next to the heart symbol For the most accurate heart rate reading hold the con tacts for at least 15 seconds If your heart rate is not shown make sure that your hands are positioned as...

Page 15: ...main display To enter your weight 1 kilogram 2 2 pounds press the increase and decrease buttons beside the Enter button Then press the Enter but ton 5 Enter a goal for the program If you selected the...

Page 16: ...l program the main display will show the time your exercise intensity in mets the approximate number of calories you have burned the approximate number of calories you are burn ing per hour and the di...

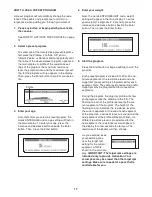
Page 17: ...pounds press the increase and decrease buttons beside the Enter button Then press the Enter button 5 Start the program Press the Start button or begin pedaling to start the program Each preset progra...

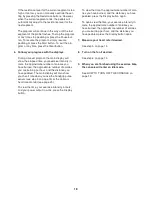
Page 18: ...proximate number of calories you are burning per hour and the distance you have pedaled The main display will also show your heart rate when you use the handgrip pulse sensor see step 5 on page 14 or...

Page 19: ...h custom workout is divided into 30 one minute segments You can program one resistance level and one target rpm pace setting for each seg ment To program a resistance level for the first segment simpl...

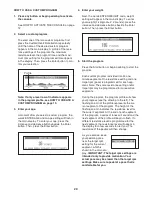
Page 20: ...ase buttons beside the Enter button Then press the Enter button 5 Start the program Press the Start button or begin pedaling to start the program Each custom program is divided into 30 one minute segm...

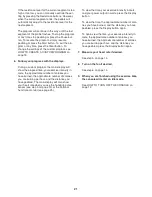
Page 21: ...ate number of calories you have burned the approximate number of calories you are burning per hour and the distance you have pedaled The main display will also show your heart rate when you use the ha...

Page 22: ...a maximum heart rate setting press the increase and decrease buttons beside the Enter button Then press the Enter button 4 Start the program Press the Start button or begin pedaling to start the progr...

Page 23: ...ou have pedaled press the Display button again To again view the time your exercise intensity in mets the approximate number of calories you have burned the approximate number of calories you are burn...

Page 24: ...will enter an idle mode When the console is in the idle mode the displays will be reset to zeros and a screen saver will appear in the main display The pause timeout can occur from 1 minute to 5 minut...

Page 25: ...it card Remove the iFit card when you are finished exer cising Store the iFit card in a secure place HOW TO USE THE SOUND SYSTEM To play music or audio books through the console s sound system while y...

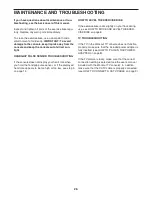
Page 26: ...en you hold the handgrip pulse sensor or if the displayed heart rate appears to be too high or too low see step 5 on page 14 HOW TO LEVEL THE EXERCISE BIKE If the exercise bike rocks slightly on your...

Page 27: ...r goal is to strengthen your cardiovascular system you must perform aerobic exer cise which is activity that requires large amounts of oxygen for prolonged periods of time For aerobic exercise adjust...

Page 28: ...r Rail Cap 49 8 Backrest Cover Screw 50 1 Handlebar 51 1 Handlebar Cover 52 6 Carriage Spacer 53 2 Handlebar Gasket 54 2 Wheel Screw 55 4 Generator Screw 56 4 M8 x 20mm Flat Head Screw 57 4 M8 x 20mm...

Page 29: ...udio Out Cable Console Wire CN 3 Jumper Wire Ground Wire CN 2 Generator Wire CN 1 Generator Wire Key No Qty Description Key No Qty Description Note Specifications are subject to change without notice...

Page 30: ...15 6 43 43 43 43 34 35 41 7 49 49 72 81 72 81 73 73 71 71 75 74 74 75 74 75 79 79 75 75 75 76 76 76 76 41 77 77 77 77 83 78 78 78 52 46 46 5 32 69 53 53 51 90 66 58 91 92 33 86 86 86 86 93 45 48 50 39...

Page 31: ...55 55 57 57 56 56 29 28 24 1 47 47 3 89 9 9 64 80 85 64 80 85 18 17 74 74 74 74 74 81 63 80 80 65 65 23 60 60 67 67 67 60 60 82 62 80 65 65 80 59 59 87 68 40 88 42 44 88 61 25 27 60 60 60 60 31 67 EX...

Page 32: ...e original owner and is non transferable The labor warranty applies only to products sold in the US The following will void the warranty on this product 1 Any misuse abuse or improper service 2 Users...

Reviews: