background image

6

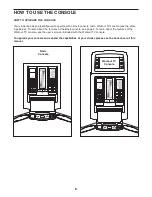
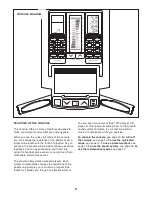
HOW TO USE THE STRIDER

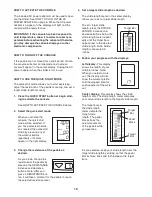
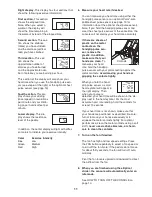
HOW TO PLUG IN THE AC POWER ADAPTER

This product must be grounded.

If it should mal-

function or break down, grounding provides a path of

least resistance for electric current to reduce the risk

of electric shock. This product is equipped with a cord

having an equipment-grounding conductor and a

grounding plug.

Plug the AC power adapter into an appropriate

outlet that is properly installed and grounded in

accordance with all local codes and ordinances.

This product is for use on a nominal 120-volt cir-

cuit. IMPORTANT: The strider is not compatible

with GFCI-equipped outlets and may not be com-

patible with AFCI-equipped outlets.

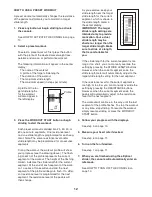
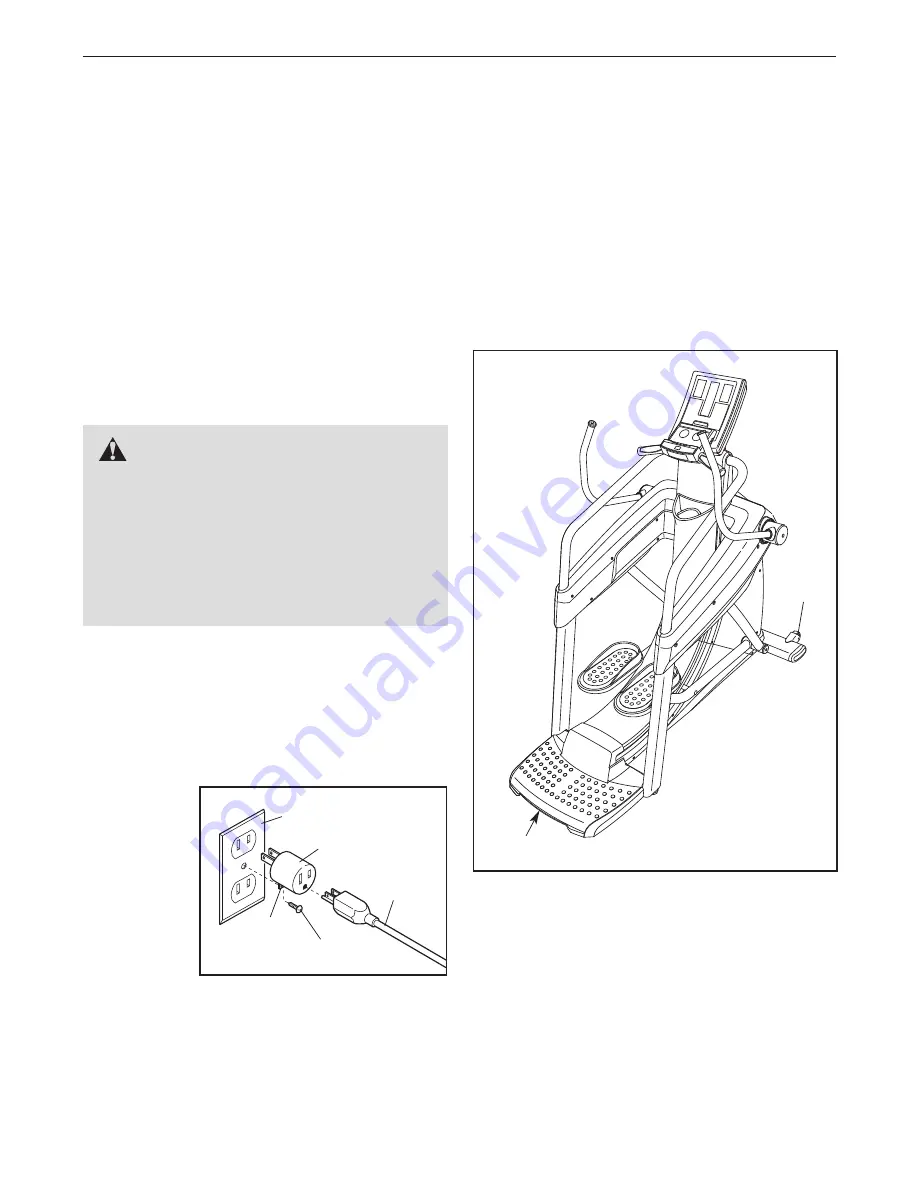
A temporary adapter may be used to connect the AC

power adapter to a 2-pole receptacle as shown below

if a properly grounded outlet is not available. The tem-

porary adapter should be used only until a properly

grounded outlet can be installed by a qualified electri-

cian.

The green-

colored rigid

ear, lug, or

the like

extending

from the

adapter must

be con-

nected to a

permanent

ground such

as a properly

grounded outlet box cover. Whenever the adapter is

used, it must be held in place by a metal screw.

Some

2-pole receptacle outlet box covers are not

grounded. Contact a qualified electrician to deter-

mine if the outlet box cover is grounded before

using an adapter.

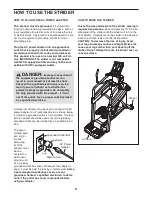
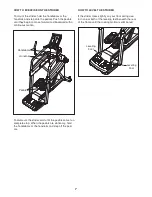
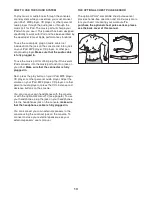
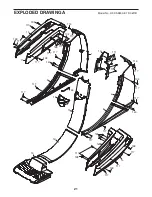
HOW TO MOVE THE STRIDER

Due to the size and weight of the strider, moving it

requires two persons.

Have two persons lift the indi-

cated end of the strider until the strider will roll on the

front wheels. Carefully move the strider to the desired

location and then lower it to the level position.

CAUTION: To decrease the risk of injury, bend

your legs and keep your back straight. Make sure

to use your legs rather than your back to lift the

strider. Do not attempt to move the strider over an

uneven surface.

DANGER:

Improper connection of

the equipment-grounding conductor can

result in an increased risk of electric shock.

Check with a qualified electrician or service-

man if you are in doubt as to whether the

product is properly grounded. Do not modify

the plug provided with the product—if it will

not fit the outlet, have a proper outlet installed

by a qualified electrician.

Grounded Outlet Box

Adapter

Lug

Metal Screw

AC Power

Adapter

Wheel

Lift here

Summary of Contents for HF-XS9800-E.1

Page 1: ...p this manual for future reference QUESTIONS If you have questions or if parts are damaged or missing please see HOW TO CONTACT CUSTOMER CARE on the back cover of this manual www HotelFitness com Mode...

Page 2: ...Cover HOTEL FITNESS is a registered trademark of Hotel Fitness Club Inc FREEMOTION is a registered trademark of ICON IP Inc iPod is a trademark of Apple Computer Inc registered in the U S and other co...

Page 3: ...12 and pets away from the strider at all times 7 The strider should not be used by persons weighing more than 350 lbs 159 kg 8 Wear appropriate clothes while exercising do not wear loose clothes that...

Page 4: ...home more effective and enjoyable For your benefit read this manual carefully before you use the strider If you have questions after read ing this manual please see the back cover of this manual To h...

Page 5: ...es in the Right Handlebar with the five holes in the Right Handlebar Hub IMPORTANT Apply the included thread adhesive to the threads of four 5 16 x 3 4 Patch Screws 105 Attach the Right Handlebar 20 w...

Page 6: ...und such as a properly grounded outlet box cover Whenever the adapter is used it must be held in place by a metal screw Some 2 pole receptacle outlet box covers are not grounded Contact a qualified el...

Page 7: ...o dismount the strider wait until the pedals come to a complete stop When the pedals are stationary hold the handlebars or the handrails and step off the ped als HOW TO LEVEL THE STRIDER If the stride...

Page 8: ...low To learn about the features of the Basic console see page 9 To learn about the features of the Workout TV console see the user s manual included with the Workout TV console To upgrade your console...

Page 9: ...hest pulse sensor The console offers sixteen preset workouts Each workout automatically changes the resistance of the pedals and prompts you to maintain a target stride length as it guides you through...

Page 10: ...pear in the right display 3 Change the resistance of the pedals as desired As you stride change the resistance of the pedals by pressing the RESISTANCE increase and decrease buttons Note After you pre...

Page 11: ...the handgrip pulse sensor and wear the chest pulse sensor at the same time the console will not display your heart rate accurately If there are sheets of plastic on the metal contacts on the handgrip...

Page 12: ...begin to flash If a differ ent resistance level is programmed for the next segment the resistance level of the pedals will then change As you exercise keep your stride length near the target stride le...

Page 13: ...Pod Make sure that the connector is fully plugged in Next press the play button on your iPod MP3 player CD player or other personal audio player Adjust the volume on your iPod MP3 player CD player or...

Page 14: ...r of hours that the strider has been used the total number of vertical feet that the ped als have climbed and the total distance that the pedals have been moved To reset the usage information to zero...

Page 15: ...arts immediately To clean the strider use a damp cloth and a small amount of mild soap Make sure to regularly clean the rollers and the track on which the rollers ride IMPOR TANT To avoid damage to th...

Page 16: ...your goal is to strengthen your cardiovascular system you must perform aerobic exercise which is activity that requires large amounts of oxygen for prolonged periods of time For aerobic exercise adju...

Page 17: ...lles Stretch With one leg in front of the other reach forward and place your hands against a wall Keep your back leg straight and your back foot flat on the floor Bend your front leg lean forward and...

Page 18: ...18 NOTES...

Page 19: ...ing 48 1 Tension Pulley 49 1 Tension Bushing 50 1 Flywheel Hub 51 1 Resistance Motor 52 4 Pulley 53 1 Belt Pulley 54 2 Cable Spool 55 3 Spool Hub 56 1 Resistance Magnet 57 1 Magnet Ring 58 4 M8 Star W...

Page 20: ...knut 128 1 5 16 x 3 1 2 Pivot Axle 129 4 1 2 Locknut 130 4 1 2 Washer 131 1 Ring Sensor Bracket 132 4 6 x 3 8 Screw 133 4 6 Locknut 134 1 Pedal Position Sensor 135 2 M10 Washer 136 2 Bumper Screw 137...

Page 21: ...11 12 13 14 17 15 16 18 117 117 117 139 117 117 117 111 111 113 117 117 117 140 117 117 117 117 117 104 113 117 104 134 139 139 139 140 117 117 139 139 139 117 139 EXPLODED DRAWING A Model No HF XS98...

Page 22: ...8 138 138 100 72 72 138 138 138 58 109 132 133 131 132 133 100 64 136 137 137 138 2 2 3 3 98 114 115 118 113 113 118 113 118 115 114 98 114 98 115 118 113 113 118 118 113 115 98 114 150 150 98 114 113...

Page 23: ...4 94 96 94 101 105 105 106 119 119 91 91 34 35 54 54 53 55 55 55 59 85 85 61 61 61 93 93 93 93 125 125 125 125 126 57 41 101 34 19 84 84 84 70 27 50 51 56 60 116 120 120 127 110 92 90 90 128 71 69 125...

Page 24: ...to the original owner and is non transferable The labor warranty applies only to products sold in the US The following will void the warranty on this product 1 Any misuse abuse or improper service 2...

Reviews: