background image

31

PART LIST

Model No. HF-XT9800-E.1 R1210A

1

1

Frame

2

1

Upright

3

1

Track Frame

4

1

Rear Stabilizer

5

1

Rear Stabilizer Cover

6

1

Console

7

1

Left Frame Cover

8

1

Right Frame Cover

9

2

Crank Arm

10

1

Rear Stabilizer Overlay

11

1

Upright Cover

12

1

Generator

13

1

Pulley

14

1

Handlebar Axle

15

1

Pulley Axle

16

1

Axle Plate

17

1

Left Handlebar Cover

18

1

Right Handlebar Cover

19

1

Water Bottle Holder

20

1

Power Board

21

1

Power Board Bracket

22

1

Frame Cover Bracket

23

1

Battery Pack

24

1

Drive Belt

25

2

Transport Wheel

26

2

Roller Arm

27

1

Left Pedal Arm

28

1

Right Pedal Arm

29

1

Left Handlebar Leg

30

1

Left Pedal

31

1

Right Pedal

32

1

Right Handlebar Leg

33

2

Handlebar Foam

34

1

Left Handlebar

35

1

Right Handlebar

36

1

Right Shield

37

1

Left Shield

38

2

Pedal Disc

39

1

Shield Cover

40

2

Rear Stabilizer Foot

41

3

Frame Foot

42

10

25mm Bearing

43

8

Wave Washer

44

8

Bushing

45

2

14mm Spacer

46

1

Large Washer

47

6

11mm Cover

48

4

Roller Bushing

49

2

Handlebar Cap

50

10

Snap Ring

51

6

Thrust Washer

52

6

M4 x 15mm Screw

53

1

Console Back Cover

54

10

M8 Locknut

55

2

Roller Arm Cap

56

8

5mm Bushing

57

1

M4 Washer

58

10

M4 x 50mm Screw

59

2

M12 x 60mm Bolt

60

8

M8 x 20mm Screw

61

2

M6 Large Washer

62

6

M8 x 42mm Bolt

63

2

M8 x 32mm Screw

64

6

M10 x 20mm Screw

65

4

M8 x 40mm Bolt

66

2

M6 x 20mm Screw

67

15

M4 x 10mm Screw

68

23

M6 x 20mm Screw

69

3

M6 x 140mm Screw

70

6

M6 x 100mm Screw

71

2

M6 x 40mm Screw

72

2

M6 x 25mm Screw

73

2

M12 Locknut

74

1

Console Handlebar

75

1

Console Back

76

2

Key

77

4

M5 x 15mm Screw

78

2

M4 x 14mm Screw

79

2

M6 x 60mm Screw

80

2

Roller

81

8

M6 x 30mm Hex Bolt

82

2

M8 x 80mm Bolt

83

16

M3 x 6mm Screw

84

4

M6 x 13mm Screw

85

2

M4 x 14mm Screw

86

1

Stabilizer Bracket

87

8

M3 Standoff

88

2

M8 x 60mm Screw

89

2

Pulse Grip

90

1

Stabilizer Block

Key No. Qty.

Description

Key No. Qty.

Description

Summary of Contents for HF-XT9800-E.1

Page 1: ...g this equipment Keep this manual for future reference QUESTIONS If you have questions or if parts are damaged or missing please see HOW TO CONTACT CUS TOMER CARE on the back cover of this manual www...

Page 2: ...O CONTACT CUSTOMER CARE Back Cover LIMITED WARRANTY Back Cover WARNING DECAL PLACEMENT This drawing shows the location s of the warning decal s If a decal is missing or illegible see the back cover of...

Page 3: ...ly tighten all parts regu larly Replace any worn parts immediately 7 Keep children under age 12 and pets away from the elliptical at all times 8 The elliptical should not be used by persons weighing m...

Page 4: ...d to help you achieve your fitness goals For your benefit read this manual carefully before you use the elliptical If you have questions after reading this manual please see the back cover of this man...

Page 5: ...il assembly is completed In addition to the included tool s assembly requires a Phillips screwdriver an adjustable wrench and a rubber mallet See the drawings below to identify the small parts needed...

Page 6: ...he inset drawing Locate the wire tie in the Upright 2 Tie the lower end of the wire tie to the frame wires A Next pull the upper end of the wire tie upward out of the top of the Upright Tip To prevent...

Page 7: ...over not shown in the same way 4 While a second person holds the Console 6 near the Upright 2 connect the wires on the Console to the frame wires A Insert the excess wire downward into the Upright Not...

Page 8: ...which is marked with an R sticker Attach the Right Handlebar 35 to the Right Handlebar Leg 32 with two M8 x 40mm Bolts 65 and two M8 Acorn Nuts 99 First tighten the Bolts completely into the Right Ha...

Page 9: ...ft over after assembly is completed To protect the floor or carpet from damage place a mat under the elliptical 7 Remove the adhesive backing from the Rear Stabilizer Overlay 10 and from the Rear Stab...

Page 10: ...atures of the Basic console see page 13 To learn about the features of the Workout TV console see the user s manual included with the Workout TV console To upgrade your console and expand the capabili...

Page 11: ...and external CATV cables are not available from FreeMotion Fitness but are available at electronics stores See the owner s manual included with the equipment you wish to connect to see whether an RF m...

Page 12: ...r direction It is rec ommended that you turn the pedal discs in the direction shown by the arrow however for variety you can turn the pedal discs in the opposite direc tion To dismount the elliptical...

Page 13: ...ing you can use the cool down mode to help you recover from your workout The console also provides two heart rate programs that automatically adjust the resistance of the pedals to keep your heart rat...

Page 14: ...xposed to cold temperatures allow it to warm to room tem perature before turning on the console If you do not do this the console displays or other elec tronic components may become damaged HOW TO TUR...

Page 15: ...es The display mode that you select will determine which workout information is shown Press the DISPLAY button repeatedly to select the desired display mode The main display can show the following wor...

Page 16: ...in the display next to the heart symbol For the most accurate heart rate reading hold the contacts for at least 15 seconds If your heart rate is not shown make sure that your hands are positioned as...

Page 17: ...press the ENTER button 4 Enter your weight Next the words ENTER WEIGHT and a weight setting US pounds will appear in the main dis play To enter your weight 1 kilogram 2 2 pounds press the increase an...

Page 18: ...tance level The default resistance level for the MANUAL programs is resistance level 3 The program will continue in this way until the last segment of the profile flashes To stop the pro gram at any t...

Page 19: ...ded into 20 or 30 one minute segments One resistance level and one target rpm pace setting is programmed for each segment Note The same resistance setting and or target rpm may be programmed for conse...

Page 20: ...ment of the profile flashes To stop the pro gram at any time stop pedaling or press the PAUSE button To resume the program simply resume pedaling or press the START button To exit the program at any t...

Page 21: ...h custom workout is divided into 30 one minute segments You can program one resistance level and one target rpm pace setting for each segment To program a resistance level for the first segment simply...

Page 22: ...resistance setting and one target rpm pace is programmed for each seg ment Note The same resistance setting and or target rpm may be programmed for consecutive segments During the program the program...

Page 23: ...am at any time stop pedaling or press the PAUSE button To resume the program simply resume pedaling or press the START button To exit the program at any time press the CLEAR button To change the setti...

Page 24: ...To enter a maximum heart rate setting press the increase and decrease buttons beside the ENTER button Then press the ENTER button 4 Press the START button or begin pedaling to start the program Each...

Page 25: ...iptical the console will enter an idle mode See HOW TO TURN OFF THE CONSOLE on page 14 HOW TO USE THE COOL DOWN MODE The COOL DOWN mode is designed to help you cool down after you have finished exerci...

Page 26: ...the console is in the idle mode the displays will be reset to zeros and a screen saver will appear in the main display The pause timeout can occur from 1 minute to 5 minutes after the pedals stop mov...

Page 27: ...the iFit card Remove the iFit card when you are finished exer cising Store the iFit card in a secure place HOW TO USE THE SOUND SYSTEM To play music or audio books through the console sound system wh...

Page 28: ...clean the rollers and the track frame on which the rollers ride IMPORTANT To avoid damage to the console keep liquids away from the console and keep the console out of direct sunlight HANDGRIP PULSE S...

Page 29: ...ur goal is to strengthen your cardiovascular system you must perform aerobic exercise which is activity that requires large amounts of oxygen for prolonged periods of time For aerobic exercise adjust...

Page 30: ...lles Stretch With one leg in front of the other reach forward and place your hands against a wall Keep your back leg straight and your back foot flat on the floor Bend your front leg lean forward and...

Page 31: ...41 3 Frame Foot 42 10 25mm Bearing 43 8 Wave Washer 44 8 Bushing 45 2 14mm Spacer 46 1 Large Washer 47 6 11mm Cover 48 4 Roller Bushing 49 2 Handlebar Cap 50 10 Snap Ring 51 6 Thrust Washer 52 6 M4 x...

Page 32: ...Receptacle A V Wire Audio Out Wire Coaxial Wire Right Pulse Wire Left Pulse Wire User s Manual Console Wire CN 3 Jumper Wire Ground Wire CN 2 Generator Wire CN 1 Generator Wire Key No Qty Description...

Page 33: ...1 42 42 42 42 43 43 50 50 46 44 45 73 73 58 58 58 59 59 60 60 60 78 68 68 81 52 24 82 72 54 9 44 45 82 72 54 67 86 53 89 68 40 84 68 81 13 15 16 54 62 62 76 54 52 41 90 89 74 88 88 67 12 77 77 91 92 9...

Page 34: ...26 32 33 34 35 47 43 44 44 44 44 43 50 47 44 50 47 44 50 47 42 50 48 48 48 48 50 42 42 50 47 55 55 49 54 54 56 56 56 56 56 47 56 56 63 64 65 64 63 64 66 33 64 67 67 68 64 68 64 50 61 61 43 43 43 93 93...

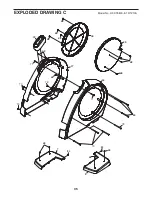
Page 35: ...35 EXPLODED DRAWING C Model No HF XT9800 E 1 R1210A 36 37 38 38 39 69 79 70 68 71 68 68 68 68 68 7 8 68 68 68 70 71 68 68 84 84 79 70...

Page 36: ...number information If this product experiences a fail ure under the warranty terms set forth FreeMotion Fitness shall provide at their option either repair replacement or refund of the purchase price...

Reviews: