background image


        Smart Wifi Multi Stage Thermostat 


Reference  No.:


HTW-81-FN7WF  Series 


2/7 


HTW-81-FN7WF  smart  thermostat  combines  user-friendly  touch  sensitive  buttons  with  WiFi  wireless  smart  control  application, 

offering  unparalleled  user  control.  Its  local  efficient  control  system  and  remote  wireless  smart  control  save  up  to  32%  heating  & 

cooling cost. Local energy-saving programmable solution for providing highly accurate temperature control. Remote wireless control 

through the application for providing easy and comfortable life style. Program a full 7 days schedule or change the settings through 

the App for total room control. The Apps support Google home and Amazon echo for good human-machine communication. 

WIRING INSTRUCTION 


Cut off power supply at circuit breaker or fuse before installation to avoid fire, shock or death! 

WIRING DIAGRAM 

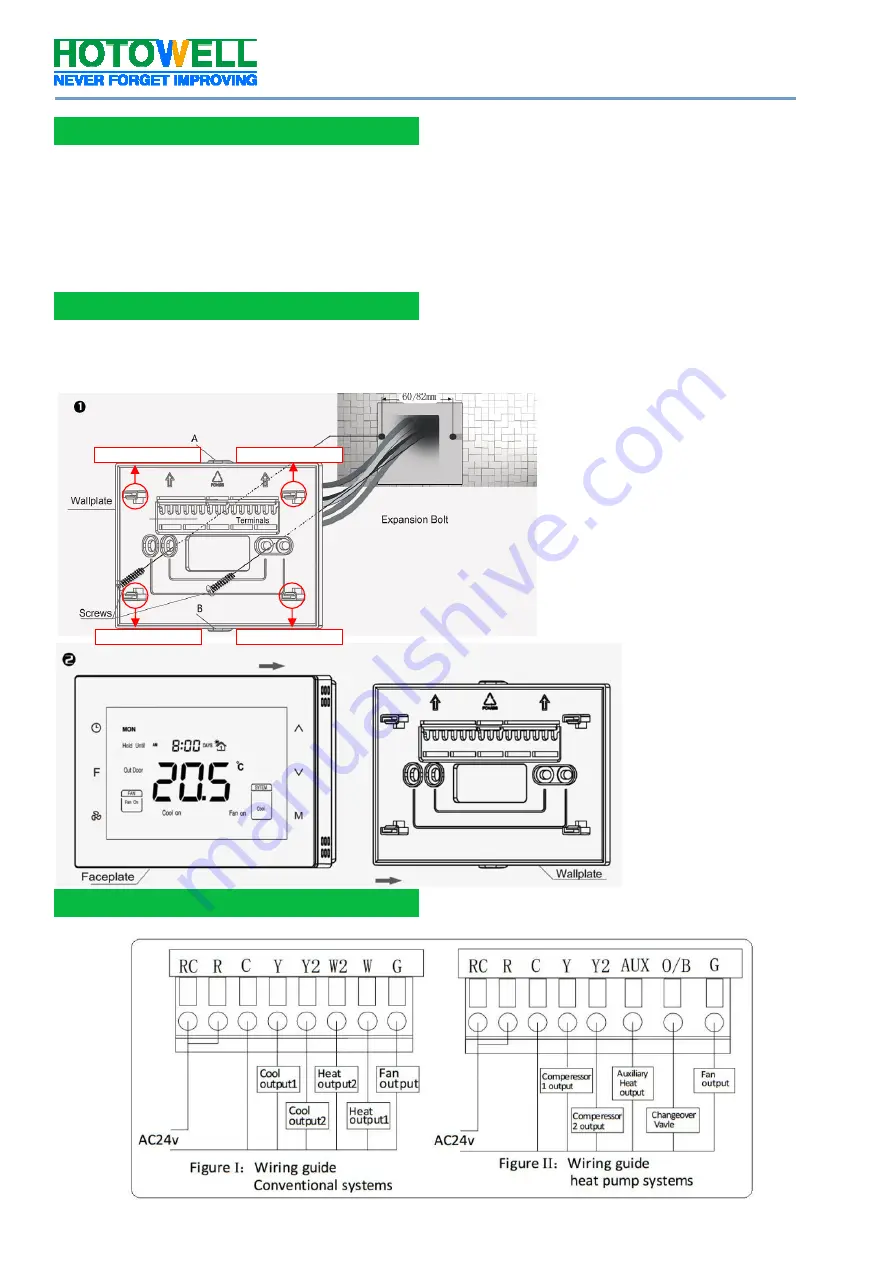
Step 1 

Separate  the  installation  plate  from 

thermostat  by  pulling  it  apart  and  holding 

point  A  and  B(or  use  a  screw  driver  to  pry 

the  4  latches  as  left  directions  ).  Insert  the 

wires  into  the  corresponding  terminals 

according to the diagram and fasten the wall 

plate  to  a  mounting  box  with  the  provided 

M*25mm  screws.  Ensure  the  proper 

orientation  of  the  wall  plate with  the  arrows 

on it pointing Up as shown on the left. 

Step 2 

Check  all  the  wires  and  then 

evenly  push  the  face  plate  into 

the  wall  plate  till  the  wall  plate 

and the face plate fit tightly. 

General 

Installation 

Wiring Diagram 

Screw drive direction 

Screw drive direction 

Screw drive direction 

Screw drive direction 

Summary of Contents for HTW-81-FN7WF Series

Page 1: ...rmostat App READ CAREFULLY These instructions will help prevent difficulties that might arise during thermostat installation and operation Studying the instructions first may save considerable time an...

Page 2: ...n echo for good human machine communication WIRING INSTRUCTION Cut off power supply at circuit breaker or fuse before installation to avoid fire shock or death WIRING DIAGRAM Step 1 Separate the insta...

Page 3: ...ut 2 2nd stage compressor output heat pump W2 AUX Heat output 2 Auxiliary heat output heat pump No Type Terminals Wiring Compressor delay 0 0 1H 1C conventional R G W Y Diagram conventional systems no...

Page 4: ...ute minute value flashes press or to modify the values Continually press it will switch among Year Month Day Hour Minute Press F to save the status then back to the temperature setting interface displ...

Page 5: ...temp difference is less than 2 2nd heat stops when temp difference is less than 1 Cool Changeover valve keep open Room temp Setting temp 1 Cool on displays and 1st stage cooling system is on Room tem...

Page 6: ...s mode comes after Hold by pressing F again In this mode device will follow the setting temperature and lasting days when users are out for a holiday And then back to follow Schedules after the holida...

Page 7: ...terated or removed that has not been handled or packaged correctly that has been sold as second hand or that has been resold contrary to Country and other applicable export regulations HIDDEN MENU In...

Reviews: