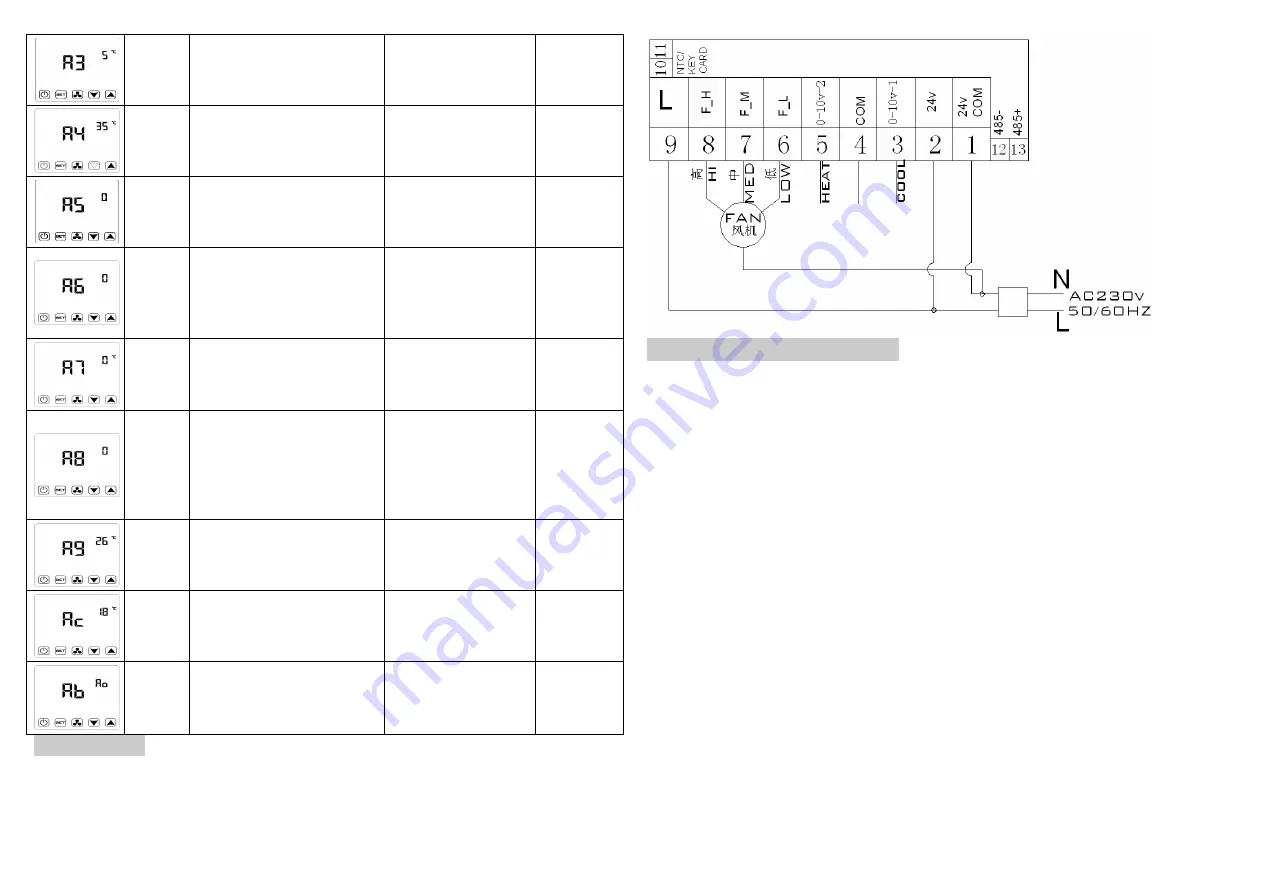
A3
Setting Temperature Lowest
Limit
1-25
℃
5
℃
A4
Setting Temperature Highest
Limit
30-70
℃
35
℃
A5
Fan Coil Units Control
0=Fan Under Control
1=Fan Isn’t Under
Control
0
A6
Timing Turn On/Off Running
Way
0=Timing
Turn
On/Off For One Time
1=Timing
Turn
On/Off
For
Cycle
Running
0
A7
°C or °F
Temperature Unit
Switch
Celsius
degree
or
Fahrenheit degree
0= °C
1= °F
0= °C
A8
Key Card Status
00:S1 Connect S2
Means Put-in Card
Status;
01:S1 Disconnect S2
Means Pull-out Card
Status.
00
A9
After Door Card Pull Out To
Cool Temperature
Setting Range 22
~
32
℃
26
℃
Ac
After Door Card Pull Out To
Heat Temperature
Setting Range 10
~
21
℃
18
℃
Ab
Return To Factory Default
Setting
Display Ao, Long
Press Fan Key To
Return To Factory
Default Setting
Wiring Diagram
Cautions on Installation and Use
1.
To prevent the thermostat display from a high fluctuation, special treatment has Aeen made
to the program. Therefore, it is
normal that the thermostat cannot immediately display the sudden change of temperature.
2.
The thermostat installed on 1.5m aAove the ground.
3.
For the thermostat installed,please take care not to install it to the wall corner, door /
window side or Aehind the door or in such
unheated area as exterior wall. Avoid hot / cold air duct, radiator, flue or thermal pipe.
4.
If you have any proAlem for the installed ,please contact our company hysen, we will make
a demonstration for you
5.
Only the professional technicians are permitted to open the transmitting and receiving Aox
of the thermostat for installation. When install the power supply, make sure that the power
caAle is well insulated.
6.
The thermostat is unrepairaAle product. The user shall not open the internal circuit Aoard.
7.
HTW-IZ19 series thermostat design for the standard 75x75x 35mm wall mount Aox
installed. Follow the instructions to open the rear cover Aase, mount it on the wall and wire
it.
8.
Before installing the thermostat, make sure that the system is disconnected. The maximum
voltage of the system shall meet the requirements specified in the Instruction Manual (Max.
AC Voltage: 250V).
Warranty
:
We offer the warranty of 18 months, from the sales day. The products of our company can have
lifetime warranty ,if it is not the quality proAlems, or Aeyond the warranty period, we will charge
for the after-sale service.


