background image

EN

5

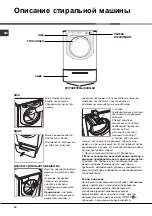
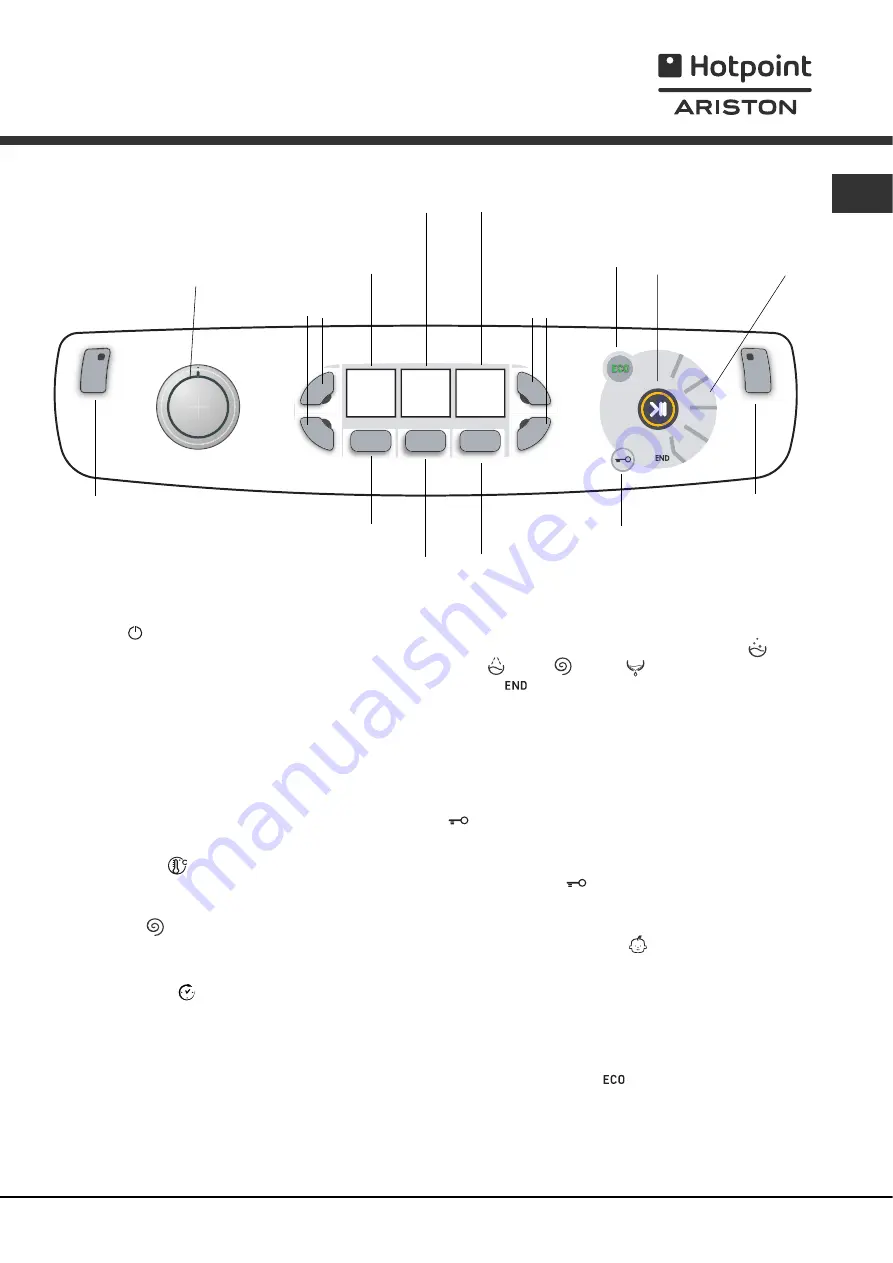
TEMPERATURE 

button

WASH CYCLE

SELECTOR


knob

OPTION 

buttons with

indicator lights

DOOR LOCKED

indicator light

START/PAUSE

button with indicator
light

WASH

CYCLE

PHASE

icons

SPIN

button

DELAYED

START

button

CONTROL PANEL

LOCK 

button with

indicator light

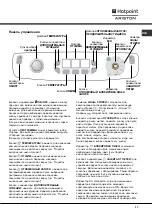
Button with

ON/OFF

indicator light

ECO 

indicator light

OPTION 

buttons with

indicator lights

TEMPERATURE

display

SPIN

display

DELAYED START/CYCLE

DURATION

display

Control panel

Button with 

ON/OFF

 indicator light: press this briefly

to switch the machine on or off. The green indicator light

indicates that the machine is switched on. To switch off

the washing machine during the wash cycle, press and

hold the button for approximately 3 seconds; if the

button is pressed briefly or accidentally the machine will

not switch off. If the machine is switched off during a

wash cycle, this wash cycle will be cancelled.

WASH  CYCLE  SELECTOR


knob: may be turned in

either direction. To select the most suitable wash cycle,

please refer to the 

“Table of wash cycles”.

The knob will not move during the wash cycle.

TEMPERATURE


 button: press to modify or exclude

the temperature setting; the value selected will appear

on the display above 

(see “Running a wash cycle”).

SPIN CYCLE


 button: press to modify or exclude the

spin cycle; the value selected will appear on the display

above 

(see “Running a wash cycle”).

DELAYED START

   button: press to set a delayed

start for the selected wash cycle; the set delay time will

appear on the display above 

(see “Running a wash

cycle”).

OPTION

 buttons with indicator lights: press to select the

available options. The indicator light corresponding to the

selected option will remain lit 

(see “Running a wash

cycle”).

WASH  CYCLE  PHASE

  icons

these  illuminate  to

indicate the progress of the wash cycle (Wash 

 –

Rinse   – Spin   – Drain 

).

The text 

 lights up when the cycle is complete.

START/PAUSE 

button with indicator light: when the

green indicator light flashes slowly, press the button to

start a wash cycle. Once the cycle has begun the

indicator light will remain lit in a fixed manner. To pause

the wash cycle, press the button again; the indicator

light will flash in an orange colour. If the “Door locked”

 indicator light is switched off, the door may be

opened. To start the wash cycle from the point at which

it was interrupted, press the button again.

DOOR  LOCKED


 indicator light: indicates that the

porthole door is locked. To open the door, pause the

wash cycle (see “

Running a wash cycle

”).

CONTROL PANEL LOCK


 button with indicator

light: to activate or deactivate the control panel lock,

press and hold the button for approximately 2 seconds.

when the indicator light is illuminated, the control panel is

locked. This means it is possible to prevent wash cycles

from being modified accidentally, especially where there

are children in the home.

ECO

 indicator light: the 

 icon lights up when, after

altering the washing parameters, an energy saving of at

least  10%  is  made.  Furthermore,  before  the  machine

enters “Standby” mode, the icon will light up for a few

seconds; when the machine is switched off the

estimated energy saving will be around the 80% mark.

Summary of Contents for Aqualtis AQ8F 29 U H

Page 1: ...Hotpoint Ariston AQ8F 29 U H EU 1 AQ8F 29 U EU...

Page 2: ...ry Washing recommendations Load balancing system Precautions and advice 9 General safety Disposal Opening the porthole door manually Care and maintenance 10 Cutting off the water and electricity suppl...

Page 3: ...ing sure that the hooks have been positioned in the holes provided before pushing it towards the machine For more detailed information please refer to the guidelines provided inside the chest Packagin...

Page 4: ...posite the socket is compatible with the plug of the appliance If this is not the case have the socket or the plug replaced The machine must not be installed outdoors even in covered areas It is extre...

Page 5: ...e wash compartment use powder detergent Before pouring in the detergent make sure that extra compartment 3 has been removed 2 main wash compartment use powder or liquid detergent If using the latter t...

Page 6: ...ll appear on the display above see Running a wash cycle OPTION buttons with indicator lights press to select the available options The indicator light corresponding to the selected option will remain...

Page 7: ...reased Modify the cycle settings Press the OPTION buttons to customise the wash cycle in accordance with your own requirements Press the button to activate the option the corresponding indicator light...

Page 8: ...dual detergent removal is guaranteed It is particularly useful for skin which is sensitive to detergents We recommend this option is used with a full load of washing or when a large amount of detergen...

Page 9: ...g a greater quantity of water and optimising the effect of special disinfecting additives added to the detergent At the end of the wash cycle the machine will slowly rotate the drum to end the cycle p...

Page 10: ...2002 96 EC relating to Waste Electrical and Electronic Equipment WEEE states that household appliances should not be disposed of using the normal solid urban waste cycle Exhausted appliances should be...

Page 11: ...machine is fitted with a self cleaning pump which does not require any maintenance Sometimes small items such as coins or buttons may fall into the protective pre chamber at the base of the pump Make...

Page 12: ...the START PAUSE button or the Easy iron button The drain hose is not fitted at a height between 65 and 100 cm from the floor see Installation The free end of the hose is under water see Installation I...

Page 13: ...orised Technical Assistance Service If the washing machine has been installed or used incorrectly you will have to pay for the call out service Always request the assistance of authorised technicians...

Page 14: ...15 14 15 16 17 18 19 20 21 22 23 24 15 AQUALTIS AQ8F 29 U H...

Page 15: ...15 1 2 4 3 4 4 1 2 2 1 2 3 4 3...

Page 16: ...15 65 100 cm 65 100 150 AQ8F 29 U H 59 5 105 64 5 1 8 c max 1 10 min 0 05 0 5 62 1200 K EN 60456 60 8 89 336 03 05 89 2002 96 CE 2006 95 CE...

Page 17: ...15 1 3 2 3 3 ON OFF 3 1 2...

Page 18: ...15 ON OFF 3 o ocka e 2 10 80 ON OFF ECO...

Page 19: ...15 90 1 1 2 3 4 5 6 K 90 OFF 3 7 8 END Aqualtis...

Page 20: ...l l l 8 40 600 l l l 2 Jeans 40 800 l l 4 40 800 l l l 4 e ka 60 800 l l l 4 e ka 40 800 l l l 4 60 1200 l l l 8 x epo 30 1000 l l 3 5 e k 30 0 l l 2 e c 40 600 l l 2 kc 30 30 800 l l 3 5 o ocka e 120...

Page 21: ...00 500 1 150 200 1 400 500 1 900 1200 1 150 250 1 400 500 1 150 200 a k a k Jeans Jeans Denim Baby Baby e k Hotpoint Ariston Woolmark Platinum Care M 0508 The Woolmark Company x epo 3 5 x epo x epo Be...

Page 22: ...15 2002 96 1 2 3 4 5 6...

Page 23: ...15 1 2 1 2 1 2 1 5 3 4 5 6...

Page 24: ...15 ON OFF Baby e k 65 100 1 3 ON OFF...

Page 25: ...15 S N...

Page 26: ...25 UK 26 27 i i i 28 29 30 31 32 33 34 35 36 UK AQUALTIS AQ8F 29 U H...

Page 27: ...UK 26 1 i i 2 4 3 4 i 4 1 2 2 1 2 3...

Page 28: ...27 UK 65 100 cm 65 100 i i i 150 i i AQ8F 29 U H 59 5 105 64 5 1 8 i i 1 10 0 05 0 5 62 1200 EN 60456 60 C 8 89 336 CEE i 03 05 89 2002 96 CE 2006 95 CE...

Page 29: ...UK 28 3 1 2 i I i i i i i i i 1 i 3 2 3 3 i i i i stand by i i i i ON OFF i...

Page 30: ...29 UK ON OFF 3 i i I I i i i I I i i 2 i i i i i i 10 i i i i Stand by i i i i 80 I I I ON OFF E O I I A I...

Page 31: ...UK 30 90 1 1 2 3 4 5 6 i i i i i i i i i i 90 i i i i i i i i i i i i i i i i OFF i i i i i i i i i i 7 I i i i i I i 8 END i i i i i i i Aqualtis i i...

Page 32: ...C i i i i i i i i i 90 1200 l l 8 i 1 i i i i 60 Max 90 1200 l l l 8 i 2 i i i i 40 1200 l l l 8 K a 3 40 1200 l l l 8 40 600 l l l 2 40 800 l l 4 i i i i i 40 800 l l l 4 i i i 60 800 l l l 4 i i i...

Page 33: ...00 1 150 200 1 400 500 1 900 1200 1 150 250 1 400 500 1 150 200 i i i i i i Denim i i i i i i i i i i i i i i i i i i i i i i i i i Hotpoint Ariston Woolmark Platinum Care M 0508 The Woolmark Company...

Page 34: ...33 UK i i i i i i i i i i i i i i 2002 96 CE i i i i i i i i i 1 2 3 4 5 6 i i...

Page 35: ...UK 34 1 2 1 2 1 2 1 5 3 4 5 6 i i...

Page 36: ...35 UK i i i i i ON OFF i i i i i i i i i i i i i i i 65 100 i i i i 1 i i 3 ON OFF...

Page 37: ...UK 36 i i i i i i i i...

Page 38: ...o Preparare la biancheria Consigli di lavaggio Sistema bilanciamento del carico Precauzioni e consigli 45 Sicurezza generale Smaltimento Apertura manuale della porta obl Manutenzione e cura 46 Esclude...

Page 39: ...lo zoccolo di plastica in dotazione nel cassettone assicurandosi prima di spingerlo verso la macchina di aver inserito i ganci nelle apposite asole Per informazioni pi dettagliate vedere le indicazion...

Page 40: ...ella tabella Dati tecnici vedi a fianco la presa sia compatibile con la spina della macchina In caso contrario far sostituire la presa o la spina La macchina non va installata all aperto nemmeno se lo...

Page 41: ...e che non sia inserita la vaschetta aggiuntiva 3 2 vaschetta per il lavaggio usare detersivo in polvere o liquido In quest ultimo caso si raccomanda di versarlo immediatamente prima dell avvio della l...

Page 42: ...Centrifuga Scarico finale La scritta si illumina quando il ciclo terminato Pulsante con spia AVVIO PAUSA quando la spia verde lampeggia lentamente premere il pulsante per avviare un lavaggio A ciclo...

Page 43: ...e fino a che sul display compare la scritta OFF il simbolo si spegner Una volta premuto il pulsante AVVIO PAUSA il valore del ritardo potr essere modificato solo diminuendolo Modificare le caratterist...

Page 44: ...prestazioni grazie all utilizzo di una maggior quantit d acqua nella fase iniziale del ciclo e alla maggior durata del programma ed utile per eliminare le macchie pi resistenti Pu essere utilizzata co...

Page 45: ...delle lente rotazioni del cestello per terminare il ciclo premere il tasto AVVIO PAUSA Seta utilizzare l apposito programma Seta per lavare tutti i capi in seta Si consiglia l utilizzo di un detersivo...

Page 46: ...he prevede che gli elettrodomestici non debbano essere smaltiti nel normale flusso dei rifiuti solidi urbani Gli apparecchi dismessi devono essere raccolti separatamente per ottimizzare il tasso di re...

Page 47: ...dotata di una pompa autopulente che non ha bisogno di manutenzione Pu per succedere che piccoli oggetti monete bottoni cadano nella precamera che protegge la pompa situata nella parte inferiore di ess...

Page 48: ...e il bucato necessario premere il pulsante AVVIO PAUSA o il pulsante Stira Facile Il tubo di scarico non installato fra 65 e 100 cm da terra vedi Installazione L estremit del tubo di scarico immersa n...

Page 49: ...ervento chiamare il Numero Unico Nazionale 199 199 199 Un operatore sar a completa disposizione per fissare un appuntamento con il Centro Assistenza Tecnico Autorizzato pi vicino al luogo da cui si ch...

Page 50: ...dlo 56 Prac prost edek P prava pr dla Rady pro pran Syst m automatick ho vyv en n pln Opat en a rady 57 Z kladn bezpe nostn pokyny Likvidace Manu ln otev en dv ek s pr zorem dr ba a p e 58 Uzav en p...

Page 51: ...te 4 bo n rouby a sejm te kovovou li tu Po ukon en t to operace prove te mont plastov ho podstavce je ulo en v z suvce a d ve ne jej zatla te sm rem k za zen se ujist te zda jsou h ky zasunut do p slu...

Page 52: ...dle Hodnota nap jec ho nap t odpov d daj m uveden ch v tabulce s technick mi daji viz vedle Se z suvka shoduje se z str kou nap jec ho kabelu za zen V opa n m p pad je t eba d t vym nit z suvku nebo z...

Page 53: ...d napln n m p ihr dky prac m prost edkem se ujist te e v d vkova i nen vlo ena p davn p ihr dka 3 2 p ihr dka pro pran pou ijte pr kov nebo tekut prac prost edek V posledn uveden m p pad se doporu uje...

Page 54: ...ogramu hodnota nastaven ho odlo en bude zobrazena na displeji nad tla tkem viz Spu t n prac ho cyklu Tla tka s kontrolkami VOLITELN FUNKCE Slou k volb jednotliv ch nab zen ch voliteln ch funkc P slu n...

Page 55: ...dnotu odlo en startu pouze jej m sn en m Zm te vlastnosti cyklu Stisknut m tla tek VOLITELN CH FUNKC m ete nastavit prac program dle va ich pot eb Stiskn te tla tko za elem aktivace voliteln funkce ro...

Page 56: ...ivost na prac prost edky Tuto volitelnou funkci doporu ujeme pou vat na zcela napln nou pra ku nebo p i pou it vysok ch d vek prac ho prost edku Tuto volitelnou funkci nen mo n aktivovat u programu 3...

Page 57: ...p sad p idan ch k prac mu prost edku Na konci pran provede za zen pomal ot en bubnu aby se zabr nilo tvorb z hyb cyklus je mo n ukon it stisknut m tla tka START PAUSE Hedv b pro pran ve ker ho pr dla...

Page 58: ...ktronick mi za zen mi na izuje e elektrospot ebi e nesm b t likvidov ny v r mci b n ho pevn ho m stsk ho odpadu Vy azen za zen mus b t sesb r na zvl aby se zv ilo mno stv recyklovan ch a znovupou it c...

Page 59: ...tic erpadlo kter nevy aduje dr bu M e se v ak st t e se v jeho vstupn sti ur en k jeho ochran a nach zej c se v jeho spodn sti zachyt drobn p edm ty mince knofl ky Ujist te se e byl prac cyklus ukon e...

Page 60: ...tko Snadn ehlen Vypou t c hadice se nach z mimo ur en rozmez od 65 do 100 cm nad zem viz Instalace Koncov st vypou t c hadice je pono en ve vod viz Instalace V p pad e se byt nach z na jednom z nejvy...

Page 61: ...ativn ho v sledku se obrat te na Servisn slu bu nebo na specializovan technick person l V p pad chybn instalace nebo nespr vn ho pou it pra ky bude t eba za servisn z sah zaplatit Nikdy se neobracejte...

Page 62: ...zny Zalecenia dotycz ce prania System r wnowa enia adunku Zalecenia i rodki ostro no ci 69 Og lne zasady bezpiecze stwa Utylizacja R czne otwieranie drzwiczek Utrzymanie i konserwacja 70 Od czenie wod...

Page 63: ...ci 4 ruby boczne i zdj metalow opask Po zako czeniu tej czynno ci zamontowa podest plastikowy b d cy na wyposa eniu w skrzynce upewniwszy si przed wsuni ciem go do maszyny e za o one zosta y uchwyty d...

Page 64: ...anych technicznych patrz obok napi cie zasilania mie ci si w warto ciach wskazanych w tabeli Danych technicznych patrz obok gniazdko jest kompatybilne z wtyczk urz dzenia W przeciwnym razie nale y wym...

Page 65: ...nik do prania wst pnego stosowa rodek pior cy w proszku Przed wsypaniem rodka pior cego nale y sprawdzi czy nie jest w o ona dodatkowa przegr dka 3 2 pojemnik do prania stosowa rodek pior cy w proszku...

Page 66: ...si kiedy cykl zostaje zako czony Przycisk z kontrolk START PAUSE kiedy zielona kontrolka pulsuje powoli nale y nacisn przycisk w celu uruchomienia prania Po uruchomieniu cyklu kontrolka wieci w spos b...

Page 67: ...a nie Po naci ni ciu przycisku START PAUSE warto op nienia mo e by zmieniana jedynie malej co Zmiana charakterystyki cyklu Naciska przyciski OPCJE w celu personalizacji prania zgodnie z w asnymi wymag...

Page 68: ...pewnia si maksymalne usuwanie rodka pior cego Jest przydatne dla w kna szczeg lnie wra liwego na rodki pior ce Radzimy u ywa tej opcji z pralk o pe nym wsadzie i z wi ksz ilo ci rodka pior cego Nie mo...

Page 69: ...dzia ania specjalnych dodatk w higienizuj cych kt rymi uzupe niany jest rodek pior cy Po zako czeniu prania urz dzenie wykona seri wolnych obrot w b bna aby zapobiec powstawaniu zagniece w celu zako c...

Page 70: ...z ca odpad w urz dze elektrycznych i elektronicznych przewiduje e elektryczne urz dzenia gospodarstwa domowego nie powinny by utylizowane w normalnym ci gu utylizacji sta ych odpad w miejskich Stare u...

Page 71: ...y Pralka wyposa ona jest w pomp samoczyszcz c kt ra nie wymaga zabieg w konserwacyjnych Mo e si jednak zdarzy e drobne przedmioty monety guziki wpadn do komory wst pnej zabezpieczaj cej pomp kt ra zna...

Page 72: ...m od pod ogi patrz Instalacja Ko c wka rury usuwania wody jest zanurzona w wodzie patrz Instalacja Je li mieszkanie znajduje si na najwy szych pi trach budynku mo liwe e zaistnia efekt syfonu w wyniku...

Page 73: ...wnym razie wezwa Autoryzowany Serwis Techniczny W przypadku b dnego zainstalowania i nieprawid owego u ywania pralki interwencja serwisu b dzie p atna Nigdy nie wzywa nieautoryzowanych technik w Nale...

Page 74: ......

Reviews: