GB
4
Care and maintenance
Cutting off the water and
electricity supplies
• Turn off the water tap after every wash cycle.
This will limit wear on the hydraulic system in
the machine and help to prevent leaks.
• Unplug the appliance when cleaning it and
during all maintenance work.
Cleaning the machine
The outer parts and rubber components of the
appliance can be cleaned using a soft cloth
soaked in lukewarm soapy water. Do not use
solvents or abrasives.
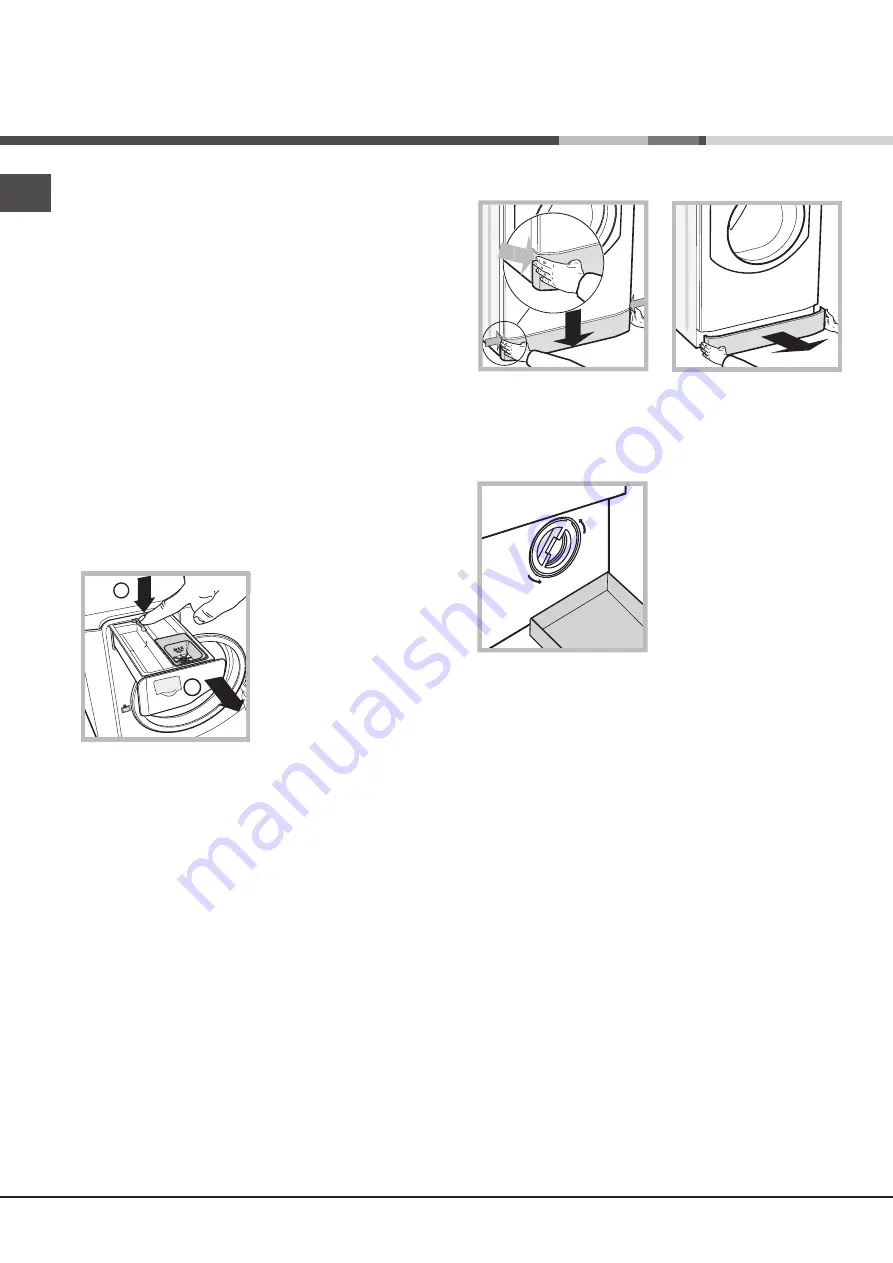
Cleaning the detergent dispenser
drawer
To remove the drawer,
press lever (1) and pull
the drawer outwards (2)
(see figure).
Wash it under running
water; this procedure
should be repeated
frequently.
Caring for your appliance drum
• Always leave the door ajar to prevent
unpleasant odours from forming.
Cleaning the pump
The Washer-dryer is fitted with a self-
cleaning pump which does not require any
maintenance. Sometimes, small items (such
as coins or buttons) may fall into the protective
pre-chamber at the base of the pump.
!
Make sure the wash cycle has finished and
unplug the appliance.
To access the pre-chamber:
1. take off the cover panel on the front of the
machine by first pressing it in the centre and
then pushing downwards on both sides until
you can remove it
(see figures);
2. position a container
so that it will collect the
water which flows out
(approximately 1.5 l)
(
see
figure
)
;
3. unscrew the lid by
rotating it in an anti-
clockwise direction (
see
figure
)
;
4. clean the inside thoroughly;
5. screw the lid back on;
6. reposition the panel, making sure the hooks
are securely in place before you push it onto
the appliance.
Checking the water inlet hose
Check the inlet hose at least once a year. If
there are any cracks, it should be replaced
immediately: during the wash cycles, water
pressure is very strong and a cracked hose
could easily split open.
1
2
1
2
1
2
Summary of Contents for Aqualtis AQD1171D 69ID
Page 73: ...73 SR C 74 75 76 77 78 79 touch control 80 81 82 83 84 SR AQUALTIS AQD1171D 69ID...
Page 74: ...SR 74 1 2 4 3 4 1 2 2 1 2 3...
Page 76: ...SR 76 1 2 1 2 1 5 3 4 5 6 1 2 1 2 1 2...
Page 77: ...77 SR 8 3 2012 19 EU 1 2 3 4 5...
Page 83: ...83 SR ON OFF a START PAUSE START PAUSE START PAUSE 65 100 START PAUSE 1 OFF...

