background image

EN

5

Precautions and tips

•  Make sure that the water tap is turned on during    

  the drying cycles.

Disposal

•  Disposing of the packaging materials: observe local 

regulations so that the packaging may be re-used.

•  The European Directive 2002/96/EC relating to Waste 

Electrical and Electronic Equipment (WEEE) states 

that household appliances should not be disposed of 

using the normal solid urban waste cycle. Exhausted 

appliances should be collected separately in order to 

optimise the cost of re-using and recycling the materials 

inside the machine, while preventing potential damage 

to the atmosphere and to public health. The crossed-out 

dustbin is marked on all products to remind the owner 

of their obligations regarding separated waste collection.

  For more information relating to the correct disposal of 

household appliances, owners should contact their local 

authorities or appliance dealer.

Opening the porthole door manually

In the event that it is not possible to open the porthole door 

due to a powercut, and if you wish to remove the laundry, 

proceed as follows:

1. remove the plug from the 

electrical socket.

2. make sure the water level 

inside the machine is lower 

than the door opening; if 

it is not, remove excess 

water using the drain hose, 

collecting it in a bucket as 

indicated in the 

figure

.

3. remove the cover panel 

on the lower front part of the 

washer dryer (

see overleaf

).

4. pull outwards using the 

tab as indicated in the figure, 

until the plastic tie-rod is freed 

from its stop position; pull 

downwards until you hear a 

“click”, which indicates that 

the door is now unlocked.

5. open the door; if this is 

still not possible repeat the 

procedure.

6. reposition the panel, 

making sure the hooks are 

securely in place before you 

push it onto the appliance.

!

 The machine was designed and constructed in 

accordance with international safety regulations. The 

following information is provided for safety reasons and 

must therefore be read carefully.

General safety

•  This appliance is not intended for use by persons 

(including children) with reduced physical, sensory 

or mental capabilities, or lack of experience and 

knowledge, unless they have been given supervision or 

instruction concerning use of the appliance by a person 

responsible for their safety.

  Children should be supervised to ensure that they do 

not play with the appliance. 

– Do not dry unwashed items in the tumble dryer.

  – Items that have been soiled with substances such 

as cooking oil, acetone, alcohol, petrol, kerosene, 

spot removers, turpentine, waxes and wax removers 

should be washed in hot water with an extra amount of 

detergent before being dried in the tumble dryer.

  – Items such as foam rubber (latex foam), shower caps, 

waterproof textiles, rubber backed articles and clothes 

or pillows fitted with foam rubber pads should not be 

dried in the tumble dryer.

  – Fabric softeners, or similar products, should be used 

as specified by the fabric softener instructions.

  – The final part of a tumble dryer cycle occurs without 

heat (cool down cycle) to ensure that the items are left 

at a temperature that ensures that the items will not be 

damaged.


WARNING

: Never stop a tumble dryer before the end of 

the drying cycle unless all items are quickly removed and 

spread out so that the heat is dissipated.

•  This appliance was designed for domestic use only.

•  Do not touch the machine when barefoot or with wet or 

damp hands or feet.

•  Do not pull on the power supply cable when unplugging 

the appliance from the electricity socket. Hold the plug 

and pull. 

•  Do not touch the drained water as it may reach 

extremely high temperatures. 

•  Never force the porthole door. This could damage the 

safety lock mechanism designed to prevent accidental 

opening.

•  If the appliance breaks down, do not under any 

circumstances access the internal mechanisms in an 

attempt to repair it yourself.

•  Always keep children well away from the appliance while 

it is operating.

•  If it must be moved, proceed with the help of two or 

three people and handle it with the utmost care. Never 

try to do this alone, because the appliance is very heavy.

•  Before loading laundry into the washer dryer, make sure 

the drum is empty.

•  During the drying phase, the door tends to get    

  quite hot.

•  Do not use the appliance to dry clothes that have   

  been washed with flammable solvents (e.g.  


  trichlorethylene).

•  Do not use the appliance to dry foam rubber or    

  similar elastomers.

Summary of Contents for AQUALTIS AQD970F 69

Page 1: ...mp Checking the water inlet hose Precautions and advice 5 General safety Disposal Opening the porthole door manually Description of the machine 6 7 Control panel How to run a wash cycle or a drying cy...

Page 2: ...for children Levelling 1 Place the Washer dryer on a flat sturdy floor without resting it up against walls or cabinets 2 If the floor is uneven the front feet of the machine may be adjusted until it r...

Page 3: ...leave the appliance exposed to rain storms and other weather conditions The mains socket must remain within easy reach after the Washer dryer has been installed Do not use extension cords or multiple...

Page 4: ...cleaning pump which does not require any maintenance Sometimes small items such as coins or buttons may fall into the protective pre chamber at the base of the pump Make sure the wash cycle has finish...

Page 5: ...bilities or lack of experience and knowledge unless they have been given supervision or instruction concerning use of the appliance by a person responsible for their safety Children should be supervis...

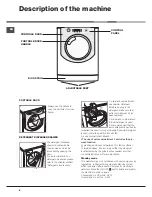
Page 6: ...fabric softeners are diluted Standby mode This wasdher dryer in compliance with new energy saving regulations is fitted with an automatic standby system which is enabled after about 30 minutes if no...

Page 7: ...dicator lights press to select the available options The indicator light corresponding to the selected option will remain lit see How to run a wash cycle or a drying cycle WASH CYCLE PHASE icons these...

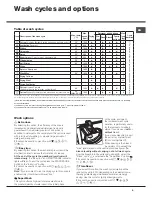
Page 8: ...ure for the remainder of the load A cooling down period is always added to the end of each drying cycle Drying only Use the cycle selector knob to select a drying cycle in accordance with the type of...

Page 9: ...ycle duration will be reduced by up to 50 depending on the selected cycle thereby guaranteeing simultaneous water and energy saving Use this cycle for lightly soiled garments It cannot be used in conj...

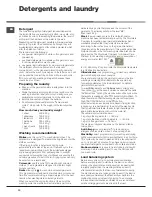
Page 10: ...anced correctly the machine spins at a reduced spin speed If the load is excessively unbalanced the Washer dryer performs the distribution process instead of spinning To encourage improved load distri...

Page 11: ...ose is under water see Installation If the dwelling is on one of the upper floors of a building there may be problems relating to water drainage causing the Washer dryer to fill with water and drain c...

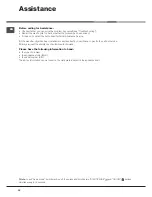
Page 12: ...n installed or used incorrectly you will have to pay for the call out service Always request the assistance of authorised technicians Please have the following information to hand the type of problem...

Page 13: ...tubo di alimentazione dell acqua Precauzioni e consigli 17 Sicurezza generale Smaltimento Apertura manuale della porta obl Descrizione della macchina 18 19 Pannello comandi Come effettuare un ciclo di...

Page 14: ...appoggiarla a muri o mobili 2 Compensare le irregolarit svitando o avvitando i piedini finch la macchina non sia orizzontale non deve essere inclinata pi di 2 gradi Un accurato livellamento d stabili...

Page 15: ...e temporali A macchina installata la presa della corrente deve essere facilmente raggiungibile Non usare prolunghe e multiple Il cavo non deve subire piegature o compressioni Il cavo di alimentazione...

Page 16: ...re il rubinetto dell acqua dopo ogni lavaggio Si limita cos l usura dell impianto idraulico della macchina e si elimina il pericolo di perdite Staccare la spina della corrente quando si pulisce la mac...

Page 17: ...cedere ai meccanismi interni per tentare una riparazione Controllare sempre che i bambini non si avvicinino alla macchina in funzione Se deve essere spostata lavorare in due o tre persone con la massi...

Page 18: ...dalla griglia e di diluire ammorbidenti concentrati Modalit di stand by Questa lavatrice in conformit alle nuove normative legate al risparmio energetico dotata di un sistema di autospegnimento stand...

Page 19: ...DI LAVAGGIO si illuminano ad indicare l avanzamento del ciclo Lavaggio Risciacquo Centrifuga Scarico Asciugatura La scritta si illumina quando il ciclo terminato Pulsante con spia START PAUSE quando l...

Page 20: ...RA Ripeti le stesse operazioni per il carico rimanente Alla fine dell asciugatura viene effettuato un periodo di raffreddamento SOLO ASCIUGATURA Selezionare con la manopola dei programmi un asciugatur...

Page 21: ...ile sui programmi Risparmio Tempo Selezionando questa opzione si riduce la durata del programma fino al 50 in base al ciclo scelto garantendo al contempo un risparmio di acqua ed energia Utilizzare qu...

Page 22: ...ce Hotpoint Ariston stato testato e approvato dalla Woolmark Company per il lavaggio di capi in lana classificati come lavabili a mano purch il lavaggio venga eseguito nel rispetto delle istruzioni ri...

Page 23: ...tubo di scarico immersa nell acqua vedi Installazione Se l abitazione si trova agli ultimi piani di un edificio possibile che si verifi chino fenomeni di sifonaggio per cui la macchina carica e scari...

Page 24: ...sar a completa disposizione per fissare un appuntamento con il Centro Assistenza Tecnico Autorizzato pi vicino al luogo da cui si chiama attivo 7 giorni su 7 sabato e domenica compresi e non lascia ma...

Page 25: ...la bomba Controlar el tubo de alimentaci n de agua Precauciones y consejos 29 Seguridad general Eliminaci n Apertura manual de la puerta Descripci n de la m quina 30 31 Panel de control C mo efectuar...

Page 26: ...n los muebles 2 Compense las irregularidades desenroscando o enroscando las patas hasta que la m quina quede en posici n horizontal no debe estar inclinada m s de 2 grados Una cuidadosa nivelaci n bri...

Page 27: ...egido ya que es muy peligroso dejarla expuesta a la lluvia o a las tormentas Una vez instalada la m quina la toma de corriente debe ser f cilmente accesible No utilice prolongaciones ni conexiones m l...

Page 28: ...Pero puede suceder que objetos peque os monedas botones caigan en la prec mara que protege la bomba situada en la parte inferior de la misma Verifique que el ciclo de lavado haya terminado y desenchuf...

Page 29: ...n a la m quina cuando est en funcionamiento Si debe ser trasladada deber n intervenir dos o m s personas procediendo con el m ximo cuidado La m quina no debe ser desplazada nunca por una sola persona...

Page 30: ...r los suavizantes concentrados Modalidad de stand by Esta lavasecadora est en conformidad con las nuevas normativas vinculadas al ahorro energ tico Est dotada de un sistema de auto apagado stand by qu...

Page 31: ...l avance del ciclo Lavado Aclarado Centrifugado Desag e Secado El mensaje se ilumina cuando ha finalizado el ciclo Bot n con piloto START PAUSE cuando el piloto verde centellea lentamente presione el...

Page 32: ...a la carga restante Al finalizar el secado contin a siempre un per odo de enfriamiento S lo el secado Seleccionar con el mando de programas el secado adecuado al tipo de tejido Se puede programar tamb...

Page 33: ...isminuye la duraci n del programa hasta un 50 seg n el ciclo elegido garantizando al mismo tiempo un ahorro de agua y energ a Utilice este ciclo para prendas no excesivamente sucias No se puede activa...

Page 34: ...una velocidad inferior a la prevista Cuando existe un excesivo desequilibrio la lavasecadora realiza la distribuci n antes que el centrifugado Para obtener una mejor distribuci n de la carga y su cor...

Page 35: ...uentra en uno de los ltimos pisos de un edificio es posible que se verifiquen fen menos de sifonaje por ello la m quina carga y descarga agua de modo continuo Para eliminar este inconveniente se encue...

Page 36: ...solo para Espa a Para otros pa ses de habla hispana consulte a su vendedor Ampliaci n de garant a Llame al 902 363 539 y le informaremos sobre el fant stico plan de ampliaci n de garant a hasta 5 a o...

Page 37: ...impar a bomba Verificar o tubo de alimenta o de gua Precau es e conselhos 41 Seguran a geral Elimina o Abertura manual da porta de vidro Descri o da m quina 42 43 Painel de comandos Como efectuar um c...

Page 38: ...sem encost la em paredes ou m veis 2 Compense as irregularidades desatarraxando ou atarraxando os p s at que a m quina esteja nivelada horizontalmente n o deve ter uma inclina o superior aos 2 graus...

Page 39: ...chuva e s tempestades Depois de ter instalado a m quina de lavar roupa o acesso tomada el ctrica deve ser f cil N o empregue extens es nem fichas m ltiplas O cabo n o deve ser dobrado nem apertado O...

Page 40: ...o precisa de opera es de manuten o Entretanto pode acontecer que pequenos objectos moedinhas bot es caiam na pr c mara que protege a bomba situada na parte inferior da mesma Certifique se que o ciclo...

Page 41: ...mecanismos internos para tentar reparar Verifique sempre que crian a n o se aproximem da m quina a funcionar Se for preciso deslocar a m quina s o precisas pelo menos duas ou tr s pessoas com a m xima...

Page 42: ...parede divis ria A fornecido com o aparelho para uma correcta dosagem Para o uso do detergente em p coloque o recipiente na cavidade B 3 Gaveta adicional gua de Javel Se utilizar a gaveta adicional 3...

Page 43: ...o ciclo tiver terminado Bot o com indicador luminoso START PAUSE quando o indicador luminoso verde acende se com intermit ncia lenta carregar no bot o para iniciar uma lavagem Quando o ciclo iniciar o...

Page 44: ...Repetir as mesmas opera es para a carga que ficou No final da secagem efectua se sempre um per odo de resfriamento S secagem Seleccione com o selector dos programas uma secagem em fun o do tipo de tec...

Page 45: ...s Se tamb m desejar enxugar este bot o estar activado somente em combina o com o n vel Engomar Super Lavagem Esta op o garante uma lavagem com altas performances gra as ao uso de uma maior quantidade...

Page 46: ...lavar roupa Hotpoint Ariston foi testado e aprovado pela Woolmark Company para a lavagem de vestu rio em l classificado como lav vel m o desde que a lavagem seja executada de acordo com as instru es...

Page 47: ...arga est imersa na gua veja Instala o Se a morada encontrar se nos ltimos andares de um edif cio poss vel que aconte am fen menos de sif o por causa dos quais a m quina de lavar roupa carrega e descar...

Page 48: ...o No caso de uma incorrecta instala o ou de um uso n o correcto do aparelho o servi o de assist ncia ser a pagamento Nunca recorra a t cnicos n o autorizados Comunique o tipo de anomalia o modelo da m...

Page 49: ...e buis van de watertoevoer Voorzorgsmaatregelen en advies 53 Algemene veiligheid Balanceersysteem van de lading Afvalverwijdering Handmatige opening van het deurtje Beschrijving van de Wasdroogmachine...

Page 50: ...en rechte en stevige vloer en laat hem niet tegen muren of meubels leunen 2 Compenseer eventuele oneffenheden door de stelvoetjes vast of los te draaien totdat de automaat volledig horizontaal staat h...

Page 51: ...rd om elektronische schade door bevriezing of condensatie te voorkomen Als de Wasdroogmachine is ge nstalleerd moet het stopcontact gemakkelijk te bereiken zijn Gebruik geen verlengsnoeren of dubbelst...

Page 52: ...age van de waterinstallatie van de Wasdroogmachine alsmede lekkagegevaar Sluit altijd eerst de stroom af voordat u de Wasdroogmachine schoonmaakt en gedurende onderhoudswerkzaamheden Reinigen van de W...

Page 53: ...en gelijksoortige producten moeten overeenkmostig de instructies van de fabrikant gebruikt worden Het laatste deel van een droogcyclus wordt uitgevoerd zonder warmte koelcyclus om te zorgen dat de art...

Page 54: ...del gebruikt raden we u aan het bijgeleverde schotje A te gebruiken voor een correcte dosering Voor het gebruik van poederwasmiddel doet u het schotje terug in de opening B 3 extra bakje Bleekmiddel H...

Page 55: ...assen Spoelen Centrifugeren Afpompen Drogen De tekst wordt verlicht als de wascyclus is be indigd Knop met controlelampje START PAUSE als het groene controlelampje langzaam knippert drukt u op de knop...

Page 56: ...gen Herhaal deze handelingen met de rest van de lading Aan het einde van de droogcyclus wordt altijd een afkoeltijd ingezet Alleen drogen Selecteer met de programmaknop een droogniveau aan de hand van...

Page 57: ...s u deze optie selecteert verkort u de duur van het programma tot aan 50 aan de hand van de gekozen cyclus en zorgt u als gevolg voor een aanzienlijke water en energiebesparing Gebruik deze cyclus voo...

Page 58: ...is door The Woolmark Company getest en goedgekeurd voor het wassen van wollen kleding die als handwas geclassificeerd is op voorwaarde dat de aanwijzingen worden opgevolgd die op het etiket van het kl...

Page 59: ...Het uiteinde van de afvoerbuis ligt onder water zie Installatie Als u op een van de hoogste verdiepingen van een flatgebouw woont kan zich een hevelingsprobleem voordoen waarbij de Wasdroogmachine vo...

Page 60: ...ogmachine verkeerd is ge nstalleerd of u hem niet correct heeft gebruikt zal u gevraagd worden de reparatiekosten te betalen Wendt u nooit tot een niet erkende installateur Vermeld het type storing he...

Reviews: