background image

EN

5

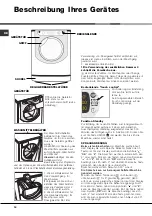
WASH CYCLE

SELECTOR


knob

Button with

ON/OFF

indicator light

Touch control panel

Button with 

ON/OFF

 indicator light: press this briefly

to switch the machine on or off. The green indicator light

indicates that the machine is switched on. To switch off

the washer-dryer during the wash cycle, press and hold

the button for approximately 3 seconds; if the button is

pressed briefly or accidentally the machine will not

switch off. If the machine is switched off during a wash

cycle, this wash cycle will be cancelled.

WASH  CYCLE  SELECTOR


knob: may be turned in

either direction. To select the most suitable wash cycle,

please refer to the 

“Table of wash cycles”.

The knob will not move during the wash cycle.

M1-M2

 buttons:

press and hold one of the buttons to

store a cycle with your own set preferences in the

memory of the machine. To recall a previously-stored

cycle, press the corresponding button.

DRYING 

button


:

 press to decrease or exclude drying;

the selected drying level or time will appear on the display

(see "How to run a wash cycle or a drying cycle").

TEMPERATURE


 button: press to modify or exclude

the temperature setting; the value selected will appear

on the display above 

(see “How to run a wash cycle or a

drying  cycle”).

SPIN CYCLE


 button: press to modify or exclude the

spin cycle; the value selected will appear on the display

above 

(see “How to run a wash cycle or a drying cycle”).

DELAYED START

   button: press to set a delayed

start for the selected wash cycle; the set delay time will

appear on the display above 

(see “How to run a wash

cycle or a drying cycle”).

OPTION

 buttons: press to select the available options.

The indicator light corresponding to the selected option

will remain lit 

(see “How to run a wash cycle or a drying

cycle”).

WASH  CYCLE  PHASE

  icons

these  illuminate  to

indicate the progress of the wash cycle (Wash 

 –

Rinse   – Spin/Drain   – Drying 

). The text 

lights up when the cycle is complete.

START/PAUSE 

button with indicator light: when the

green indicator light flashes slowly, press the button to

start a wash cycle. Once the cycle has begun the

indicator light will remain lit in a fixed manner. To pause

the wash cycle, press the button again; the indicator

light will flash in an orange colour. If the “Door locked”

 indicator light is switched off, the door may be

opened. To start the wash cycle from the point at which

it was interrupted, press the button again.

DOOR  LOCKED


 indicator light: indicates that the

porthole door is locked. To open the door, pause the

wash cycle (see “

How to run a wash cycle or a drying

cycle

”).

CONTROL PANEL LOCK


 button with indicator

light: to activate or deactivate the control panel lock,

press and hold the button for approximately 2 seconds.

when the indicator light is illuminated, the control panel is

locked. This means it is possible to prevent wash cycles

from being modified accidentally, especially where there

are children in the home.

ECO

 indicator light: the 

 icon lights up when, after

altering the washing parameters, an energy saving of at

least  10%  is  made.  Furthermore,  before  the  machine

enters “Standby” mode, the icon will light up for a few

seconds; when the machine is switched off the

estimated energy saving will be around the 80% mark.

TEMPERATURE

button

OPTION

buttons

SPIN

button

DISPLAY

M1

DRYING

ECO

indicator light

DELAYED START

button

START/PAUSE

button

with indicator light

DOOR LOCKED


indicator light

WASH

CYCLE

PHASE

icons

CONTROL PANEL

LOCK 

button with

indicator light

M2

Summary of Contents for AQUALTIS AQM8D 69 U

Page 1: ...mendations Load balancing system Precautions and advice 9 General safety Disposal Opening the porthole door manually Care and maintenance 10 Cutting off the water and electricity supplies Cleaning the...

Page 2: ...for children Levelling 1 Place the washing machine on a flat sturdy floor without resting it up against walls or cabinets 2 If the floor is uneven the front feet of the machine may be adjusted until...

Page 3: ...ening the duct supplied to the tap see figure The free end of the hose should not be underwater We advise against the use of hose extensions if it is absolutely necessary the extension must have the s...

Page 4: ...he settings gently press the icon inside the sensitive touch control area as illustrated in the figure Standby mode This washer dryer in compliance with new energy saving regulations is fitted with an...

Page 5: ...ns The indicator light corresponding to the selected option will remain lit see How to run a wash cycle or a drying cycle WASH CYCLE PHASE icons these illuminate to indicate the progress of the wash c...

Page 6: ...ed to the end of each drying cycle Drying only Use the cycle selector knob to select a drying cycle in accordance with the type of fabric The desired drying level or time may also be set using the DRY...

Page 7: ...ing this option the efficiency of the rinse is increased and optimal residual detergent removal is guaranteed It is particularly useful for skin which is sensitive to detergents We recommend this opti...

Page 8: ...es from suffering allergic reactions The cycle has been designed to reduce the amount of bacteria by using a greater quantity of water and optimising the effect of special disinfecting additives added...

Page 9: ...lf Always keep children well away from the appliance while it is operating If it must be moved proceed with the help of two or three people and handle it with the utmost care Never try to do this alon...

Page 10: ...self cleaning pump which does not require any maintenance Sometimes small items such as coins or buttons may fall into the protective pre chamber at the base of the pump Make sure the wash cycle has...

Page 11: ...ton The drain hose is not fitted at a height between 65 and 100 cm from the floor see Installation The free end of the hose is under water see Installation If the dwelling is on one of the upper floor...

Page 12: ...yer has been installed or used incorrectly you will have to pay for the call out service Always request the assistance of authorised technicians Please have the following information to hand the type...

Page 13: ...r W sche Waschhinweise System zur Auswuchtung der W scheladung Vorsichtsma regeln und Hinweise 21 Allgemeine Sicherheit Entsorgung Manuelles ffnen der Ger tet r Reinigung und Pflege 22 Abstellen der W...

Page 14: ...Kinder Nivellierung 1 Der WASCHTROCKNER muss auf einem ebenen festen Untergrund aufgestellt werden ohne ihn an W nde oder M belteile anzulehnen 2 Eventuelle Unebenheiten durch An bzw Ausdrehen der vo...

Page 15: ...de darf nicht unter Wasser bleiben Verl ngerungsschl uche sollten nicht eingesetzt werden sollte dies jedoch absolut unvermeidlich sein muss die Verl ngerung denselben Durchmesser des Originalschlauch...

Page 16: ...werden Bedienblende touch control Zur nderung der Einstellung dr cken Sie leicht auf die Ikone im ber hrungssensiblen Bereich touch control wie auf der Abbildung gezeigt Funktion Standby Zur Erf llung...

Page 17: ...llleuchten ZUSATZFUNKTIONEN Die Taste zur Einstellung der verf gbaren Zusatzfunktionen dr cken Die entsprechende Kontrollleuchte leuchtet siehe Durchf hrung eines Wasch oder Trockenzyklus Symbole PROG...

Page 18: ...dasselbe nun mit der restlichen W schemenge Im Anschluss an den Trockenvorgang folgt immer eine kurze Abk hlzeit Nur Trocknen W hlen Sie mit dem Programmw hlschalter einen Trockenvorgang entsprechend...

Page 19: ...u den Programmen Extra Sp len W hlen Sie diese Zusatzfunktion wird die Sp lwirkung verbessert und somit ein optimales Aussp len von Waschmittelresten garantiert Dies ist besonders empfehlenswert bei s...

Page 20: ...n an der empfindlichen Kinderhaut zu vermeiden Dieser Zyklus reduziert das Bakterienaufkommen durch eine Erh hunh der Wassermenge und wurde optimiert f r die Verwendung von speziellen desinfizierenden...

Page 21: ...rieren Halten Sie Kinder stets von dem in Betrieb befindlichen Ger t fern Sollte es erforderlich sein das Ger t zu versetzen sollten hierf r 2 oder 3 Personen verf gbar sein Vorsichtig vorgehen Verset...

Page 22: ...ine Wartung ist demnach nicht erforderlich Es k nnte jedoch vorkommen dass kleine Gegenst nde M nzen Kn pfe in die Fremdk rperfalle geraten Vergewissern Sie sich dass der Waschgang abgeschlossen ist u...

Page 23: ...der vorgeschriebenen H he d h 65 100 cm vom Boden siehe Installation Das Schlauchende liegt unter Wasser siehe Installation Falls Sie in einer der obersten Etagen eines Geb udes wohnen kann es vorkom...

Page 24: ...den autorisierten Kundendienst Im Falle einer fehlerhaften Installation oder eines unkorrekten Gebrauchs wird der Einsatz eventuell in Rechnung gestellt Beauftragen Sie bitte niemals unbefugtes Perso...

Page 25: ...Lessive Triage du linge Conseils de lavage Syst me d quilibrage de la charge Pr cautions et conseils 33 S curit g n rale Mise au rebut Ouverture manuelle de la porte hublot Entretien et soin 34 Coupu...

Page 26: ...dosser un mur ou un meuble 2 Pour compenser les irr gularit s du sol visser ou d visser les pieds de r glage jusqu ce que l appareil soit parfaitement l horizontale il ne doit pas tre inclin de plus d...

Page 27: ...stique fourni avec l appareil au robinet voir figure L extr mit libre du tuyau d vacuation ne doit pas tre plong e dans l eau L utilisation d un tuyau de rallonge est absolument d conseill e mais si o...

Page 28: ...omme illustr voir figure Stand by Ce lavante s chante conform ment aux nouvelles normes en vigueur dans le domaine de l conomie d nergie est quip e d un syst me d extinction automatique veille activ a...

Page 29: ...ons disponibles Le voyant correspondant l option s lectionn e reste allum voir Comment faire un cycle de lavage ou un s chage Ic nes PHASES DE LAVAGE elles s allument pour indiquer le stade d avanceme...

Page 30: ...and le s chage est termin S chage seulement S lectionner l aide du bouton programmes un s chage en fonction du type de tissu Possibilit de s lectionner le niveau ou le temps de s chage souhait l aide...

Page 31: ...ile En cas de s lection de cette option le lavage et l essorage seront d ment modifi s pour r duire la formation de plis A la fin du cycle de lavage le lavante s chante fait tourner le tambour lenteme...

Page 32: ...alement con u pour diminuer la charge bact rienne ce cycle utilise une plus grande quantit d eau et optimise l effet des additifs d sinfectants sp cifiques ajout s la lessive En fin de lavage l appare...

Page 33: ...der aux m canismes internes pour tenter une r paration Veiller ce que les enfants ne s approchent pas de l appareil pendant son fonctionnement Deux ou trois personnes sont n cessaires pour le d placer...

Page 34: ...on d entretien Il peut toutefois arriver que de menus objets pi ces de monnaie boutons tombent dans la pr chambre qui prot ge la pompe plac e en bas de cette derni re S assurer que le cycle de lavage...

Page 35: ...stance du sol comprise entre 65 et 100 cm voir Installation L extr mit du tuyau de vidange est plong e dans l eau voir Installation Si l appartement est situ aux derniers tages dans un immeuble il peu...

Page 36: ...istance technique agr En cas de probl me d installation ou d utilisation inad quate du lavante s chante l intervention sera payante Ne jamais faire appel des techniciens non agr s Signalez le type de...

Page 37: ...wasgoed Wastips Balanceersysteem van de lading Voorzorgsmaatregelen en advies 45 Algemene veiligheid Afvalverwijdering Handmatige opening van het deurtje Onderhoud en verzorging 46 Afsluiten van wate...

Page 38: ...en rechte en stevige vloer en laat hem niet tegen muren of meubels leunen 2 Compenseer eventuele oneffenheden door de stelvoetjes vast of los te draaien totdat de automaat volledig horizontaal staat h...

Page 39: ...tigd zie afbeelding Het uiteinde van de afvoerslang mag niet onder water hangen Gebruik nooit verlengstukken voor de slang indien dit niet te vermijden is moet het verlengstuk dezelfde doorsnede hebbe...

Page 40: ...ch control deel zoals op de afbeelding aangegeven Stand by modus Deze Wasdroogmachine beschikt in overeenkomst met de nieuwe normen betreffende de energiebesparing over een systeem wat het apparaat au...

Page 41: ...ie blijft aan zie Het uitvoeren van een was of droogcyclus Symbolen WASFASES gaan aan om weer te geven in welke fase van de cyclus de automaat zich bevindt Wassen Spoelen Centrifugeren Afpompen Drogen...

Page 42: ...het uitvoeren van Alleen drogen Herhaal deze handelingen met de rest van de lading Aan het einde van de droogcyclus wordt altijd een afkoeltijd ingezet Alleen drogen Selecteer met de programmaknop een...

Page 43: ...wasgoed Deze optie is niet beschikbaar tijdens de programma s Extra Spoelen Door deze optie te selecteren verhoogt u het spoelresultaat en zorgt u ervoor dat elk spoor van wasmiddel verdwijnt Deze opt...

Page 44: ...iaal ontwikkeld om de hoeveelheid bacteri n terug te dringen door een vergroot waterverbruik en een optimale toepassing van hygi nische wasversterkers Aan het einde van de wascyclus zal de trommel lan...

Page 45: ...hanismen van de Wasdroogmachine te repareren Zorg ervoor dat kleine kinderen niet te dicht bij de machine komen als deze in werking is Als het apparaat verplaatst moet worden doe dit dan met twee of d...

Page 46: ...e pomp die niet hoeft te worden onderhouden Het kan echter gebeuren dat kleine voorwerpen muntjes knopen in het voorvakje dat de pomp beschermt en zich aan de onderkant ervan bevindt terechtkomen Verz...

Page 47: ...E drukken of op de knop Makkelijk Strijken De afvoerbuis is niet op 65 tot 100 cm afstand van de grond af ge nstalleerd zie Installatie Het uiteinde van de afvoerbuis ligt onder water zie Installatie...

Page 48: ...Servicedienst In het geval de Wasdroogmachine verkeerd is ge nstalleerd of u hem niet correct heeft gebruikt zal u gevraagd worden de reparatiekosten te betalen Wendt u nooit tot een niet erkende inst...

Page 49: ...Consejos sobre el lavado Sistema de equilibrado de la carga Precauciones y consejos 57 Seguridad general Eliminaci n Apertura manual de la puerta Mantenimiento y cuidados 58 Interrumpir el agua y la...

Page 50: ...n los muebles 2 Compense las irregularidades desenroscando o enroscando las patas hasta que la m quina quede en posici n horizontal no debe estar inclinada m s de 2 grados Una cuidadosa nivelaci n bri...

Page 51: ...a ba era uniendo la gu a suministrada con el aparato al grifo ver la figura El extremo libre del tubo de descarga no debe permanecer sumergido en el agua No se aconseja utilizar tubos de prolongaci n...

Page 52: ...esionar levemente en el icono dentro del rea sensible touch control como se indica en la figura Modalidad de stand by Esta lavasecadora est en conformidad con las nuevas normativas vinculadas al ahorr...

Page 53: ...ente a la opci n seleccionada permanecer encendido ver C mo efectuar un ciclo de lavado o de secado Iconos FASES DE LAVADO se iluminan para indicar el avance del ciclo Lavado Aclarado Centrifugado Des...

Page 54: ...l secado contin a siempre un per odo de enfriamiento S lo el secado Seleccionar con el mando de programas el secado adecuado al tipo de tejido Se puede programar tambi n el nivel o el tiempo de secado...

Page 55: ...ta opci n aumentar la eficacia del aclarado y se asegurar la m xima eliminaci n de los residuos de detergente Es til para pieles particularmente sensibles a los detergentes Se aconseja el uso de esta...

Page 56: ...ciclo ha sido estudiado para disminuir la carga bacteriana utilizando una mayor cantidad de agua y optimizando el efecto de aditivos espec ficos higienizantes agregados al detergente Al finalizar el l...

Page 57: ...est en funcionamiento Si debe ser trasladada deber n intervenir dos o m s personas procediendo con el m ximo cuidado La m quina no debe ser desplazada nunca por una sola persona ya que es muy pesada A...

Page 58: ...iento Pero puede suceder que objetos peque os monedas botones caigan en la prec mara que protege la bomba situada en la parte inferior de la misma Verifique que el ciclo de lavado haya terminado y des...

Page 59: ...r Instalaci n El extremo del tubo de descarga est sumergido en el agua ver Instalaci n Si la vivienda se encuentra en uno de los ltimos pisos de un edificio es posible que se verifiquen fen menos de s...

Page 60: ...para Espa a Para otros pa ses de habla hispana consulte a su vendedor Ampliaci n de garant a Llame al 902 363 539 y le informaremos sobre el fant stico plan de ampliaci n de garant a hasta 5 a os Cons...

Reviews: