background image

GB

3

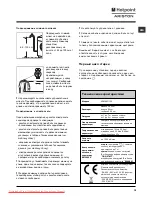
Technical data

Model

ARMXXD 129

Dimensions

width 59.5 cm

height 85 cm
depth 53,5 cm

Capacity

from 1 to 7 kg for the wash programme;

from 1 to 5 kg for the drying programme

Electrical

connections

please refer to the technical data plate

fixed to the machine

Water

connections

maximum pressure 1 MPa (10 bar)
minimum pressure 0.05 MPa (0.5 bar)

drum capacity 52 litres

Spin speed

up to 1200 rotations per minute

Energy rated
programmes

according to

regulation
EN 50229

Wash:

 programme     

 (1

st

 press of the

button

); temperature 60°C;

using a load of 7 kg.

Drying: 

first drying cycle performed with a

2

 kg load, by selecting the "

IRON DRY

"

dryness level;

The second drying cycle is performed

with a 

5

 kg load, by selecting the

"

CUPBORD DRY

" dryness level.

This appliance conforms to the following

EC Directives:

- 89/336/EEC dated 03/05/89
(Electromagnetic Compatibility) and

subsequent modifications

- 2006/95/EC (Low Voltage) 
- 2002/96/EC

65 - 100 cm 

Connecting the drain hose

Connect  the  drain  hose,

without bending it, to a

drainage duct or a wall

drain located at a height

between 65 and 100 cm

from the floor;

alternatively,  rest  it  on

the side of a washbasin

or  bathtub,  fastening  the

duct supplied to the tap

(

see figure

). The free end

of the hose should not

be  underwater.

 We advise against the use of hose extensions; if it is

absolutely  necessary,  the  extension  must  have  the

same diameter as the original hose and must not

exceed 150 cm in length.

Electrical  connections

Before plugging the appliance into the electricity

socket,  make  sure  that:

• the socket is earthed and complies with all

applicable  laws;

• the  socket  is  able  to  withstand  the  maximum  power

load of the appliance as indicated in the Technical

data table

 (see opposite);

• the power supply voltage falls within the values

indicated in the Technical data table

 (see opposite);

• the socket is compatible with the plug of the

washer dryer. If this is not the case, replace  the

socket or the plug.

 The washer dryer must not be installed outdoors,

even in covered areas. It is extremely dangerous to

leave the appliance exposed to rain, storms and other

weather  conditions.

 When the washer dryer has been installed, the

electricity  socket  must  be  within  easy  reach.

 Do not use extension cords or multiple sockets.

 The cable should not be bent or compressed.

 The power supply cable must only be replaced by

authorised  technicians.

Warning! The company shall not be held responsible

in  the  event  that  these  regulations  are  not  respected.

The first wash cycle

Once the appliance has been installed, and before

you use it for the first time, run a wash cycle with

detergent  and  no  laundry,  using  the  wash  cycle 

.

Downloaded From WashingMachine-Manual.com Manuals

Summary of Contents for ARMXXD 129

Page 1: ...nser drawer Preparing the laundry Special wash cycles Load balancing system Precautions and tips 9 General safety Disposal Opening the porthole door manually Care and maintenance 10 Cutting off the wa...

Page 2: ...abinets or anything else 2 If the floor is not perfectly level compen sate for any unevenness by tightening or loosening the adjustable front feet see figure the angle of inclination measured in relat...

Page 3: ...underwater We advise against the use of hose extensions if it is absolutely necessary the extension must have the same diameter as the original hose and must not exceed 150 cm in length Electrical co...

Page 4: ...ROL PANEL LOCK button to activate the control panel lock press and hold the button for approximately 2 seconds When the symbol is illuminated the control panel is locked This means it is possible to p...

Page 5: ...the string remains unused Indicator lights F correspond to the functions and light up when the selected function is compatible with the set wash cycle Door locked symbol If the symbol is lit this indi...

Page 6: ...s and put some of them back in the drum At this point follow the instructions provided for a Drying only cycle Repeat this procedure for the remainder of the load N B a cooling down period is always a...

Page 7: ...OP WITH WATER will appear on the display To drain the water so that the laundry may be removed press the START PAUSE button or the EASY IRON button It may not be used with the Pump out and Drying prog...

Page 8: ...efore saves both energy and time By selecting this wash cycle at 30 C it is possible to wash different fabrics together except for wool and silk items with a maximum load of 3 kg Mix 15 this wash cycl...

Page 9: ...e appliance to dry foam rubber or similar elastomers Make sure that the water tap is turned on during the drying cycles Disposal Disposing of the packaging materials observe local regulations so that...

Page 10: ...mp The washer dryer is fitted with a self cleaning pump which does not require any maintenance Sometimes small items such as coins or buttons may fall into the pre chamber which protects the pump situ...

Page 11: ...even after these checks turn off the water tap switch the appliance off and contact the Assistance Service If the dwelling is on one of the upper floors of a building there may be problems relating t...

Page 12: ...Centre using the telephone number provided on the guarantee certificate Always request the assistance of authorised technicians Have the following information to hand the type of problem the applianc...

Page 13: ...CIS 13 14 15 16 17 18 19 20 21 22 23 24 CIS ARMXXD 129 C C KO Downloaded From WashingMachine Manual com Manuals...

Page 14: ...14 CIS A 1 2 3 4 4 5 1 2 2 1 3 4 2 3 Downloaded From WashingMachine Manual com Manuals...

Page 15: ...S 15 65 100 cm 65 100 150 ARMXXD 129 59 5 85 53 5 1 7 1 5 c max 1 10 min 0 05 0 5 52 1200 K EN 50229 1 60 7 2 5 K 89 336 03 05 89 2006 95 CE 2002 96 CE Downloaded From WashingMachine Manual com Manual...

Page 16: ...16 CIS 2 MEMO 2 2 Downloaded From WashingMachine Manual com Manuals...

Page 17: ...CIS 17 D F 5 A B C D E F Downloaded From WashingMachine Manual com Manuals...

Page 18: ...18 CIS 1 2 3 4 5 6 OFF OFF OFF A a B 40 180 OFF 7 8 a 5 180 170 160 3 180 170 160 1 150 140 130 Downloaded From WashingMachine Manual com Manuals...

Page 19: ...3 K 1 60 800 l l l l 3 1 5 K 2 40 800 l l l l 3 1 5 M K 30 1 30 800 l l l 3 M K 15 2 30 800 l l l 1 5 K K 30 0 l l 1 1 40 800 l l l l 1 5 1 K 1 l 5 K 2 l 3 3 l 1 5 1200 l 7 1 1200 l l l 7 3 2 0 7 EN 6...

Page 20: ...1 5 1 1 400 500 1 150 200 1 400 500 1 900 1200 1 150 250 MAX 1 2 4 3 M 30 30 30 C 3 M 15 15 30 C 1 5 Hotpoint Ariston Woolmark Platinum Care M 0508 The Woolmark Company 1 5 Downloaded From WashingMach...

Page 21: ...CIS 21 2002 96 1 2 3 4 5 20 Downloaded From WashingMachine Manual com Manuals...

Page 22: ...22 CIS 1 2 3 4 5 1 2 Downloaded From WashingMachine Manual com Manuals...

Page 23: ...CIS 23 F 01 F 65 100 1 OFF Downloaded From WashingMachine Manual com Manuals...

Page 24: ...24 CIS Downloaded From WashingMachine Manual com Manuals...

Page 25: ...elizny Programy specjalne System r wnowa enia adunku Zalecenia i rodki ostro no ci 33 Og lne zasady bezpiecze stwa Utylizacja R czne otwieranie okr g ych drzwiczek Utrzymanie i konserwacja 34 Od czeni...

Page 26: ...nie pozioma nale y skompensowa nier wno ci odkr caj c lub dokr caj c przednie n ki patrz rysunek k t nachylenia zmierzony na g rnym blacie pralki nie powinien przekracza 2 Staranne wypoziomowanie pral...

Page 27: ...owinno by atwo dost pne Nie u ywa przed u aczy ani rozga nik w Przew d nie powinien by pozginany ani przygnieciony Przew d zasilania elektrycznego mo e by wymieniany wy cznie przez autoryzowanych tech...

Page 28: ...homienia lub wylaczenia blokady panelu sterowania nalezy przytrzymac nacisniety przycisk przez okolo 2 sekundy Podswietlony symbol wskazuje ze panel sterowania zostal zablokowany W ten spos b uniemozl...

Page 29: ...atury wiersz pozostaje wygaszony Kontrolki F zwi zane s z funkcjami i w czaj si kiedy wybrana funkcja zgodna jest z wybranym programem Symbol zablokowanych drzwiczek Zapalony symbol oznacza e okr g e...

Page 30: ...iu programu podzieli adunek i w o y do b bna tylko jego cz Dalej post powa wed ug instrukcji dotycz cych opcji Tylko suszenie Powt rzy te same czynno ci dla pozosta ej cz ci bielizny N B zawsze po zak...

Page 31: ...Zaleca si wykorzystanie tej funkcji je li ilo bielizny jest r wna po owie zalecanego wsadu maksymalnego lub mniejsza patrz Tabela program w Nie mo na jej uruchomi w programach Wydalanie wody i Program...

Page 32: ...minut i pozwala dzi ki temu na zaoszcz dzenie energii i czasu Ustawiaj c program w temperaturze 30 C mo na razem wypra r nego rodzaju tkaniny z wyj tkiem we ny i jedwabiu przy maksymalnym adunku 3 kg...

Page 33: ...si by w trakcie suszenia kurek wody by odkr cony Utylizacja Utylizacja opakowania stosowa si do lokalnych przepis w dzi ki temu opakowanie b dzie mog o zosta ponownie wykorzystane Europejska Dyrektyw...

Page 34: ...w pomp samoczyszcz c kt ra nie wymaga zabieg w konserwacyjnych Mo e si jednak zdarzy e drobne przedmioty monety guziki wpadn do komory wst pnej zabezpieczaj cej pomp kt ra znajduje si w jej dolnej cz...

Page 35: ...wdzeniu tych mo liwo ci problem nie zostanie rozwi zany nale y zamkn kurek dop ywu wody wy czy pralk i wezwa Serwis Techniczny Je li mieszkanie znajduje si na najwy szych pi trach budynku mo e wyst pi...

Page 36: ...dzi czy problem nie znikn Je li nie zwr ci si do autoryzowanego Serwisu Technicznego dzwoni c pod numer podany w karcie gwarancyjnej Nigdy nie wzywa nieautoryzowanych technik w Nale y poda rodzaj niep...

Page 37: ...BG 38 39 40 41 42 43 44 45 46 47 48 BG ARMXXD 129 Downloaded From WashingMachine Manual com Manuals...

Page 38: ...BG A 1 2 3 4 4 5 1 2 2 1 3 4 2 3 Downloaded From WashingMachine Manual com Manuals...

Page 39: ...BG 65 100 cm 65 100 150 ARMXXD 129 59 5 85 53 5 1 7 1 5 1 10 bar 0 05 0 5 bar 52 1200 EN 50229 1 60 7 2 5 89 336 03 05 89 2006 95 CE 2002 96 CE Downloaded From WashingMachine Manual com Manuals...

Page 40: ...BG 2 AMET 2 2 AMET Downloaded From WashingMachine Manual com Manuals...

Page 41: ...BG A B C D F TEM TEM 5 A B C D E F Downloaded From WashingMachine Manual com Manuals...

Page 42: ...BG 1 2 3 O 4 5 6 OFF OFF OFF A B 40 180 OFF 7 8 5 180 170 160 3 180 170 160 1 5 150 140 130 Downloaded From WashingMachine Manual com Manuals...

Page 43: ...00 l l l l 3 1 5 2 40 800 l l l l 3 1 5 3 0 1 30 800 l l l 3 1 5 2 30 800 l l l 1 5 K 30 0 l l 1 1 A M ET K 40 800 l l l l 1 5 1 1 l 5 2 l 3 3 l 1 5 1200 l 7 K 1 1200 l l l 7 3 M 2 0 7 Test Institutes...

Page 44: ...7 3 2 1 5 1 1 400 500 1 150 200 1 400 500 1 900 1200 1 150 250 MAX 1 2 4 3 30 30 30 C 3 15 15 30 C 1 5 Hotpoint riston Woolmark Platinum Care M 0508 Woolmark 1 5 Downloaded From WashingMachine Manual...

Page 45: ...BG 2002 96 CE 1 2 3 4 5 20 Downloaded From WashingMachine Manual com Manuals...

Page 46: ...BG 1 2 3 4 5 1 2 Downloaded From WashingMachine Manual com Manuals...

Page 47: ...BG F 01 F 65 100 1 OFF Downloaded From WashingMachine Manual com Manuals...

Page 48: ...BG Mod S N Downloaded From WashingMachine Manual com Manuals...

Page 49: ...i Preg tirea rufelor Programe optionale Sistemul de echilibrare a nc rc turii Precau ii i sfaturi 57 Norme de protec ie i siguran generale Aruncarea reziduurilor Deschiderea manual a u ii ntre inere...

Page 50: ...au altceva 2 Dac podeaua nu este perfect orizontal compensa i neregularit ile de urub nd sau n urub nd picioru ele anterioare a se vedea figura unghiul de nclinare m surat pe planul de lucru nu trebui...

Page 51: ...e multiple Cablul nu trebuie s fie ndoit sau comprimat Cablul de alimentare trebuie s fie nlocuit doar de tehnicieni autoriza i ai centrului de service ce apare scris pe certificatul de garantie emis...

Page 52: ...R ap sa i pentru a mic ora temperatura valoarea va fi indicat pe display Tast BLOCARE TASTE pentru a bloca panoul de comand ine i ap sat tasta timp de 2 secunde Dac ledul corespunz tor este aprins atu...

Page 53: ...ales dac programul prevede sp larea la rece atunci r ndul este ntunecat Indicatoarele F se refer la func ii i se aprind c nd func ia selectat este compatibil cu programul ales Indicator U blocat Simb...

Page 54: ...ctua i sp larea iar la terminarea programului mp r i i cantitatea de rufe n mai multe p r i i usca i le separat Urma i apoi instruc iunile prev zute pentru a efectua numai programul Doar uscare Repeta...

Page 55: ...in dotare n sertarul 1 C nd doza i decolorantul nu dep i i nivelul max indicat pe pivotul central a se vedea figura Pentru a efectua numai ciclul de decolorare turna i decolorantul n sertarul adi iona...

Page 56: ...Select nd programul la 30 C este posibil sp larea articolelor din materiale diferite excluse l na i m tasea cu o greutate maxim de 3 kg Mix 15 a fost studiat pentru a sp la articolele foarte pu in mu...

Page 57: ...eschis Aruncarea reziduurilor Eliminarea ambalajelor respecta i normele locale n acest fel ambalajele vor putea fi utilizate din nou Directiva European 2002 96 CE cu privire la de eurile care provin d...

Page 58: ...de sp lat este dotat cu o pomp de autocur are care nu are nevoie de ntre inere Se poate nt mpla ns ca unele obiecte mici monede nasturi s cad n anticamera care protejeaz pompa situat n partea inferioa...

Page 59: ...aceste verific ri problema nu se rezolv nchide i robinetul de ap opri i ma ina de sp lat i chema i Service ul Dac locuin a se afl la ultimele etaje ale unui edificiu este posibil s aib loc fenomene d...

Page 60: ...en a tehnic autorizat la num rul telefonic indicat pe certificatul de garan ie Nu apela i niciodat la persoane neautorizate Comunica i tipul de anomalie modelul ma inii Mod num rul de serie S N Aceste...

Reviews: