background image

17

GB

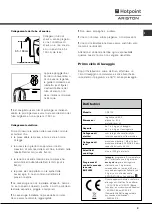
Connecting the drain hose

Connect  the  drain  hose,

without bending it, to a

draining duct or a wall

drain  situated  between

65 and 100 cm from the

floor;

alternatively,  place  it

over the edge of a

basin, sink or tub,

fastening  the  duct

supplied to the tap 

(see

figure)

. The free end of

the hose should not be

underwater.

 We advise against the use of hose extensions; in

case  of  absolute  need,  the  extension  must  have  the

same diameter as the original hose and must not

exceed 150 cm in length.

Electric  connection

Before plugging the appliance into the mains socket,

make  sure  that:

• the  socket  is  earthed  and  in  compliance  with  the

applicable  law;

• the socket is able to sustain the appliance's

maximum  power  load  indicated  in  the  Technical

details table 

(on the right)

;

• the supply voltage is included within the values i

ndicated  on  the  Technical  details  table

(on the right)

;

• the  socket  is  compatible  with  the  washer

dryer's plug. If this is not the case, replace the

socket or the plug.

 The Washer-dryer should not be installed in an

outdoor  environment,  not  even  when  the  area  is

sheltered, because it may be very dangerous to

leave it exposed to rain and thunderstorms.

  When  the  Washer-dryer  is  installed,  the  mains

socket  must  be  within  easy  reach.

 Do not use extensions or multiple sockets.

 The  power supply cable must never be bent or

dangerously  compressed.

 The power supply cable must only be replaced by

an  authorised  serviceman.

Warning! The company denies all liability if and when

these  norms  are  not  respected.

The first wash cycle

Once the appliance has been installed, and before

you use it for the first time, run a wash cycle with

detergent and no laundry, setting the 90°C

programme  without  a  pre-wash  cycle.

65 - 100 cm 

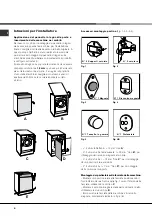
Technical details 

Model

CDE 129

Dimensions

59.5 cm wide

81,5 cm high
54 cm deep

Capacity

from 1 to 5 kg for the wash programme;

from 1 to 4 kg for the drying programme

Electric

connections

please refer to the technical data plate

fixed to the machine

Water

connections

maximum pressure 1 MPa (10 bar)
minimum pressure 0.05 MPa (0.5 bar)
drum capacity 46 litres

Spin speed

up to 1200 rpm

Control

programmes

according to

EN 50229

directive

Wash: 

programme 3; temperature

60°C; run with a load of 5 kg.

Drying: 

first drying cycle performed

with a 1 kg load, by selecting a

drying time of 40 min;
Second drying cycle performed with

a 4 kg load and the DRYING knob

on the      setting.

This appliance is compliant with the
following European Community

Directives:
- 73/23/CEE of 19/02/73 (Low

Voltage) and subsequent amendments

- 89/336/CEE of 03/05/89
(Electromagnetic Compatibility) and

subsequent amendments

- 2002/96/CE

Summary of Contents for CDE 129

Page 1: ...oni Detersivi e biancheria 10 Cassetto dei detersivi Preparare la biancheria Capi particolari Woolmark Platinum Care Precauzioni e consigli 11 Sicurezza generale Smaltimento Risparmiare e rispettare l...

Page 2: ...pavimento non fosse perfettamente orizzontale compensare le irregolarit svitando o avvitando i piedini anteriori vedi figura l angolo di inclinazione misurato sul piano di lavoro non deve supe rare i...

Page 3: ...e raggiungibile Non usare prolunghe e multiple Il cavo non deve subire piegature o compressioni Il cavo di alimentazione deve essere sostituito solo da tecnici autorizzati Attenzione L azienda declina...

Page 4: ...applicate sul lato sinistro A B C D E Tur seite Accessori montaggio portina Fig 1 2 3 4 5 Fig 1 N 2 cerniere N 1 Magnete N 1 Riscontro magnete N 1 Tassello in gomma N 2 Supporti cerniera N 1 Distanzia...

Page 5: ...o della macchina nei mobili Spingere l apparecchio nell apertura allineandola con gli altri mobili fig 6 Agire sui piedini di regolazione per portare la macchina all altezza desiderata Per regolare la...

Page 6: ...Manopola PROGRAMMI per impostare i programmi vedi pag 8 La manopola del tipo a scomparsa per estrarla premerla leggermente al centro Durante il programma la manopola resta ferma Manopola ASCIUGATURA P...

Page 7: ...care che bisogna riporta re la manopola ASCIUGATURA sulla posizione 0 Tasti funzione I TASTI FUNZIONE fungono anche da spie Selezionando una funzione il relativo tasto si illuminer Se la funzione sele...

Page 8: ...Delicati Lana 9 40 C 50 Lavaggio risciacqui e centrifuga delicata Tessuti molto delicati tende seta viscosa ecc 10 30 C 45 Lavaggio risciacqui antipiega o scarico Asciugatura per tessuti delicati PRO...

Page 9: ...metterne una parte nel cestello Seguire a questo punto le istruzioni per effettuare solo l asciugatura Ripeti le stesse operazioni per il carico rimanente Solo asciugatura Ruotare la manopola PROGRAMM...

Page 10: ...marle dentro una federa o un sacchetto a rete Lavarle da sole senza superare il mezzo carico Utilizzare il programma 10 che esclu de in automatico la centrifuga Piumini e giacche a vento se l imbottit...

Page 11: ...essere smaltiti nel normale flusso dei rifiuti solidi urbani Gli apparecchi dismessi devono essere raccolti separatamente per ottimizzare il tasso di recupero e riciclaggio dei materiali che li compon...

Page 12: ...rare obl e cestello Lasciare sempre socchiuso l obl per evitare che si formino cattivi odori Pulire la pompa La lavasciuga dotata di una pompa autopulente che non ha bisogno di manutenzione Pu per suc...

Page 13: ...ia Se dopo queste verifiche il problema non si risolve chiudere il rubinetto dell acqua spegnere la Lavasciuga e chiamare l Assistenza Se l abitazione si trova agli ultimi piani di un edificio possibi...

Page 14: ...l estensione di garanzia AIRBAG una formula che con una minima spesa iniziale garantisce al cliente 5 anni di assistenza tecnica qualificata In caso di guasto il cliente che abbia aderito al programm...

Page 15: ...he drying cycle Functions Detergents and laundry 24 Detergent dispenser Preparing your laundry Special items Woolmark Platinum Care Precautions and advice 25 General safety Disposal Saving energy and...

Page 16: ...erfectly level compen sate for any unevenness by tightening or loosening the adjustable front feet see figure the angle of inclination measured according to the worktop must not exceed 2 Levelling you...

Page 17: ...ocket must be within easy reach Do not use extensions or multiple sockets The power supply cable must never be bent or dangerously compressed The power supply cable must only be replaced by an authori...

Page 18: ...hine itself the left A B C D E Tur seite Door Mounting Accessories Fig 1 2 3 4 5 Fig 1 N 2 Hinges N 1 Magnet N 1 Magnet plate N 1 Rubber plug N 2 Hinge Supports N 1 Spacer Fig 2 Fig 3 Fig 4 Fig 5 Fig...

Page 19: ...e into the Cabinet Push the machine into the opening aligning it with the cabinets fig 6 Regulate the adjustable feet to raise the machine to the appropriate height To adjust the position of the woode...

Page 20: ...and if the appliance door can be opened see page 21 PROGRAMME knob to select the wash programmes The retractable control knob press the centre of the knob for it to pop out The knob stays still during...

Page 21: ...indicate that the DRYING knob needs to be set back to the 0 setting Function buttons The FUNCTION BUTTONS also act like LEDS When a function is selected the corresponding button is illuminated If the...

Page 22: ...es and delicate spin cycle Very delicate fabrics curtains silk viscose etc 10 30 C 45 Wash cycle rinse cycles anti crease or draining cycle Drying cycle for delicate fabrics PARTIAL PROGRAMMES Delicat...

Page 23: ...the wash cycle and when the programme is complete divide up the garments and put part of them back in the drum Now follow the instructions provided for a dry only cycle Repeat this procedure for the...

Page 24: ...fold curtains and place them in a pillow case or mesh bag Wash them separately without exceeding half the appliance load Use programme 10 which excludes the spin cycle automatically Quilted coats and...

Page 25: ...ctrical appliances must not be disposed of in the normal unsorted municipal waste stream Old appliances must be collected separately in order to optimise the recovery and recycling of the materials th...

Page 26: ...drum Always leave the appliance door ajar to prevent unpleasant odours from forming Cleaning the pump The Washer dryer is fitted with a self cleaning pump that does not require any maintenance Sometim...

Page 27: ...ven after these checks turn off the water tap switch the appliance off and call for Assistance If the dwelling is on one of the upper floors of a building there may be drain trap problems causing the...

Page 28: ...this is not the case contact an authorised Technical Service Centre on the telephone number provided on the guarantee certificate Always request the assistance of authorised servicemen Notify the oper...

Page 29: ...rature S lectionnez le s chage Fonctions Produits lessiviels et linge 38 Tiroir produits lessiviels Triage du linge Pi ces de linge particuli res Woolmark Platinum Care Pr cautions et conseils 39 S cu...

Page 30: ...autre 2 Si le sol n est pas parfaitement horizontal vissez ou d vissez les petits pieds avant voir figure pour niveler l appareil son angle d inclinaison mesur sur le plan de travail ne doit pas d pas...

Page 31: ...s installation du lavante s chante la prise de courant doit tre facilement accessible N utilisez ni rallonges ni prises multiples Le c ble ne doit tre ni pli ni cras Le c ble d alimentation ne doit t...

Page 32: ...dont les charni res sont mont es sur le c t gauche A B C D E Tur seite Accessoires montage porte Fig 1 2 3 4 5 Fig 1 N 2 Charni re N 1 Aimant N 1 Butoir aimant N 1 Cheville en caoutchouc N 2 Supports...

Page 33: ...ssemblage P et de la vis R Montage de la machine l int rieur des l ments Poussez la machine travers l ouverture en l alignant aux autres meubles fig 6 Servez vous des pieds de r glage pour amener la m...

Page 34: ...eut tre ouvert voir page 35 Bouton PROGRAMMES choix des programmes voir page 36 Le bouton est escamotable pour le faire sortir pressez l g rement au centre En cours de lavage le bouton ne bouge pas Bo...

Page 35: ...u il faut ramener le bouton SECHAGE sur 0 Touches fonction Les TOUCHES FONCTION servent aussi de voyants La s lection d une fonction entra ne l allumage du voyant correspondant Si la fonction s lectio...

Page 36: ...s linge en tout genre l g rement sale 5 40 C 62 Lavage rin ages anti froissement ou essorage d licat Couleurs r sistantes tr s sales linge de b b etc 6 50 C 73 Lavage rin ages anti froissement ou esso...

Page 37: ...onnellement la charge de linge laver et faire s cher d passe la charge maximum pr vue voir tableau ci contre proc dez au lavage et une fois le programme termin s parez votre linge et placez en une par...

Page 38: ...d passer la demi charge S lectionnez le pro gramme 10 qui supprime automatiquement l essorage Doudounes et anoraks s ils sont en duvet d oie ou de canard ils peuvent tre lav s la machine Lavez les v...

Page 39: ...g s ne soient pas jet s dans le flux normal des d chets municipaux Les appareils usag s doivent tre collect s s par ment afin d optimiser le taux de r cup ration et le recyclage des mat riaux qui les...

Page 40: ...e lavante s chante laissez toujours le hublot entrouvert pour viter la formation de mauvaises odeurs Nettoyage de la pompe Le lavante s chante est quip d une pompe autonettoyante qui n exige aucune op...

Page 41: ...te fermez le robinet de l eau teignez la machine et appelez le service Assistance Si vous habitez en tage dans un immeuble il peut y avoir des ph nom nes de siphonnement qui font que votre lavante s c...

Page 42: ...r si dysfonctionnement a disparu Autrement appelez le Service apr s vente de votre revendeur Ne vous adressez jamais des techniciens non agr s Communiquez le type de panne le mod le de la machine R f...

Page 43: ...Trockengang einstellen Funktionen Waschmittel und W sche 52 Waschmittelschublade Vorsortieren der W sche Besondere W scheteile Woolmark Platinum Care Vorsichtsma regeln und Hinweise 53 Allgemeine Sich...

Page 44: ...M belteile oder hnliches anzulehnen 2 Sollte der Boden nicht perfekt eben sein m ssen die Unebenheiten durch An bzw Ausdrehen der vorderen Stellf e ausge glichen werden siehe Abbildung der auf der Ar...

Page 45: ...e Steckdose sollte nach installiertem Ger t leicht zug nglich sein Verwenden Sie bitte keine Verl ngerungen oder Mehrfachstecker Das Kabel darf nicht gebogen bzw eingeklemmt werden Das Versorgungskabe...

Page 46: ...Seite montierten Scharnieren A B C D E Tur seite Montagezubeh r f r die T r Abb 1 2 3 4 5 Abb 1 N 2 Scharnier N 1 Magnet N 1 Magnetanschlag N 1 Gummid bel N 2 Scharnierhalterung N 1 Distanzst ck Abb 2...

Page 47: ...e in die ffnung und passen Sie sie der M belfront an abb 6 Regulieren Sie die verstellbaren F e auf die gew nschte H he der maschine Drehen Sie die Schrauben C und D wie in abb 7 angege ben um die Pos...

Page 48: ...R GESPERRT Um Erkennen zu k nnen ob die Maschine eingeschaltet ist und demnach das F llfenster nicht ge ffnet werden kann siehe Seite 49 Wahlschalter PROGRAMME zur Programmwahl Die Wahlschalter sind f...

Page 49: ...uzeigen dass der W hlschalter TROCKNEN wieder auf Pos 0 zur ck zudrehen ist Tasten FUNKTIONEN Die Funktionstasten fungieren auch als Kontrollleuchten Bei Wahl einer Funktion leuchtet die entsprechende...

Page 50: ...hutz oder Wasser abpumpen Trockengang f r Feinw sche TEILPROGRAMME Sanftes Sp len Sp len Knitterschutz oder Abpumpen Sanftes Schleudern Abpumpen und sanftes Schleudern Abpumpen Abpumpen Inbetriebnahme...

Page 51: ...n Sie daraufhin die Anleitungen des Abschnitts Nur Trocknen Wiederholen Sie dasselbe nun mit der restlichen W schemenge Nur Trocknen Drehen Sie den PROGRAMM W hlschalter auf einen der Trocknungszyklen...

Page 52: ...hen Sie diese allein ohne das Gesamtge wicht f r halbe F llung zu bersteigen Stellen Sie das Programm 10 ein das ein automatisches Ausschlie en der Schleuder vorsieht Skijacken und Anoraks Sind diese...

Page 53: ...reislauf entsorgt werden Altger te m ssen separat gesammelt werden um die Wiederver wertung und das Recycling der beinhalteten Materialien zu optimieren und die Einfl sse auf die Umwelt und die Gesund...

Page 54: ...r che zu vermeiden Reinigung der Pumpe Ihr Ger t ist mit einer selbstreinigenden Pumpe ausger stet eine Wartung ist demnach nicht erforderlich Es k nnte doch einmal vorkommen dass kleine Gegen st nde...

Page 55: ...ngs ffnung versehen Konnte die St rung durch diese Kontrollen nicht behoben werden dann drehen Sie den Wasserhahn zu schalten das Ger t aus und fordern den Kundendienst an Falls Sie in einer der obers...

Page 56: ...nicht der Fall dann kontaktieren Sie den autorisierten Kundendienst unter der auf dem Garantie schein aufgedruckten Telefonnummer Wenden Sie sich auf keinen Fall an nicht autorisierte Techniker Geben...

Reviews: