background image

8

GB

How to run a wash cycle or a 

drying cycle

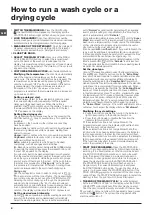
1. 

SWITCH THE MACHINE ON. 

Press the On/Off button 

; the text POWER ON will appear on the display and the 

START/PAUSE indicator light will flash slowly in a green colour.

2. 

LOAD THE LAUNDRY. 

Open the porthole door. Load the 

laundry, making sure you do not exceed the maximum load value 

indicated in the table of programmes on the following page.

3. 

MEASURE OUT THE DETERGENT. 

Open the detergent 

dispenser drawer and pour the detergent into the relevant 

compartments as described in “Detergents and laundry”.

4. 

CLOSE THE DOOR.

5. 

SELECT THE WASH CYCLE. 

Press one of the WASH 

CYCLE SELECTOR buttons to select the required wash 

cycle; the name of the wash cycle will appear on the 

display. A temperature and spin speed is set for each wash 

cycle; these may be adjusted. The duration of the cycle will 

appear on the display.

6. 

CUSTOMISE THE WASH CYCLE. 

Use the relevant buttons:


Modifying the temperature. 

The machine automatically 

select the maximum temperature set for the selected 

wash cycle; this values cannot therefore be increased. The 

temperature can be decreased by pressing the  button, 

until the cold wash “OFF” setting is reached. If this button 

is pressed again, the maximum values are restored. 

!


Exception: if the 2 (40°) 

(2nd press of the button) 

programme is selected, the temperature can be increased 
up to a value of 90°C.

Setting a delayed start.

To set a delayed start for the selected programme, press 

the corresponding button repeatedly until the required 

delay period has been reached. When this option is 

enabled, the 

 symbol lights up on the display. To remove 

the delayed start function press the button until the text 

“OFF” appears on the display.

Setting the drying cycle

.

The desired drying cycle type may be set by pressing the 

DRYING button


once or several times. Two options are 

available: 

A

 - Based on the how damp the clothes are once they 

have been dried

:


Iron:

 suitable for clothes which will need ironing afterwards. 

the remaining dampness softens creases, making them 

easier to remove.


Hanger:

 ideal for clothes which do not need to be dried fully.


Cupboard:

 suitable for laundry which can be put back in a 

cupboard without being ironed.


Extra:

 suitable for garments which need to be dried 

completely, such as sponges and bathrobes.

B

 -  Based on a set time period: between 

20 

and 

180 

minutes

.

To exclude the drying phase press the relevant button until 

the text OFF appears on the display

.

If your laundry load to be washed and dried is much greater 

than the maximum stated load, perform the wash cycle, and 

when the cycle is complete, divide the garments into groups 

and put some of them back in the drum. At this point, follow 

the instructions provided for a “

Drying only

” cycle. Repeat 

this procedure for the remainder of the load. A cooling-down 

period is always added to the end of each drying cycle.

Drying only

Use the cycle selector knob to select a drying cycle ( - -

) in accordance with the type of fabric. The desired drying 

level or time may also be set using the DRYING button


.

Selecting the cotton drying cycle through the programme 

selector knob and pressing the “Eco” button activates an 

automatic drying cycle that allows for saving energy, thanks 

to an optimal combination of air temperature and cycle 

duration; the display will visualise the “Eco” dryness level.

Set the desired wash intensity.

Option 

 makes it possible to optimise washing based on the 

level of soil in the fabrics and on desired wash cycle intensity. 

Select the wash programme: the cycle will be automatically 

set to “

Normal

” as optimised for garments with an average 

level of soil (this setting is not applicable to the “Wool” cycle, 

which is automatically set to “

Delicate

”).

For heavily-soiled garments press button 

 until the “

Super 

Wash

” level is reached. This level ensures a high-performance 

wash due to a larger quantity of water used in the initial phase 

of the cycle and due to increased drum rotation. It is useful 

when removing the most stubborn stains. 

It can be used 

with 

or 

without 

bleach. If you wish to bleach the 

items insert the additional compartment (

4

) into compartment 

1

. When pouring the bleach, be careful not to exceed the “max” 

level marked on the central pivot 

(see figure pag. 10).

For lightly-soiled garments or a more delicate treatment of the 
fabrics, press button 

 until the “

Delicate

” level is reached. 

The cycle will reduce the drum rotation to ensure washing results 

are perfect for delicate garments.

Set the rinse type.

Option 

 makes it possible to select the desired rinse type 

for sensitive skin. Press the button once for the “

Extra Rinse

” 

level, which makes it possible to select an additional rinse after 

the standard cycle rinse and remove all traces of detergent. 

Press the button again for the “

Sensitive Skin

” level, which 

makes it possible to select two additional rinses to the standard 

cycle rinses; it is recommended for very sensitive skin. When 

the button is pressed for the third time, the “

Anti allergy Rinse

” 

level is set, thus allowing the selection of 3 rinses in addition 

to the standard cycle’s rinses. The option - started with cycles 

at a temperature of 40°C - makes it possible to remove major 

allergens such as pollen, cat and dog hair. With cycles at a 

temperature higher than 40° a very good level of antiallergic 

protection is achieved. Press the button again to go back to 

the “

Normal Rinse

” rinse type. If the current adjustment can be 

neither set nor changed, the display will show “

Not allowed

”. 

Modifying the cycle settings.

•  Press the button to enable the function; the indicator 

light corresponding to the button will switch on.

•  Press the button again to disable the function; the 

indicator light will switch off.

!

 If the selected function is not compatible with the 

programmed wash cycle, the indicator light will flash and 

the function will not be activated.

!

 If the selected function is not compatible with another 

function which has been selected previously, the indicator 

light corresponding to the first function selected will flash 

and only the second function will be activated; the indicator 

light corresponding to the enabled function will remain lit.

!

 The functions may affect the recommended load value 

and/or the duration of the cycle.

7. 

START THE PROGRAMME.

 Press the START/PAUSE 

button. The corresponding indicator light will become green, 

remaining lit in a fixed manner, and the door will be locked 

(the DOOR LOCKED symbol will be on). During the wash 

cycle, the name of the phase in progress will appear on 

the display. To change a wash cycle while it is in progress, 

pause the washer-dryer using the START/PAUSE button 

(the START/PAUSE indicator light will flash slowly in an 

orange colour); then select the desired cycle and press 

the START/PAUSE button again. To open the door while a 

cycle is in progress, press the START/PAUSE button; if the 

DOOR LOCKED 

 symbol is switched off the door may be 

opened. Press the START/PAUSE button again to restart the 

wash cycle from the point at which it was interrupted.

8. 

THE END OF THE WASH CYCLE.

 This will be indicated 

by the text “END OF CYCLE” on the display; when the DOOR 

LOCKED 

 symbol switches off the door may be opened. 

Open the door, unload the laundry and switch off the machine.

!

 If you wish to cancel a cycle which has already begun, press 

and hold the   button. The cycle will be stopped and the 

machine will switch off.

Summary of Contents for FDD 9640

Page 1: ...ance Cleaning the pump Checking the water inlet hose Precautions and tips 5 General safety Disposal Opening the porthole door manually Description of the washer dryer 6 7 Control panel Display How to...

Page 2: ...e If the washer dryer is sold transferred or moved make sure that the instruction manual remains with the machine so that the new owner is able to fa miliarise himself herself with its operation and f...

Page 3: ...cket must remain within easy reach Do not use extension cords or multiple sockets The cable should not be bent or compressed The power supply cable must only be repla ced by authorised technicians 65...

Page 4: ...penser drawer Remove the dispenser by raising it and pul ling it out see figure Wash it under running water this operation should be repeated frequently 1 2 B A Caring for the door and drum of your ap...

Page 5: ...rature that ensures that the items will not be damaged WARNING Never stop a tumble dryer before the end of the drying cycle unless all items are quickly removed and spread out so that the heat is diss...

Page 6: ...When the symbol is illuminated the control panel is locked apart from the ON OFF button This means it is possible to prevent wash cycles from being modified accidentally especially where there are ch...

Page 7: ...sh cycle cannot be modified the string remains unused Indicator lights F correspond to the functions and light up when the selected function is compatible with the set wash cycle Door locked symbol If...

Page 8: ...ts with an average level of soil this setting is not applicable to the Wool cycle which is automatically set to Delicate For heavily soiled garments press button until the Super Wash level is reached...

Page 9: ...onditions The actual duration can vary according to factors such as water temperature and pressure the amount of detergent used the amount and type of load inserted load balancing and any wash options...

Page 10: ...tages of preserving garments from yellowing due to sunlight exposure and pre venting loss of whiteness caused by the possible presence of dust in the air Drying cycles can only be selected on a level...

Page 11: ...tion The wall drainage system is not fitted with a breather pipe If the problem persists even after these checks turn off the water tap switch the appliance off and contact the Assistance Service If t...

Page 12: ...hnical Assistance Centre using the telephone number provided on the guarantee certificate Always request the assistance of authorised technicians Have the following information to hand the type of pro...

Page 13: ...ambour Nettoyage de la pompe Contr le du tuyau d arriv e de l eau Pr cautions et conseils 17 S curit g n rale Mise au rebut Ouverture manuelle de la porte hublot Description du lavante s chante 18 19...

Page 14: ...autre 2 Si le sol n est pas parfaitement horizon tal visser ou d visser les pieds de r glage avant voir figure pour niveler l appareil son angle d inclinaison mesur sur le plan de travail ne doit pas...

Page 15: ...vante s chante la pri se de courant doit tre facilement accessible N utiliser ni rallonges ni prises multiples Le c ble ne doit tre ni pli ni trop cras Le c ble d alimentation ne doit tre remplac que...

Page 16: ...u tiroir produits les siviels Soulever le tiroir et le tirer vers soi pour le sortir de son logement voir figure Le laver l eau cou rante effectuer cette op ration assez sou vent Entretien du hublot e...

Page 17: ...mer aux instructions du fabricant La partie finale d un cycle du s che linge se produit sans chaleur cycle de refroidissement pour viter tout endommagement du linge ATTENTION Ne jamais arr ter le s ch...

Page 18: ...ron 2 secondes Le symbole allum indique que le bandeau de commandes est verrouill Ceci permet d viter toute modification involontaire des programmes surtout s il y a des enfants la maison Pour d sacti...

Page 19: ...si si le programme ne pr voit pas la s lection de la temp rature la cha ne reste teinte Les voyants F correspondent aux fonctions et s allument quand la fonction programm e est compatible avec le prog...

Page 20: ...at Pour du linge tr s sale appuyer sur la touche jusqu ce que le niveau Super Lavage soit atteint Ce niveau permet d obtenir un lavage tr s performant car l utilisation d une plus grande quantit d eau...

Page 21: ...e l eau en entr e temp rature ambiante quantit de lessive quantit et type de charge quilibrage de la charge options suppl mentaires s lectionn es Pour tous les instituts qui effectuent ces tests 1 Pro...

Page 22: ...les s chages par niveaux peuvent tre s lectionn s Il est conseill d utiliser le niveau de s chage Sur cintre Coton 20 C id al pour des charges de linge sale en coton Les bonnes performances m me froi...

Page 23: ...lation L vacuation murale n a pas d vent Si apr s ces v rifications le probl me persiste fermer le robinet de l eau teindre la machine et appeler le service Assistance Si l appartement est situ en tag...

Page 24: ...inconv nient a disparu Autrement contacter le Centre d Assistance technique agr au num ro de t l phone indiqu sur le certificat de garantie Ne jamais s adresser des techniciens non agr s Communiquer l...

Page 25: ...Ger tet r und Trommel Reinigung der Pumpe Kontrolle des Wasserzulaufschlauchs Vorsichtsma regeln und Hinweise 29 Allgemeine Sicherheit Entsorgung Manuelles ffnen der Ger tet r Beschreibung Ihres Wasch...

Page 26: ...n an W nde M belteile oder hnli ches anzulehnen 2 Sollte der Boden nicht perfekt eben sein m ssen die Unebenheiten durch An bzw Ausdrehen der vorderen Stellf e ausgeglichen werden siehe Abbildung der...

Page 27: ...rlich das Ger t Gewittern und Unwettern auszusetzen Die Steckdose mu jederzeit zug nglich sein Verwenden Sie bitte keine Verl ngerungen oder Mehrfachstecker 65 100 cm Das Netzkabel darf nicht gebogen...

Page 28: ...ne hin heraus sie he Abbildung Sp len Sie sie regel m ig unter flie en dem Wasser gr ndlich aus Reinigung und Pflege B A Pflege der Ger tet r und Trommel Lassen Sie die Ger tet r stets leicht offen st...

Page 29: ...hen Ger t fern W hrend des Waschgangs kann die Ger tet r sehr hei werden Muss das Ger t versetzt werden sollten hierf r zwei oder drei Personen verf gbar sein Versetzen Sie es niemals allein das Ger t...

Page 30: ...lang gedr ckt Das eingeschaltete Symbol zeigt an dass die Bedienblende gesperrt ist Auf diese Weise wird verhindert dass ein Programm aus Versehen ge ndert wird vor allem wenn kleine Kinder im Hause...

Page 31: ...sieht bleibt die Zeilenreihe ausgeschaltet Die Kontrollleuchten F sind den Funktionen zugeordnet und leuchten wenn die ausgew hlte Funktion mit dem eingestellten Programm kompatibel ist Symbol Ger tet...

Page 32: ...Taste bis Sie die Einstellung SuperWash erreichthaben DieseEinstellunggew hrleistet dank der Verwendung einer gr eren Menge Wasser zu Beginn des Zyklus sowie dank einer gr eren mechanischen Bewegung...

Page 33: ...reicher Faktoren wie Temperatur und Druck des Zulaufwassers Raumtemperatur Waschmittelmenge Art Menge und Verteilung der Waschladung sowie der gew hlten Zusatzfunktionen variieren F r alle Testinstitu...

Page 34: ...rocknungsprogramme eingestellt werden Wir empfehlen die Trockenstufe Aufh ngen Baumwolle 20 C ideal f r normalverschmutze Bau mwolle Die auch mit kaltem Wasser erreichten Leistungen vergleichbar mit e...

Page 35: ...tion Der Abfluss der Hausinstallation wurde nicht mit einer Entl ftungs ffnung versehen Konnte die St rung durch diese Kontrollen nicht behoben werden dann drehen Sie den Wasserhahn zu schalten das Ge...

Page 36: ...oben wurde Ist dies nicht der Fall dann kontaktieren Sie den autorisierten Kundendienst unter der auf dem Garantieschein befindlichen Telefonnummer Wenden Sie sich auf keinen Fall an nicht autorisiert...

Page 37: ...einigen van de pomp Controleren van de buis van de watertoevoer Voorzorgsmaatregelen en advies 41 Algemene veiligheid Afvalverwijdering Handmatige opening van de deur Beschrijving van de wasdroogmachi...

Page 38: ...r latere raadpleging In het geval u het appa raat verkoopt of u verhuist moet het boekje bij de wasdroogmachine blijven zodat de nieuwe gebruiker de functies en betreffende raadgevin gen kan doornemen...

Page 39: ...makkelijk te bereiken zijn Gebruik geen verlengsnoeren of dubbelstekkers Het snoer mag niet gebogen of samengedrukt worden De voedingskabel mag alleen door een bevo egde installateur worden vervangen...

Page 40: ...n Gebruik nooit tweedehands buizen Onderhoud en verzorging Afsluiten van water en stroom Sluit na iedere wasbeurt de kraan af Hiermee beperkt u slijtage van de waterinstallatie van de wasmachine en vo...

Page 41: ...areren Zorg ervoor dat kleine kinderen niet te dicht bij de machine komen als deze in werking is Als het apparaat verplaatst moet worden doe dit dan met twee of drie personen tegelijk en heel voorzich...

Page 42: ...toets Wasmiddelbakje FUNCTIE TOETSEN ON OFF toets Toetsen PROGRAMMAKEUZE TOETSBLOKKERING toets DISPLAY UITGESTELDE START toets MY CYCLE toets Toets TOETSBLOKKERING om de blokkering van het bedieningsp...

Page 43: ...ng van de temperatuur voorziet dan zal er in dit vak niets verschijnen De controlelampjes F hebben betrekking tot de functies en zullen aangaan als de geselecteerde functie compatibel is met het inges...

Page 44: ...e was drukt u op de toets totdat u het niveau Super Wash bereikt Dit niveau garandeert een kwalitatief zeer hoog wasresultaat dankzij het gebruik van een grotere hoeveelheid water in de beginfase van...

Page 45: ...culeerd bij standaard omstandigheden De effectieve tijd kan vari ren aan de hand van talloze factoren zoals temperatuur en druk van de watertoevoer de kamertemperatuur de hoeveelheid wasmiddel de hoev...

Page 46: ...ht aanwezig zijn U kunt droogcycli alleen op niveaus instellen We raden u aan het droogniveau Han ger te gebruiken Katoen 20 C ideaal voor een lading vuil katoen De opti male prestaties zelf met koud...

Page 47: ...erbuis ligt onder water zie Installatie De afvoer in de muur heeft geen ontluchting Als na deze controles het probleem niet is opgelost moet u de waterkraan dichtdra aien de wasdroogmachine uitzetten...

Page 48: ...lpen Als dit niet het geval is moet u contact opnemen met de erkende Technische Servicedienst via het telefoonnummer dat op het garantiebewijs staat Wendt u nooit tot een niet erkende installateur Ver...

Page 49: ...49 GR 50 51 52 53 54 55 56 57 58 59 60 GR FDD 9640...

Page 50: ...50 GR 1 3 4 gas 2 3 1 2 3 4 4 5 1 2 2...

Page 51: ...51 GR 65 100 cm 150 cm 65 100 cm FDD 9640 cm 59 5 cm 85 cm 54 1 9 kg 1 6 kg 1 MPa 10 bar 0 05 MPa 0 5 bar 58 1400 EN 50229 2 60 2 9 kg 3kg 3 2 1 2004 108 CE 2012 19 EU WEEE 2006 95 CE...

Page 52: ...52 GR 10 40 5 70 START PAUSE 1 2 3 4 5 1 2 B A...

Page 53: ...53 GR 8 3 1 2 3 4 5 20 2012 19 EU...

Page 54: ...54 GR ON OFF START PAUSE 3 sec MY CYCLE MY CYCLE 2 ON OFF 2 START PAUSE stand by stand by 30 ON OFF off mode 0 5 W Left on 8 W START PAUSE ON OFF MY CYCLE...

Page 55: ...55 GR A B C D F START PAUSE X Y Z X Y Z A B C D E F Z X Y...

Page 56: ...56 GR 1 START PAUSE 2 3 4 5 6 OFF 2 40 C 1 90 OFF A B 20 180 OFF Eco Eco 4 1 max 58 3 40 40 7 START PAUSE START PAUSE START PAUSE START PAUSE START PAUSE START PAUSE 8...

Page 57: ...C Kg CLEAN Plus 1 1 40 1400 5 1 2 40 1200 4 5 2 1 40 Max 90 1400 9 2 60 C 2 1 60 1400 9 2 40 C 2 2 40 1400 9 2 20 C 3 20 1400 9 3 60 1000 4 SPECIALS 4 1 cachemire 40 800 2 4 2 30 0 1 M MY CYCLE MNHMH...

Page 58: ...C 1 B 2 3 1 400 500 gr 1 150 200 gr 1 400 500 gr 1 900 1 200 gr 1 150 250 gr A MAX 1 3 2 A B 20 C 40 1 WoolmarkApparelCare Green Woolmark Company M1127 4 2 1 kg 160 min 1 kg 180 min 1 kg 180 min 4 2 7...

Page 59: ...59 GR F 01 F ON OFF START PAUSE START PAUSE 65 100 cm 1 OFF...

Page 60: ...60 GR Mod S N...

Page 61: ...hazne bak m Pompan n temizlenmesi Su besleme hortumunun kontrol edilmesi nlemler ve neriler 65 Genel g venlik uyar lar At klar n tasfiye edilmesi Cam kapa n a lmas ama r makinesinin tan m 66 67 Kontr...

Page 62: ...rla kapay n z 5 T m par alar muhafaza ediniz ama r makinesinin nakli gerekti i takdirde tak lmalar gerekmektedir Ambalajlar ocuk oyunca de ildir Cihaz n ayn seviyeye getirilmesi 1 ama r makinesini d z...

Page 63: ...nde elektrik prizi kolay ula labilir bir durumda olmal d r Uzatma kablosu veya oklu priz kullanmay n Kablo b k lmemeli veya s k t r lmamal d r G kablosu ve fisi sadece yetkili teknis yenler taraf ndan...

Page 64: ...amadan sonra kapat n z B ylece ama r makinesinin su tesisat n n eskimesi engellenir su ka a tehlikesi ortadan kalkar Bak m ve temizlik i lemleri esnas nda ama r makinesinin fi ini ekiniz ama r makines...

Page 65: ...lar kurcalamay n z ocuklar n al r vaziyetteki makineye yakla malar na mani olunuz al ma esnas nda kapak s nabilir Ta nmas gerekti inde bu i lemin iki veya ki i taraf ndan azami dikkatle yap lmas gerek...

Page 66: ...eli etkin haline getirmek i in tu u yakla k 2 saniye bas l tutman z gerekir Sembol a k ise kontrol panelinin kilitli oldu unu g sterir B ylece zellikle ocuklar n z varsa program n yanl l kla de i tiri...

Page 67: ...de erini g r nt lenir E er s ayar programda mevcut de ilse bu sat r s n k kal r F uyar lambalar i levler ile ilgili olup se ili i lev ayarlanan programa uygunsa yanar KAPAK KILITLI sembol I kl g sterg...

Page 68: ...un olan NORMAL seviyede otomatik olarak ayarlan r otomatik olarak NAR N seviyede ayarlanan Y nl ler i in ge erli olmayan ayar ok kirli ama rlar i in cihaz S PER YIKAMA seviyeye ula ana kadar tu una ba...

Page 69: ...ilen ilave se enekler gibi say s z fakt rlere g re de i iklik g sterebilmektedir B t n Test merkezleri i in 1 EN 50229 d zenlemesine uygun test y kama evrimi 60 C s cakl kta y kama evrimi 2 60 C yi s...

Page 70: ...jlar ile a k alandaki gibi otomatik olarak bir kurutma i lemi ger ekle tirilir Sadece seviyeli kurutmalar ayarlanabilir Kuruluk seviyesi Ask nerilir PAMUKLU 20 C kirli pamuklu ama rlar i in idealdir 4...

Page 71: ...ba suya girmi bkz Montaj Duvardaki tahliyenin hava bo lu u yok Bu kontrollerden sonra olumlu sonu al namazsa muslu u ve kapat p ama r makinesini durdurarak Servise haber veriniz Daire binan n st katla...

Page 72: ...herhangi bir ad alt nda hi bir cret talep etmeksizin mal n onar m yap lacak veya yapt r lacakt r cretsiz onar m hakk n n kullanmas halinde mal n garanti s resi i inde tekrar ar zalanmas tamiri i in ge...

Reviews: