background image

EN

11

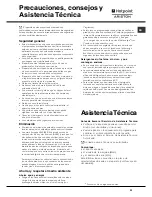
Precautions, advice

and Assistance

 This appliance was designed and manufactured in

compliance with current international safety standards. The

following information has been provided for safety reasons

and should therefore be read carefully.

General safety

•   This appliance is not intended for use by persons

(including children) with reduced physical, sensory or

mental capabilities, or lack of experience and knowledge,

unless they have been given supervision or instruction

concerning use of the appliance by a person responsible

for their safety.

•   Children should be supervised to ensure that they do not

play with the appliance.

• The appliance was designed for domestic use inside the

home and is not intended for commercial or industrial use.

• The appliance must be used by adults only, to wash

domestic crockery in accordance with the instructions in

this manual.

• The appliance must not be installed outdoors, even in

covered areas. It is extremely dangerous to leave the

machine exposed to rain and storms.

• Do not touch the appliance when barefoot.

• When unplugging the appliance always pull the plug from

the mains socket, do not pull on the cable.

• The water supply tap must be shut off and the plug should

be removed from the electrical socket before cleaning the

appliance or carrying out any maintenance work.

• If the appliance breaks down, do not under any

circumstances touch the internal parts in an attempt to

perform the repair work yourself.

• Never touch the heating element.

• Do not lean or sit on the open door of the appliance: this

may cause the appliance to overturn.

• The door should not be left open as it may create a

dangerous obstacle.

• Keep detergent and rinse aid out of reach of children.
• The packaging material should not be used as a toy.

Disposal

• Disposal of packaging materials: observe local legislation

so that the packaging may be reused.

• The European Directive 2002/96/EC relating to Waste

Electrical and Electronic Equipment (WEEE) states that

household appliances should not be disposed of using the

normal solid urban waste cycle. Exhausted appliances

should be collected separately in order to optimise the cost

of re-using and recycling the materials inside the machine,

while preventing potential damage to the atmosphere and

to public health. The crossed-out dustbin is marked on all

products to remind the owner of their obligations regarding

separated waste collection.

For further information relating to the correct disposal of

household appliances, owners may contact the relevant
public authority or the local appliance dealer.

Saving energy and respecting the

environment

Saving water and energy

• Only begin a wash cycle when the dishwasher is full. While

waiting for the dishwasher to be filled, prevent unpleasant

odours using the Soak cycle (

see Wash cycles

).

• Select a wash cycle which is suited to the type of crockery

and to the soil level of the crockery using the 

Table of wash

cycles

:

- For dishes with a normal soil level, use the Eco wash

cycle, which guarantees low energy and water

consumption levels.

- If the load is smaller than usual activate the Half load
option

(

see Start-up and use

).

• If your electricity supply contract gives details of electricity

saving time bands, run wash cycles during the periods
when a lower tariff is applied. The Delayed start

*

 button

(

see Start-up and use

) helps you organise the wash cycles

accordingly.

Phosphate-free and chlorine-free detergents

containing  enzymes

• We strongly recommend that you use detergents that do

not contain phosphates or chlorine, as these products are

harmful to the environment.

• Enzymes provide a particularly effective action at

temperatures around 50°C, and as a result detergents

containing enzymes can be used in conjunction with low-

temperature wash cycles in order to achieve the same

results as a normal 65°C wash cycle.

• To avoid wasting detergent, use the product in appropriate

quantities based on the manufacturer’s recommendations,

the hardness of the water and the soil level and quantity of

crockery to be washed. Even if they are biodegradable,

detergents contain substances which may alter the balance
of nature.

Assistance

Before contacting Assistance:

• Check whether the problem can be resolved using the

Troubleshooting guide (

see Troubleshooting

).

• Restart the programme to check whether the problem has

ceased to exist.

• If the problem persists, contact the Authorised Technical

Assistance Service.

Never use the services of unauthorised technicians.

Please  have  the  following  information  to  hand:

• The type of malfunction.

• The appliance model (Mod.).

• The serial number (S/N).

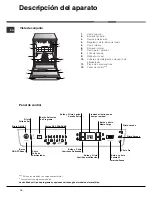
This information can be found on the appliance data plate

(

see Description of the appliance

).

*

 Only available in selected models.

Summary of Contents for LFF 8214

Page 1: ...s Wash cycles 8 Table of wash cycles Rinse aid and refined salt 9 Measuring out the rinse aid Measuring out the refined salt Care and maintenance 10 Shutting off the water and electricity supplies Cleaning the dishwasher Preventing unpleasant odours Cleaning the sprayer arms Cleaning the water inlet filter Cleaning the filters Leaving the machine unused for extended periods Precautions advice and ...

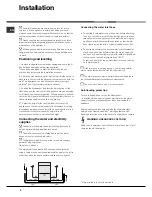
Page 2: ...ater and electricity supplies should only be performed by a qualified technician The dishwasher should not stand on top of the water hoses or the electricity supply cable The appliance must be connected to the water supply network using new hoses Do not use old hoses The water inlet A and outlet B hoses and the electricity supply cable may be positioned towards the right or the left in order to ac...

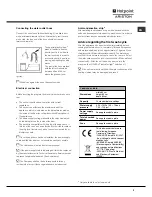
Page 3: ... or its Technical Assistance Service in order to prevent all potential hazards See Assistance The Company shall not be held responsible for any incidents that occur if these regulations are not observed Anti condensation strip After installing the dishwasher open the door and stick the adhesive transparent strip under the wooden shelf in order to protect it from any condensation which may form Adv...

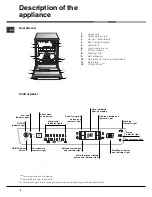
Page 4: ...r and type of wash cycles and options may vary depending on the dishwasher model Control panel ON OFF indicator light Select wash cycle button Low rinse aid indicator light Extra Dry option button and indicator light Low salt indicator light Time remaining light up display Start Pause button and indicator light ON OFF Reset button Delayed start button and indicator light Half load button and indic...

Page 5: ... place these on the tip up compartments Tip up compartments with adjustable tilt The tilt feature can be used to increase the space in the upper rack to position wine glasses with different stem lengths safely and to improve drying performance Lift the tip up compartment slide it gently and position it in the desired tilt angle Adjusting the height of the upper rack In order to make it easier to a...

Page 6: ...t button Switch it back on using the same button and select the desired wash cycle and options Adding extra crockery Press the Start Pause button the corresponding indicator light will flash Open the door taking care to avoid the escaping steam and place the crockery inside the appliance Press the Start Pause button fixed light the cycle will restart after a prolonged beep is emitted If the Start ...

Page 7: ...desired wash cycle and any other options press the DELAYED START button the corresponding indicator light will illuminate Use the same button to select the time at which you wish the wash cycle to begin after a period of 1 to 24 hours 2 Confirm your selection using the Start Pause button the countdown will begin The selected delay period indicator light flashes and the Start Pause button stops fla...

Page 8: ... A 6 ml B 1 A Yes A B C D 2 40 Economic and fast wash to be used for lightly soiled dishes Run cycle immediately after use 2 plates 2 glasses 4 pieces of cutlery 1 saucepan 1 small frying pan 25 g A 25 ml A 1 A No A C 0 25 Economic and fast wash for delicate items which are sensitive to high temperatures Run cycle immediately after use glasses in the upper rack delicate plates in the lower rack Cr...

Page 9: ...tton repeatedly until the desired hardness level has been reached 1 2 3 4 5 see Water hardness table E g Hardness level 1 1st wash cycle indicator light flashes Hardness level 2 1st wash cycle indicator light on 2nd wash cycle indicator light flashes Hardness level 3 1st and 2nd wash cycle indicator lights on 3rd wash cycle indicator light flashes etc up to a maximum of level 5 To exit the functio...

Page 10: ...iod of time let the water run to make sure it is clear and free of impurities before performing the necessary connections If this precaution is not taken the water inlet could become blocked and damage the dishwasher Clean the water inlet filter at the tap outlet regularly Turn off the water tap Unscrew the end of the water inlet hose remove the filter and clean it carefully under running water Re...

Page 11: ...e and to public health The crossed out dustbin is marked on all products to remind the owner of their obligations regarding separated waste collection For further information relating to the correct disposal of household appliances owners may contact the relevant public authority or the local appliance dealer Saving energy and respecting the environment Saving water and energy Only begin a wash cy...

Page 12: ...aded see Loading the racks The crockery has not been arranged well The sprayer arms cannot move freely The wash cycle is too gentle see W ash cycles An excessive amount of foam has been produced the detergent has not been measured out correctly or it is not suitable for use in dishwashers see Start up and use The lid on the rinse aid compartment has not been shut correctly The filter is dirty or b...

Page 13: ...l detergente Opciones de lavado Programas 20 Tabla de programas Abrillantador y sal regeneradora 21 Cargar el abrillantador Cargar la sal regeneradora Mantenimiento y cuidados 22 Interrumpir el agua y la corriente eléctrica Limpiar el lavavajillas Evitar los malos olores Limpiar los rociadores Limpieza del filtro de entrada de agua Limpiar los filtros Si se ausenta durante largos períodos Precauci...

Page 14: ...or personal especializado El lavavajillas no se debe apoyar en los tubos ni en el cable de alimentación eléctrica El aparato debe conectarse a la red de distribución de agua empleando tubos nuevos No reutilice los tubos viejos Los tubos de carga A y de descarga B de agua y el cable de alimentación eléctrica se pueden orientar hacia la derecha o hacia la izquierda para permitir una mejor instalació...

Page 15: ...be plegar ni comprimir Si el cable de alimentación está dañado deberá ser cambiado por el fabricante o por su servicio de asistencia técnica a fin de prevenir riesgos Ver Asistencia La Empresa declina toda responsabilidad cuando no se hayan respetado estas normas Cinta anticondensación Después de haber empotrado el lavavajillas abra la puerta y pegue la cinta adhesiva transparente debajo de la sup...

Page 16: ...s modelos con empotramiento total Presente sólo en algunos modelos La cantidad y el tipo de programas y opciones varían según el modelo de lavavajillas Panel de control Piloto Falta de Abrillantador Botón ON OFF Reset Piloto ON OFF Piloto Falta de Sal Botón Selección de Programa Botón y Piloto Comienzo Retrasado Botón y Piloto Pastillas multifunción Botón y Piloto opción Secado Extra Botón y pilot...

Page 17: ...ionales Cestos adicionales con inclinación variable La inclinación permite obtener mayor espacio en el cesto superior colocar copas con pies de diferentes longitudes y mejorar las prestaciones de secado Levante el cesto adicional hágalo correr ligeramente y colóquelo con la inclinación deseada Regular la altura del cesto superior Para facilitar la colocación de la vajilla se puede ubicar el cesto ...

Page 18: ...uz fija el ciclo se reanudará después de un sonido prolongado Presionando el botón Puesta en funcionamiento Pausa para poner la máquina en pausa se interrumpe tanto el programa como el Comienzo Retrasado si se había fijado En esta fase no se puede cambiar el programa Interrupciones accidentales Si durante el lavado se abre la puerta o se produce una interrupción de corriente el programa se interru...

Page 19: ...e cargar la vajilla sólo en el cesto superior y disminuir a la mitad la cantidad de detergente Es preferible utilizar detergente en polvo Esta opción no está disponible con los programas Speed y Baby Comienzo retrasado Es posible postergar el comienzo del programa de 1 a 24 horas 1 Después de haber seleccionado el programa de lavado deseado y otras opciones presione el botón del COMIENZO RETRASADO...

Page 20: ...l secado Opciones Duración del programa tolerancia 10 Horas Mín Vajilla y ollas muy sucias no usar para vajilla delicada Lavado Intensivo 35 g A 35 ml A 1 A Si A B C D 2 15 Vajilla y ollas normalmente sucias Programa estándar diario Lavado Normal 29 g A 6 g B 29 ml A 6 ml B 1 A Si A B C D 1 45 Vajilla con la suciedad diaria en cantidad limitada 4 cubiertos 1 olla 1 sartén Lavado Cotidiano 25 g A 2...

Page 21: ...ureza fijado El ablandador está configurado en el nº 3 Presione el botón P varias veces hasta alcanzar la dureza deseada 1 2 3 4 5 Ver la tabla de dureza de agua Ej dureza 1 piloto 1º programa centellea dureza 2 piloto 1º programa encendido piloto 2º programa centellea dureza 3 pilotos 1º y 2º programas encendidos piloto 3º programa centellea etc hasta un máximo de 5 niveles Para salir de la funci...

Page 22: ... haga correr el agua para verificar que sea límpida y que no contenga impurezas Sin esta precaución existe el riesgo de que el lugar por donde entra el agua se obstruya dañando el lavavajillas Periódicamente limpie el filtro de entrada de agua colocado a la salida del grifo Cierre el grifo de agua Desenrosque el extremo del tubo de carga de agua quite el filtro y límpielo delicadamente bajo un cho...

Page 23: ...l medio ambiente El símbolo del cesto tachado se encuentra en todos los productos para recordar la obligación de recolección separada Para mayor información sobre la correcta eliminación de los electrodomésticos los poseedores de los mismos podrán dirigirse al servicio público encargado de la recolección o a los revendedores Ahorrar y respetar el medio ambiente Ahorre agua y energía Ponga en funci...

Page 24: ...gar los cestos La vajilla no está bien distribuida Los rociadores no giran libremente El programa de lavado no es suficientemente enérgico ver Programas Excesiva espuma el detergente no está dosificado adecuadamente o no es adecuado para lavar en lavavajillas ver Puesta en funcionamiento y uso El tapón del abrillantador no se ha cerrado correctamente El filtro está sucio u obstruido ver Mantenimie...

Page 25: ...rgente Opções de lavagem Programas 32 Tabela dos programas Abrilhantador e sal regenerante 33 Carregar o abrilhantador Carregar o sal regenerante Manutenção e cuidados 34 Excluir a água e a corrente eléctrica Limpar a máquina de lavar louça Evitar cheiros desagradáveis Limpar os braços aspersores Limpeza do filtro de entrada da água Limpar os filtros Longos períodos de ausência Precauções conselho...

Page 26: ... máquina de lavar louça não deve ficar apoiada sobre tubos ou sobre o cabo de alimentação eléctrica O aparelho terá de ser conectado à rede de distribuição de água mediante tubos novos Não usar tubos já existentes Os tubos de carregamento A e de descarregamento B da água e o cabo de alimentação eléctrica podem ser virados para a direita ou para a esquerda para consentir uma melhor instalação veja ...

Page 27: ...sua substituição terá de ser efectuada pelo fabricante ou pelo Serviço de Assistência Técnica para evitar qual quer tipo de risco Veja a Assistência A Empresa declina qualquer responsabilidade no caso em que estas normas não sejam respeitadas Fita contra a condensação Depois de ter encaixado a máquina de lavar louça abra a porta e cole a fita adesiva transparente embaixo da prateleira de madeira p...

Page 28: ...encaixáveis Presente somente em alguns modelos O número e o tipo de programas e as opções variam conforme o modelo de máquina de lavar louça Painel de controlo Indicador luminoso Falta Abrilhantador Indicador luminoso ON OFF Tecla Selecção do Programa Tecla ON OFF Reset Indicador luminoso Falta Sal Tecla e Indicador opção Secagem Extra Tecla e Indicador Meia carga Tecla e indicador Início Pausa In...

Page 29: ...lheres de cozinha posicione as sobre as peças basculantes Peça articulada de inclinação variável A inclinação possibilita obter mais espaço no cesto superior para colocar cálices com hastes de comprimentos diferentes e melhorar as performances da secagem Erga a peça articulada deslize a ligeiramente e coloque a na inclinação que desejar Regule a altura do cesto superior Para facilitar o posicionam...

Page 30: ...na tecla ON OFF a máquina desliga se com um bip longo Ligue novamente a máquina com a tecla ON OFF e seleccione o novo programa e as eventuais opções iniciar fechando a porta Acrescentar mais louça Carregue na tecla Início Pausa a luz da tecla pisca abra a porta prestando atenção à saída de vapor e introduza as louças Carregue na tecla Início Pausa luz fixa o ciclo recomeçará depois de um bip comp...

Page 31: ...horas o início do programa 1 Depois de ter seleccionado o programa de lavagem que desejar e outras eventuais opções carregue na tecla do INÍCIO POSTERIOR o respectivo indicador luminoso acende se Com a mesma tecla seleccionar quando deseja fazer iniciar o ciclo de lavagem de 1 a 24 horas 2 Confirmar a escolha com a tecla Início Pausa e começará a contagem regressiva o atraso seleccionado irá pisca...

Page 32: ... prevêem a secagem Opções Duração do programa tolerância 10 Horas Mín Louça e tachos muito sujos não usar com louça delicada Enérgico 35 g A 35 ml A 1 A Sim A B C D 2 15 Louça e tachos normalmente sujos Programa normal diário Normal 29 g A 6 g B 29 ml A 6 ml B 1 A Sim A B C D 1 45 Sujidade quotidiana em quantidade limitada 4 pessoas 1 panela 1 frigideira Lavagem Quotidiano 25 g A 25 ml A 1 A Não A...

Page 33: ...car está configurado no n º 3 Carregue na tecla P várias vezes até alcançar a dureza desejada 1 2 3 4 5 Veja a tabela da dureza da água Por ex dureza 1 o indicador do 1º programa pisca dureza 2 indicador 1º programa aceso indicador 2º programa intermitente dureza 3 indicadores 1º e 2º programa acesos indicador 3º programa pisca etc até um máximo de 5 níveis Para sair da função aguarde 30 segundos ...

Page 34: ...lizar a ligação deixe escorrer água para certificar se que seja límpida e isenta de impurezas Sem esta precaução há riscos de que o ponto de entrada da água se entupa causando danos à máquina de lavar louça Periodicamente limpe o filtro de entrada da água posicionado na saída da torneira Feche a torneira da água Desparafuse a extremidade do tubo de alimentação da água remova o filtro e limpe o del...

Page 35: ...ciclagem dos materiais que os compõem e impedir potenciais danos à saúde e ao meio ambiente O símbolo da lixeira cancelada está indicado em todos os produtos para lembrar o dever de colecta selectiva Para maiores informações sobre a correcta eliminação dos electrodomésticos os proprietários poderão contactar o serviço de colecta público ou os revendedores Economizar e respeitar o ambiente Economiz...

Page 36: ... não têm livre rotação O program a de lavagem é delicado dem ais veja Programas Excessiva presença de espum a o detergente não foi doseado adequadam ente ou não é adapto para m áquinas de lavar louça veja Início e utilização A tam pa do recipiente para o abrilhantador não foi fechada correctam ente O filtro está sujo ou obstruído veja M anutenção e cuidados Falta o sal regenerante veja Abrilhantad...

Reviews: