background image

EN

3

Connecting the drain hose
 

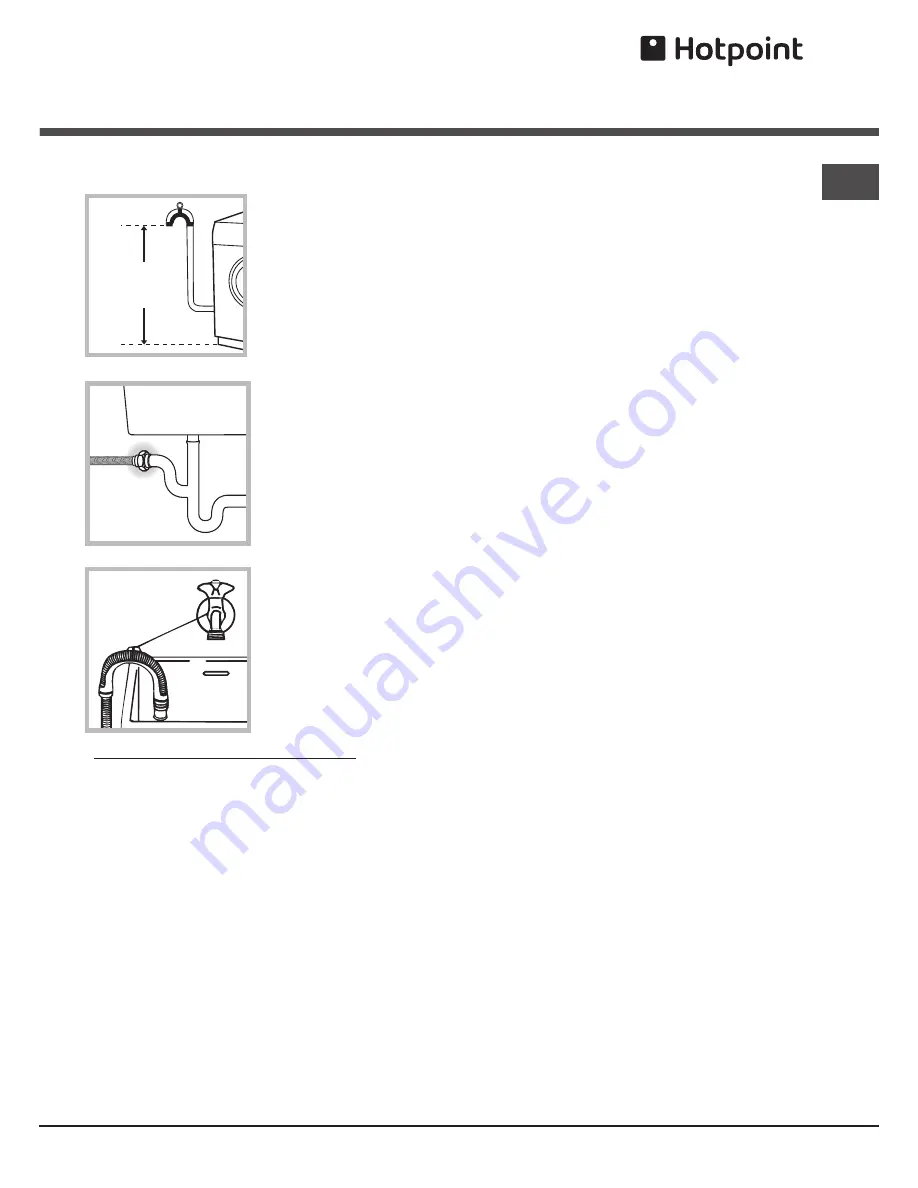
Connect the drain hose, 
without bending it, to a 
draining duct or a wall 
drain situated between 
65 and 100 cm from the 
floor;

The drain hose may 
be connected to an 
under-sink trap. Before 
connecting the drain 
hose from the machine 
ensure that any blanks 
or removable ends have 
been taken off the spigot. 

If it is placed over the 
edge of a basin or sink 
be sure the free end of 
the hose should not be 
underwater.
 

!

 We advise against the use of hose extensions; in case 

of absolute need, the extension must have the same 
diameter as the original hose and must not exceed 150 
cm in length.
Ensure that if the drain hose is pushed into a standpipe, 
that the end does not go down more than 15cms (6 
inches). If the hose is pushed down too far, this may 
cause the machine to self -syphon ie. continuously 
empty as it is filling.

Electric connection

Before plugging the appliance into the mains socket, 
make sure that:
 
• the socket is earthed and in compliance with the    
   applicable law;

• the socket is able to sustain the appliance’s  


   maximum power load indicated in the Technical details  
   table 

(see page 5)

;

•   the supply voltage is included within the values indica- 
  ted on the Technical Data Plate fixed on the machine;

• the socket is compatible with the washing machine’s plug.  
   If this is not the case, replace the socket or the plug.

Your appliance is now supplied with a 13 amp fused plug 
it can be plugged into a 13 amp socket for immediate use. 
Before using the appliance please read the instructions 
below.

WARNING - THIS APPLIANCE MUST BE EARTHED.
THE FOLLOWING OPERATIONS SHOULD  BE CARRIED 
OUT BY A QUALIFIED ELECTRICIAN.

Replacing the fuse:

When replacing a faulty fuse, a 13 amp ASTA approved 
fuse to BS 1362 should always be used, and the fuse 
cover re-fitted. If the fuse cover is lost, the plug must not 
be used until a replacement is obtained.
Replacement fuse covers:
If a replacement fuse cover is fitted, it must be of the 
correct colour as indicated by the coloured marking or the 
colour that is embossed in words on the base of the plug. 
Replacements can be obtained directly from your nearest 
Service Depot.

Removing the plug:

If your appliance has a non-rewireable moulded plug 
and you should wish to re-route the mains cable through 
partitions, units etc., please ensure that either:
the plug is replaced by a fused 13 ampere rewireable plug 
bearing the BSI mark of approval. 
or:
the mains cable is wired directly into a 13 amp cable outlet, 
controlled by a switch, (in compliance with BS 5733) which 
is accessible without moving the appliance.

Disposing of the plug:

Ensure that before disposing of the plug itself, you make 
the pins unusable so that it cannot be accidentally inserted 
into a socket.
 
Instructions for connecting cable to an alternative plug:
Important: the wires in the mains lead are coloured in 
accordance with the following code:

Green & Yellow  Earth
Blue 


 Neutral

Brown   

 Live

65 - 100 cm

Where it connects to 
the waste water pipe 
cut end off spigot or 
remove the blanking cap

Summary of Contents for AQM8L 29 I

Page 1: ...ng the laundry Washing recommendations Load balancing system Precautions and tips 12 General safety Disposal Opening the porthole door manually Care and maintenance 13 Cutting off the water and electr...

Page 2: ...for children Levelling 1 Place the washer dryer on a flat sturdy floor without resting it up against walls or cabinets 2 If the floor is uneven the front feet of the machine may be adjusted until it...

Page 3: ...an be plugged into a 13 amp socket for immediate use Before using the appliance please read the instructions below WARNING THIS APPLIANCE MUST BE EARTHED THE FOLLOWING OPERATIONS SHOULD BE CARRIED OUT...

Page 4: ...in accordance with the following code BLUE NEUTRAL N BROWN LIVE L GREEN YELLOW EARTH E Disposing of the appliance When disposing of the appliance please remove the plug by cutting the mains cable as...

Page 5: ...5 bar drum capacity 62 litres Spin speed up to 1200 rotations per minute Energy rated programmes according to regulation EN 50229 Wash programme temperature 60 C using a load of 8 kg Drying the small...

Page 6: ...the grille is not exceeded and that concentrated fabric softeners are diluted Standby mode This washer dryer in compliance with new energy saving regulations is fitted with an automatic standby syste...

Page 7: ...for the selected wash cycle the set delay time will appear on the display above see Running a wash cycle OPTION buttons with indicator lights press to select the available options The indicator light...

Page 8: ...ing may be selected A Based on a set time period between 60 and 180 B Based on the how damp the clothes are once they have been dried Iron dry slightly damp clothes easy to iron Cupboard dry suitable...

Page 9: ...ress To change a wash cycle once it has already started pause the washer dryer by pressing the START PAUSE button then select the desired cycle and press the START PAUSE button again To open the door...

Page 10: ...tion EN 50229 set wash cycle with a temperature of 60 C 2 Long wash cycle for cottons set wash cycle with a temperature of 40 C 3 Short wash cycle for cottons set wash cycle with a temperature of 40 C...

Page 11: ...d and fragrant Not recommended for wool or silk garments Do not add too much perfume to the sponge in order to avoid it dripping Do not add softeners or detergents Baby use the special Baby wash cycle...

Page 12: ...lf Always keep children well away from the appliance while it is operating If it must be moved proceed with the help of two or three people and handle it with the utmost care Never try to do this alon...

Page 13: ...ff the water and electricity supplies Turn off the water tap after every wash cycle This will limit wear on the hydraulic system in the machine and help to prevent leaks Unplug the appliance when clea...

Page 14: ...ow water to flow into the machine There is no water supply to the house The inlet valve filter is blocked The START PAUSE button has not been pressed The top of the drain hose is too low It must be fi...

Page 15: ...the door lock indicator light goes out shortly after the program has finished If there is no power to the machine you need to perform the manual unlocking procedure see Precautions Tips The door seal...

Page 16: ...of any consumable item or accessory These include but are not limited to plugs cables batteries light bulbs fluorescent tubes and starters covers and filters Replacement of any removable parts made o...

Page 17: ...t looking good and functioning efficiently throughout its life UK 08448 225 225 Republic of Ireland 0818 313 413 www hotpointservice co uk Appliance Registration We want to give you additional benefit...

Page 18: ...EN 18...

Page 19: ...EN 19...

Page 20: ...EN 20 195076163 07 01 2012 Xerox Fabriano...

Reviews: