background image

Introduction

3

CONTENTS

For Your Safety – Always

4

For Your Safety – Never

5

Know Your Oven

6

The Controls

7-8

Oven Timer Operation 

9

Know Your Timer

10

Electronic Clock & Automatic Oven Timer Operation

11-14

Solarplus Grill

15-16

Using the Oven as a Fan Oven

17-18

Using the Fan Oven for Circulaire Roasting

19

Circulaire Roasting Chart

20

Using the Oven for Other Functions

21-26

Temperature Conversion Scale

27

Oven Temperature Charts

28-29

Cooking Results Not Satisfactory

30

Care & Cleaning

31-34

Installation

35-39

Something Wrong?

40-41

Service

Back Cover

2

Summary of Contents for BS62

Page 1: ...is booklet The information can be found on the rating plate To the User You must read the instructions prior to installing and using the appliance and then retain them for future reference Note Timer...

Page 2: ...en Timer Operation 11 14 Solarplus Grill 15 16 Using the Oven as a Fan Oven 17 18 Using the Fan Oven for Circulaire Roasting 19 Circulaire Roasting Chart 20 Using the Oven for Other Functions 21 26 Te...

Page 3: ...void any fumes It is suggested that any pets be removed from the room until the smell has ceased This odour is due to any temporary finish on oven linings and elements and also any moisture absorbed b...

Page 4: ...ys keep the appliance clean as a build up of grease or fat from cooking can cause a fire Always follow the basic principles of food handling and hygiene to prevent the possibility of bacterial growth...

Page 5: ...ontainers as pressure can build up causing the container to burst Never store chemicals food stuffs or pressurised containers in or on the appliance or in cabinets immediately above or next to the app...

Page 6: ...trol Dual Grill Element Stayclean Liners 3 Oven Shelves Door Switch Oven Door Multifunction Selector 24 hour Digital Electronic Clock Oven Timer Rating plate Inner Door Glass Oven Light Oven Fan Meat...

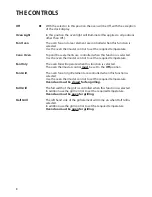
Page 7: ...icator light will illuminate This will remain on until the oven reaches the required temperature This light will then cycle on and off as the thermostat maintains control of the oven temper ature This...

Page 8: ...on is selected The oven thermostat control must be set to the Off position The oven fan and grill element are controlled when this function is selected Use the oven thermostat control to set the requi...

Page 9: ...7 We advise that dishes containing left over cooked poultry or meat e g Shepherd s Pie should not be cooked automatically if there is to be a delay period 8 Ensure that delay start times are kept to...

Page 10: ...a time period of up to 23 hours 59 minutes that will count down When it reaches zero the timer will emit an audible tone For Example If you set 20 minutes the audible tone will occur 20 minutes later...

Page 11: ...Press and hold the button a symbol will light up Step 3 With the button held in set the required Minute Minder time using the and buttons Release all buttons and the timer display will revert back to...

Page 12: ...it is possible to use the other oven only during the same Automatic programme At the end of the Automatic Cook Period the Auto Symbol will flash and an intermittent bleeping sound will be heard The b...

Page 13: ...nual operation see below Step 6 Press the button to cancel the bleeping If 2 minutes has not elapsed Step 7 Turn the oven control s to the OFF position Step 8 Press the button again to return the cook...

Page 14: ...ricity supply to the oven has been interrupted Reset the timer to the correct time of day Food in the oven may therefore not have been cooked before serving check food is thoroughly heated and complet...

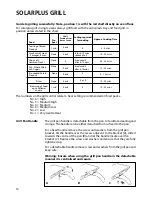
Page 15: ...down before cleaning Care must be taken to ensure the grill mesh is not distorted DO NOT store the grill pan handle on the grill pan grid when the rod shelf is in the top runner position There are tw...

Page 16: ...position 1 is with the rod shelf directly on oven floor Food Pre heat Shelf Position from base of oven Setting required for cooking Approx Cooking Time Toasting of Bread Products 1 min 5 or 6 6 3 6 mi...

Page 17: ...not use Meat pans larger than 375mm x 300mm 15 x 12 Baking Trays larger than 325mm x 250mm 13 x10 TEMPERATURE TIME If three shelves are in use to cook large quantities of food it may be necessary to...

Page 18: ...en reaches the required temperature The light will then automatically go off and on during cooking as the oven thermostat maintains the correct temperature Step 3 After use turn controls A and B to th...

Page 19: ...helf while cooking different types of food at the same temperature on other shelf positions three shelves maximum Operating Instructions STEP 1 Ensure the Oven Timer is set to manual Ensure that the o...

Page 20: ...e of joint 160 180 C 25 mins 450g 1lb 25 mins extra Pork chops 170 C 30 45 minutes LAMB Lamb any type of joint 160 180 C 25 mins 450g 1lb 25 mins extra CHICKEN TURKEY Up to 4kg 8lb 160 180 C 18 20 min...

Page 21: ...ration in their appearance may be noticed 3 Never cook joints of meat over 2 7kg 6 lb or poultry over 2 0kg 4lb 8oz We do not recommend that joints of meat or poultry are stuffed before cooking on the...

Page 22: ...e required temperature If Manual fan grilling is required always ensure the Timer is set to Manual Operating Instructions 1 Open the Oven door 2 Select the correct shelf position 3 Turn the selector s...

Page 23: ...After rinsing and drying meat place on the roasting rack over the pan supplied with the anti splash tray in position It is important that the anti splash tray is used as it will stop the splashing of...

Page 24: ...on shelf position 1 CHICKEN 1 0 180 30 30 60 Season and brush over with 1 5 180 30 30 75 melted butter to give nicely 2 0 170 35 30 100 browned skin Grill on shelf 2 5 170 35 30 115 position 1 over 2...

Page 25: ...eg cream cream cakes butter cream filled cakes gateaux cheese cakes iced cakes quiches pastries biscuits bread croissants fruit and many delicate frozen foods If fish meat and poultry are to be fan o...

Page 26: ...n the rod shelf as recommended in the chart for food being cooked 3 Position the food centrally under the grill elements 4 Turn selector B to the conv oven position 5 Turn the oven thermostat control...

Page 27: ...Mark 1 2 1 250 100 120 130 140 160 170 180 200 210 220 120 140 150 160 180 190 200 220 275 300 325 350 375 400 425 450 475 2 3 4 5 6 7 8 9 Main Conventional Oven Main Fan Oven TEMPERATURE CONVERSION S...

Page 28: ...f Meat 160 180 20 25 mins per 450g 1lb 20 mins extra 25 mins per 450g 1lb 25 mins extra 25 mins per 450g 1lb 25 mins extra 25 30 mins per 450g 1lb 25 mins extra 18 20 mins per 450g 1lb 20 mins extra 1...

Page 29: ...approx 3 3 1 2 hrs approx 170 190 180 190 190 200 160 130 140 180 190 190 200 180 190 190 200 150 160 140 150 200 80 90 Yes Yes Yes Yes Yes Yes Yes Position In Oven Pre heat Temperature C Time in mins...

Page 30: ...ways necessary 2 Cooking at too high a temperature reduce standard temperatures by 25 C for fan ovens 3 Using normal creaming method with a soft margarine If using soft margarine use an all in one met...

Page 31: ...arly it may be necessary in order to prevent heavy soiling to run the ovens without shelves or meat pan at a maximum setting for a couple of hours in Fan Oven mode only It should not normally be neces...

Page 32: ...amage the elements Clean using a damp soapy cloth if stubborn stains remain gently clean with a well soaped fine steel wool soap pad and soapy water and then wipe over with a damp cloth d Solarplus Gr...

Page 33: ...en door and remove the oven shelves Using a thick cloth grip the lamp lens unscrew anti clockwise and remove the lens Carefully unscrew the bulb anti clockwise Fit replacement bulb 15W 300 C SES Fit r...

Page 34: ...n removing and refitting DROP DOWN DOORS Remove the door inner glass as follows 1 Open the door fully and unscrew the two screws securing the glass panel so that the securing brackets can be turned Th...

Page 35: ...t Edition of the IEE Regulations WARNING THIS APPLIANCE MUST BE EARTHED a The oven unit is designed for mounting at a safe level into an oven housing which must be secured to the backing wall or alter...

Page 36: ...vide no apertures which could permit access to the oven unit when installed Mains Supply A 20 amp Double Pole control switch with a minimum contact clearance of 3mm must be fitted on or recessed in th...

Page 37: ...ng cabinet The rear of the unit should be in line with the conduit box b Ensure there is sufficient cable for any future servicing c Remove the terminal cover Prepare the cable pass it through the cab...

Page 38: ...ax 550mm min excluding pipes and other projections 578mm min 585mm max When fitting a hob above an oven always use these installation instructions in conjunction with the hob instructions Use 2 5mm2 H...

Page 39: ...inet 585mm max 578mm if cooker trim is to overlap top edge of shelf excluding pipes and other projections 6mm2 Cable if Hotplate fitted Conduit Box 4mm2 Cable if hob fitted adjacent to oven 4mm2 Cable...

Page 40: ...heck that the selector switch is set to Full Grill or Half Grill and that the grill control is turned on Check that the door is in its grilling position Grill does not work Check that the selector swi...

Page 41: ...l doors and lids where fitted Remove the mains cable where fitted by cutting off flush with the appliance and always ensure that no plug is left in a condition where it could be connected to the elect...

Page 42: ......

Page 43: ......

Page 44: ...ode Telephone number Model Serial number of the appliance Clear and concise details of the query or fault Place and Date of purchase Please keep the receipt as evidence will be required when the engin...

Reviews: