background image

If something goes wrong ...

32

To minimise the risk of injury to children please dispose of your product carefully and
safely.  Remove all doors and lids.  Remove the mains cable (where fitted) by cutting off
flush with the appliance and always ensure that no plug is left in a condition where it
could be connected to the electricity supply.
To help the environment,  Local Authority instructions should be followed for the disposal
of your product. 

Disposal of your product

Disposal of old electrical appliances

The European Directive 2002/96/EC on Waste Electrical and Electronic Equipment
(WEEE), requires that old household electrical appliances must not be disposed of in the
normal unsorted municipal waste stream. Old appliances must be collected separately in
order to optimise the recovery and recycling of the materials they contain and reduce
the impact on human health and the environment.

The crossed out “wheeled bin” symbol on the product reminds you of your
obligation, that when you dispose of the appliance it must be separately collected.
Consumers should contact their local authority or retailer for information
concerning the correct disposal of their old appliance.

continued...

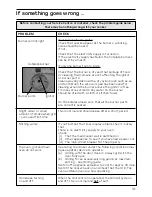
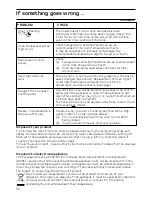
Timer is flashing 

00.00

The power supply to your oven has possibly been
interrupted, but has now come back on again. Reset the
timer to the correct time of day using the instructions
given in the timer section of the book.

Oven temperatures too
high or low

Check temperature and shelf positions are as
recommended in the Oven Temperature Charts.
It may be necessary to increase or decrease the
recommended temperature slightly to suit your taste.

Oven does not cook
evenly

Check: 
(a)  Temperature and shelf positions are as recommended

in the Oven Temperature Charts.

(b)  Oven utensils being used allow sufficient air flow 

around them.

Oven light does not
work

The oven light  is not covered by the guarantee. The part is
easily changed (see section 'Replacement of Oven Light'). 
A new light bulb may be obtained from our Parts
department see Key Contacts, back page.

Draught from beneath 
control panel

A gentle flow of air will be blown from beneath the control
panel when the appliance is used. If the appliance is still
warm, this cooling fan may run on, or restart itself when all
controls have been turned off.
The fan will stop once the appliance has been cooled. This is
normal and not a fault.

Steam is a by - product of cooking any food with a high
water contact. To help minimise always:
(a)  Try to avoid leaving food in the oven to cool after 

being cooked.

(b)  Use a covered container, wherever possible. 

Steam / Condensation in
the oven after use.

PROBLEM

CHECK

Summary of Contents for EG94

Page 1: ...EG94 To the Installer Before installation fill in the product details on the back cover of this book The information can be found on the rating plate To the User You must read the instructions prior...

Page 2: ...Main Oven Cooking Temperature Charts 25 27 Care and Cleaning 28 30 If something goes wrong If it still won t work 31 32 Installation 33 38 Hotpoint Service Cover 39 Key Contacts back page 2 Retention...

Page 3: ...er has been installed in accordance with the Installation Instructions The cooker is designed specifically for domestic use and responsibility will not be accepted for use in any other installation Wh...

Page 4: ...he oven grill door closed when the appliance is not in use Always place pans centrally over the hotplate burners and position them so that the handles cannot accidentally be caught or knocked or becom...

Page 5: ...3 full of oil and never use a lid DO NOT LEAVE DEEP FAT FRYING PANS UNATTENDED WHILE COOKING Never use proprietary spillage collectors on the hotplate Never use the appliance as a room heater Never d...

Page 6: ...rt Main Oven wire work shelf support Telescopic meat pan runners Oven Light Main Oven door Ignition button Oven light Door Switch NOTE To keep the controls cool when the appliance is used a flow of ai...

Page 7: ...control knob fully clockwise to the symbol O its off position The main oven light can be switched on when the oven is not in use by pressing the oven light button on the display The oven light will al...

Page 8: ...t anywhere between 100 C and 220 C The top oven ON indicator TOP and the top oven preheat temperature indicator symbol will be on the display bottom left hand corner The top oven preheat temperature i...

Page 9: ...mperature indicator symbol will switch OFF and an audible tone will sound when the main oven has reached the required temperature The main oven has eight cooking functions Use the main oven control to...

Page 10: ...on and reduced consumption In traditional cooking use only one rack to ensure good heat distribution By using the various shelf positions available you can balance the quantity of heat between the upp...

Page 11: ...adjust the cooking duration Bread cycle Auto this mode is fully automatic and lasts for 1 hour When this mode is selected the time and temperature cannot be adjusted It is suitable for baking bread w...

Page 12: ...and cream may curdle during the delay period so it is best to add these ingredients just before serving Foods which discolour should be protected by coating in fat or tossing in water to which lemon j...

Page 13: ...SET At the end of the set time an audible tone will be heard and the bell symbol will go out After a few seconds the audible tone will stop and after a few seconds the display will revert back to the...

Page 14: ...has been set This will change every few seconds when the display will show the cooking duration remaining THE COOKING DURATION IS NOW SET At the end of the set cooking duration End will show in the di...

Page 15: ...s started At the end of the cooking duration End and the cooking duration symbol will show in the display and an audible tone will be heard for a few seconds Turn the main oven control to O the OFF po...

Page 16: ...jority of cases it is not necessary to pre heat the oven However pre heating is recommended when cooking items such as Yorkshire puddings whisked sponges and bread Your experience with the cooker will...

Page 17: ...se the hotplate unless all pan supports are in position DO NOT use mis shapen pans which may be unstable DO NOT use round base woks directly on the pan supports Each burner is fitted with a spark igni...

Page 18: ...ot oil or fat Frozen foods in particular will cause frothing and spitting if added too quickly 5 Always keep the outside of the pan clean and free from streaks of oil or fat HOW TO DEAL WITH A FAT FIR...

Page 19: ...sh may become soiled Do not attempt to clean it while the grill is still on Turn the cooker off at the control unit and wait until it has cooled down before cleaning Care must be taken to ensure the g...

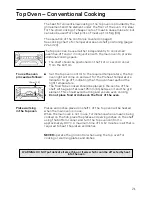
Page 20: ...in the top oven continued Setting Approx Cooking Time Food Comments Pre heat Shelf Position from base of oven Toasting of Bread Products 1 min 3 or 2 Maximum 3 5 minutes Grill pan and grid Small cuts...

Page 21: ...the required temperature the top oven light will come on and wait for the Preheat Temperature Indicator to go off indicating that the oven has reached the right temperature The food to be cooked shou...

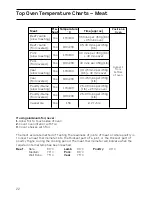
Page 22: ...ng Pork foil covered Veal slow roasting Veal foil covered Poultry Game slow roasting Poultry Game foil covered Casserole If using aluminium foil never 1 Allow foil to touch sides of oven 2 Cover oven...

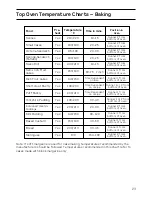
Page 23: ...om bottom of oven Runner 1 from bottom of oven Runner 1 from bottom of oven Runner 1 from bottom of oven Runner 2 from bottom of oven 20 25 20 30 20 25 10 15 60 75 7 inch Time Dependent on size Time D...

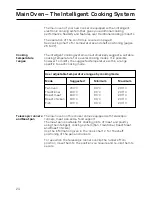
Page 24: ...each cooking mode Cooking temperature ranges The main oven on this cooker comes equipped with telescopic runners meat pan and a food support The meat pan is suitable for cooking joints of meat and pou...

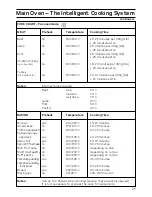
Page 25: ...90 C BAKING Preheat Temperature Cooking Time Scones yes 210 220 C 10 15 minutes Small cakes no 170 180 C 15 25 minutes Victoria sandwich no 160 170 C 20 30 minutes Fatless sponge sandwich yes 180 190...

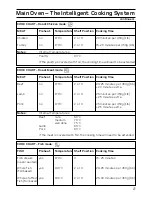
Page 26: ...atures Beef rare 60 C medium 70 C well done 75 C Lamb 80 C Pork 80 C Poultry 90 C BAKING Preheat Temperature Shelf Position Cooking Time Scones yes 220 C 3 10 15 minutes Small cakes yes 180 190 C 3 15...

Page 27: ...e Fish steaks yes 170 C 3 15 25 minutes open roasted Whole fish yes 180 C 2 or 3 20 25 minutes per 450g 1lb foil baked Whole stuffed yes 180 C 2 or 3 25 30 minutes per 450g 1lb fish foil baked COOK CH...

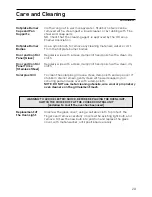
Page 28: ...kind The oven shelves can be cleaned either in a dishwasher or by using a fine steel wool soap pad The grill and meat pans can be cleaned in warm soapy water using a fine steel wool soap pad to remov...

Page 29: ...eel Solarplus Grill Cloth wrung out in warm soapy water Stubborn stains can be removed with a cream paste liquid cleaner or by rubbing with fine steel wool soap pads NB Check that the cleaning agent i...

Page 30: ...oo difficult simply lift the inner glass to ease the end caps out of position NOTE If you need to use a tool be careful not to damage the extrusion or end cap 2 Carefully slide the inner glass towards...

Page 31: ...a cloth or kitchen towel On the hotplate make sure that all the burner parts are correctly seated Top oven grill and main oven do not work Nothing works If you find that the timer display is blank the...

Page 32: ...power supply to your oven has possibly been interrupted but has now come back on again Reset the timer to the correct time of day using the instructions given in the timer section of the book Oven tem...

Page 33: ...t of safety to ensure compliance with the law In the UK CORGI registered installers work to safe standards of practice The cooker must also be installed in accordance with BS 6172 Failure to install t...

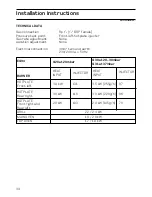
Page 34: ...nt None Electrical connection 4mm2 twin and earth 230 240V a c 50Hz HEAT INPUT G20 at 20mbar G30 at 28 30mbar G31 at 37mbar BURNER INJECTOR 2 2 2 4 kW GRILL 1 8 2 0 kW MAIN OVEN 1 7 1 9 kW TOP OVEN 3...

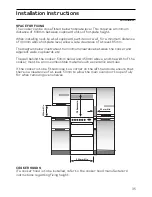
Page 35: ...65mm The diagram below illustrates the minimum clearance between the cooker and adjacent walls cupboards etc The wall behind the cooker 50mm below and 450mm above and the width of the cooker must be a...

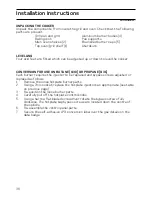
Page 36: ...E G30 OR PROPANE G31 Each burner requires the injector to be replaced and bypass screws adjusted or replaced as follows 1 Remove the loose hotplate burner parts 2 Using a 7mm socket replace the hotpla...

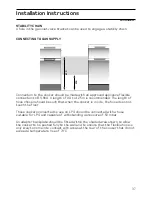
Page 37: ...ose cookers converted to use on LPG should be connected with a hose suitable for LPG and capable of withstanding a pressure of 50 mbar An adaptor backplate should be fitted within the shaded area show...

Page 38: ...ppression of radio and television interference Access to the cooker terminals is by un clipping the cover The mains cable must pass through the cable clamp and the screws must be fully tightened Suffi...

Page 39: ...g is carried out by our own Service Organisation located throughout the United Kingdom and Eire We will be happy to deal with any problems which you may have Hotpoint s Extended Warranties Whether you...

Page 40: ...UK 08709 066 066 Monday to Friday 8am to 7 30pm Saturday 8 30am to 5 30pm Sunday 9 30am to 3 30pm www hotpointservice co uk Republic of Ireland 0818 313 413 Note Our operators will require the follow...

Reviews: