background image

22

Care and Cleaning

CLEANING
THE DOORS

Take particular care not to damage the inner surface of the door inner glass that is coated
with a heat reflective layer. Do not use scouring pads, or abrasive powder,which will scratch
the glass. Ensure that the glass panel is not subjected to any sharp mechanical blows.

Stubborn stains can be removed by using a fine steel wool soap pad. For slight soiling theinner glass
panel may be cleaned, while still warm, without removing it from the door. Aftercleaning, rinse and dry
with a soft cloth.

SIDE OPENING
DOORS

Cleaning the door glass is the same as the drop down doors, except take care to support the
weight of the inner glass when removing and refitting.

DROP DOWN
DOORS

Remove the door inner glass as follows.

1. Open the door fully and remove the extrusion end caps (This should be done by hand but if it proves
too difficult, simply lift the inner glass to ease the end caps out of position).

NOTE: If you need to use a tool - be careful not to damage the extrusion or end cap.

2. Carefully slide the inner glass towards you andwithdraw it from its locating slots.  Ensure that the
door is not allowed to slam shut, due to the reduction in door weight.  Clean the glass as described
above.
3. The inside of the outer door glass can now be cleaned while still fitted to the cooker.

NEVER OPERATE THE COOKER WITHOUT THE INNER DOOR GLASS IN POSITION.

Refit the door inner glass as follows.

1. Open the door fully.
2. Locate the inner door glass into its slots, so that the printing is readable from the face nearest the
oven in the closed position and the widest black band is towards the bottom of the door. The inner door
glass has a special reflective coating on one side, in order to minimise surface temperatures and
energy consumption during use, it is important it is fitted correctly.
3.Carefully slide the glass into its slots as far as it will go and replace the end caps.

Summary of Contents for EW48G

Page 1: ...K EW48P EW48X To the Installer Before installation fill in the product details on the back cover this book The information can be found on the rating plate To the User You must read the instructions prior to installing and using the appliance and then retain them for future reference ...

Page 2: ...ven Temperature Charts Baking 17 Oven Temperature Charts Meat 18 Main Oven Fan Cooking 19 Using the Main Oven for Other Functions 20 Care and Cleaning 21 Cooking Results Not Satisfactory 23 Something Wrong With Your Cooker 24 Electronic timer 25 Technical Characteristics 26 After Sales Service 30 Hotpoint Guarantee 31 Key Contacts Back Cover You must read these instructions prior to using your app...

Page 3: ...sure that the room is well ventilated e g open a window or use an extractor fan and that persons who may be sensitive to the odour avoid any fumes It is suggested that any pets be removed from the room until the smell has ceased This odour is due to temporary finish on oven liners and elements and also any moisture absorbed by the insulation The guarantee is subject to the provisions that the appl...

Page 4: ...nal board cover see fig A l Pull and open the junction blok lid Important the wires in the mains lead are coloured in accordance with the following code Green Yellow Earth Blue Neutral Brown Live As the colours of the wires in the mains lead may not correspond with the coloured markings identifying the terminals in your plug proceed as follows Green Yellow wire to terminal marked E or or coloured ...

Page 5: ...o be used free standing Adjacent side walls which project above hob level must not be nearer to the cooker than 150mm and should be protected by heat resistant material Any overhanging surface or cooker hood should not be nearer than 650mm Before moving your cooker check that it is cool and switch off at the cooker control unit Movement of your cooker is most easily achieved by lifting the front a...

Page 6: ...les are kept away from the edge of the hob and cannot become heated by other hotplate pans l Take care to avoid heat steam burns when operating the controls l Turn off the electricity supply at the wall switch before cleaning and allow the appliance to cool l Make sure the shelves are in the correct position before switching on the oven l Keep the oven and grill doors closed when the appliance is ...

Page 7: ...the hob l Never fill a deep fat frying pan more than 1 3 full of oil or use a lid DO NOT LEAVE UNATTENDED WHILE COOKING l Never operate the grill with the grill door closed as this will cause the appliance to overheat l Never use the appliance as a room heater l Never use the grill to warm plates l Never dry any items on either the hob or oven doors l Never install the appliance next to curtains o...

Page 8: ...IN OVEN WIREWORK SHELF SUPPORTS OVEN ROD SHELVES GRILL 1700W 1200W 1200W 1700W GRILL DOOR SWITCH GRILL MEAT PAN WITH REMOVABLE HANDLE AND WIRE FOOD SUPPORT MODEL SERIAL NUMBER HOB VENTILATION SLOTS TOP OVEN GRILL DOOR REMOVABLE Hob Hot Indicators ...

Page 9: ...elements in the top oven The temperature in the oven can be set anywhere between 100 C and 220 C The thermostat light will glow initially and remain on until the oven reaches the required temperature It will then cycle off and on as the oven thermostat maintains the correct temperature The off position is identified by an 0 Main oven control This control switches on the main oven To select Fan Coo...

Page 10: ...saucepan and the amount of liquid Pans can be placed on the unheated areas of the panel when cooking is finished and before serving food It is inadvisable at any time to leave a heating element switched on without a pan in position as this wastes energy and could make soil or rub off from aluminium pans more difficult to remove To protect elements against over heating safety cut outs have been inc...

Page 11: ...nd fry fish 6 Frying potatoes Bringing water to the boil Deep fat frying Dissolve sugar for preserve making Safety requirements for deep fat frying 1 Use a deep pan large enough to completely cover the appropriate heating area 2 Never fill the pan more than one third full of oil 3 Never leave oil or fat unattended during the heating or cooking period 4 Never try to fry too much food at a time espe...

Page 12: ...ra Care Copper Toughened glass or ceramic glass pottery Not Recommended Mild steel Ferro magnetic or stainless with a magnetic sandwich base Ceramic s y a w l A r e v e N Use good quality flat based cookware on all electric heat sources Use gauze metal pan diffusers asbestos mats and stands e g Wok stands they can use overheating Always ensure pans have clean dry bases bifore use Use utensils with...

Page 13: ... aluminium or wok stand Do not leave any utensils food or combustible items on the hob when it is not in use Do not place aluminium or plastic foil or plastic containers on the hob Do not leave the hotplates or cooking areas switched On unless they are being used We recommend not to place large preserving pans or fish kettles across two heating areas Do not leave utensils partly covering the heate...

Page 14: ... A stainless steel pan with a sandwich base of aluminium and stainless steel is an excellent conductor of heat and is suitable for use on ceramic and halogen hobs providing they are used in accordance with the saucepans manufacturers recommendations Stainless steel pans with a sandwich base of aluminium and copper are excellent conductors of heat If using stainless steel saucepans with aluminium a...

Page 15: ...ess fat build up in the bottom of the pan could cause a fire hazard Never line grill pan with foil Fixing the Grill Pan Handle The grill pan handle is detachable from the pan to facilitate cleaning and storage Fix the grill pan handle securely in position before use The handle fits onto the grill pan edge with the small recess Fig 1 Tilt the handle over the recess and slide it towards the centre F...

Page 16: ...stat light to go off indicating that the oven has reached the right temperature l The food to be cooked should be placed in the centre of the shelf with a gap of at least 25mm 1in between it and the grill element This should avoid burning and ensure even cooking l Do not place food or dishes on the floor of the oven Platewarming in the top oven Plates and dishes placed on the floor of the top oven...

Page 17: ...en 20 25 20 30 20 25 10 15 60 75 7 inch Time Dependent on s ize Time Dependent on r ecipe Time Dependent on r ecipe 30 40 20 30 90 120 40 50 30 45 150 180 180 190 170 180 180 190 200 210 150 160 140 150 190 200 200 210 190 200 200 210 140 150 150 160 200 210 100 Yes Yes Yes Yes Yes Yes Yes Yes Yes Yes Yes Yes Yes Yes Temper at ur e C Top Oven Cooking Fan Oven Cooking Time in mins B aking S mall Ca...

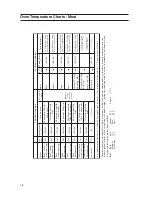
Page 18: ... f oil B eef Meat 160 180 20 25 mins per 450g 1lb 20 mins ext r a 20 30 mins per 450g 1lb 25 mins ext r a 25 30 mins per 450g 1lb 25 mins ext r a 25 30 mins per 450g 1lb 25 mins ext r a 18 20 mins per 450g 1lb 20 mins ext r a 13 15 mins per 450g 1lb at 150 160 o C allow 12 mins per 450g at 150 o C 1 1 2 2 Hr s 160 180 160 180 160 170 160 180 140 150 Temper at ur e C Time appr ox Lamb Por k Veal Ch...

Page 19: ...the correct temperature The heat for fan cooking in the main oven is provided by an element situated at the back of the oven around the fan Fan cooking is ideal for large poultry or joints of meat reducing cooking times and often eliminating the need for pre heating the oven It is also ideal for batch cooking where food is cooked on morethan one level because the forced circulation of hot air give...

Page 20: ...ill fit into the oven ensuring enough room for air to circulate 2 All dishes cooked on the slow setting will require a minimum of 6 hours however if they are cooked for 1 2 hours longer then deterioration in their appearance may be noticed 3 Never cook joints of meat over 2 7kg 6 Ib or poultry over 2 0kg 4lb 8oz We do not recommend that joints of meat or poultry are stuffed before cooking on the s...

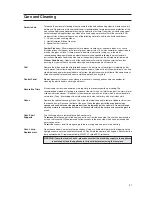
Page 21: ...ish with a dry cloth Control Panel Do not use cream cleaners oven cleaners or aerosols scouring pads or abrasive powder for cleaning the plastic knobs as damage will occur Decorative Trims It is advisable to clean the decorative trims regularly to prevent any build up of soiling The recommended method of cleaning is to wipe over the trims with a soft cloth wrung out in warm water or mild non abras...

Page 22: ...roves too difficult simply lift the inner glass to ease the end caps out of position NOTE If you need to use a tool be careful not to damage the extrusion or end cap 2 Carefully slide the inner glass towards you andwithdraw it from its locating slots Ensure that the door is not allowed to slam shut due to the reduction in door weight Clean the glass as described above 3 The inside of the outer doo...

Page 23: ...positioned centrally in the oven Food is taking too long to cook Only cook one item at a time to avoid overloading the oven Disposal of your product To minimise the risk of injury to children please dispose of your product carefully and safely Remove all doors and lids Remove the mains cable where fitted by cutting off flush with the appliance and always ensure that no plug is left in a condition ...

Page 24: ...to the recommendations in these instructions Marks appearing on hotplates Can not clean hob hotplates The hob surround can be cleaned with warm soapy water and a cream cleaner such as Cif The sealed hotplates should be cleaned regularly please refer to the Care and Cleaning section for further information Please note that replacement hob cleaning kits are available from our parts department see Ke...

Page 25: ...automatically after 10 seconds have passed To set the timer Note This function does not interrupt cooking and does not affect the oven it is simply used to activate the buzzer when the set amount of time has elapsed 1 Press the button several times until the icon and the first two numerical digits on the display start to flash 2 Use the and buttons to adjust the hour value 3 Press the button again...

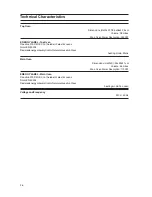
Page 26: ...ic ovens Norm EN 50304 Declared energy consumption for Natural convection Class heating mode Static Main Oven Dimensions HxWxD 34x39x41 cm Volume 54 Litres Max Oven Power Absorption 1700 W ENERGY LABEL Main Oven Directive 2002 40 EC on the label of electric ovens Norm EN 50304 Declared energy consumption for Natural convection Class heating mode Fan oven Voltage and Frequency 240V 50Hz ...

Page 27: ...27 ...

Page 28: ...28 ...

Page 29: ...29 ...

Page 30: ...All repairs include a parts and labour guarantee for 12 months from the date of the repair If you require any information or have any questions about your appliance our operators are on hand with help and advice All this ensures that you will receive the best available after sales service possible Extended Warranties UK 08709 088 088 www theservicecentre co uk Republic of Ireland 1850 502 200 Whet...

Page 31: ...d and is subject to the following provisions that your appliance l Has been installed and used correctly in accordance with this instruction booklet l Has been used solely for domestic purposes and is located on domestic premises ie not for commercial or trade use l Has been properly connected to a suitable electrical supply voltage as stated on the appliance rating plate l Has not been subject to...

Page 32: ...rvicecentre co uk Republic of Ireland 1850 302 200 Note Our operators will require the following information Model number Serial number Extended Warranties UK 08709 088 088 Open 8 to 8 Mon Sun www theservicecentre co uk Republic of Ireland 1850 502 200 Genuine Parts and Accessories UK 08709 077 077 Open 8 30 to 5 30 Mon Fri 9 to 12 Sat www theservicecentre co uk Republic of Ireland 01 842 6836 Ind...

Reviews: