Door Reversal
14
CLEANING &
MAINTENANCE
You will need a cross head screwdriver to carry out this procedure.
Our Service Department can arrange for an Engineer to do the conversion for you but
a charge will be made.
WARNING: Switch off electrical supply and pull out the mains plug.
Remove loose items/fittings from inside the freezer.
If you have previously set up and used the freezer and since decided to reverse the
doors, you must remove stored food, wrap or cover and place into insulated
containers to keep frozen whilst carrying out this operation.
1.
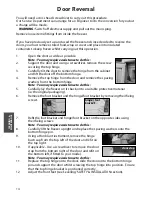
Open the door as wide as possible.
Note : You may require assistance to do this:
2.
Support the door and using a screwdriver, remove the screw
securing the top hinge
3.
Carefully tilt the door to remove the hinge from the cabinet
and lift the door off the bottom hinge.
4.
Remove the top hinge from the door and remove the spacing
washers from the bottom hinge.
Note : You may require assistance to do this:
5.
Carefully lay the freezer on its back, onto a suitable protective material
(ie. the original packaging).
6.
Remove the foot bracket and the hinge/foot bracket by removing their fixing
screws.
7.
Refit the foot bracket and hinge/foot bracket on the opposite sides using
their fixing screws.
Note : You may require assistance to do this:
8.
Carefully lift the freezer upright and replace the spacing washers onto the
bottom hinge pin.
9.
Using a thin blunt instrument, remove the hinge
bush cap from the top left of the door and refit on
the top right.
10.
If applicable - Use a screwdriver to remove the door
stop from the bottom right of the door and refit on
the bottom left, if fitted to your model.
Note : You may require assistance to do this:
11.
Replace the top hinge onto the door, slide the door onto the bottom hinge
pin and support the door whilst screwing the top hinge into position. Ensure
that the top hinge bracket is positioned correctly.
12.
Adjust the front feet (see ‘Levelling’ SAFETY & INSTALLATION section).
Note : Let the freezer stand upright in it’s final location for at least 15
minutes before plugging in and switching on the electricity supply.
foot bracket
hinge / foot
bracket
door stop
Summary of Contents for FZA30
Page 17: ...Notes 17...


