background image

EN

7

CARE AND MAINTENANCE

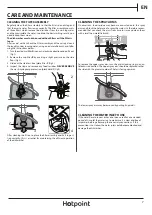
CLEANING THE FILTER ASSEMBLY

Regularly clean the filter assembly so that the filters do not clog and 

that the waste water flows away correctly. The filter assembly consists 

of three filters which remove food residues from the washing water 

and then recirculate the water: to obtain the best washing results, you 

need to keep them clean.

The dishwasher must not be used without filters or if the filter is

loose.

After several washes, check the filter assembly and if necessary clean it 

thoroughly under running water, using a non-metallic brush and follo-

wing the instructions below:
1.  Turn the cylindrical filter 

A

 in an anti-clockwise direction and pull it out 

(Fig 1)

.

2.  Remove the cup filter 

B

 by exerting a slight pressure on the side 

flaps 

(Fig 2)

.

3.  Slide out the stainless-steel plate filter 

C


(Fig 3)

.

4.  Inspect the trap and remove any food residues. 

NEVER REMOVE


the wash-cycle pump protection (black detail) 

(Fig 4)

.

A

A

B

C

2

1

4

3

After cleaning the filters, re-place the filter assembly and fix it in posi-

tion correctly; this is essential for maintaining the efficient operation 

of the dishwasher.

CLEANING THE SPRAY ARMS

On occasions, food residue may become encrusted onto the spray 

arms and block the holes used to spray the water. It is therefore recom-

mended that you check the arms from time to time and clean them 

with a small non-metallic brush.

To remove the upper spray arm, turn the plastic locking ring in an an-

ticlockwise direction. The upper spray arm should be replaced so that

the side with the greater number of holes is facing upwards.

The lower spray arm may be removed by pulling it upwards.

CLEANING THE WATER INLET HOSE

If the water hoses are new or have not been used for an extended

period of time, let the water run to make sure it is clear and free of

impurities before performing the necessary connections. If this

precaution is not taken, the water inlet could become blocked and

damage the dishwasher. 

Summary of Contents for HEFC 2B19 C UK

Page 1: ...rogram selection button with indicator light 3 Half Load button with indicator light 4 Salt refill indicator light 5 Rinse Aid refill indicator light 6 Program indicator lights 7 Delay indicator light 8 Delay button with indicator light 9 Tablet Tab button with indicator light 10 Start Pause button with indicator light Drain out 1 2 4 3 5 6 7 8 9 10 THANK YOU FOR BUYING A HOTPOINT PRODUCT In order...

Page 2: ...G THE RINSE AID DISPENSER Rinse aid makes dish DRYING easier The rinse aid dispenser A should be filled when the RINSE AID REFILL indicator light in the control panel is lit 1 Open the dispenser B by pressing and pulling up the tab on the lid 2 Pour in the rinse aid max 110 ml making sure it does not overflow from the dispenser If this happens clean the spill immediately with a dry cloth 3 Press t...

Page 3: ...emperature and pressure of the incoming water room temperature amount of detergent quantity and type of load load balancing additional selected options and sensor calibration The sensor calibration can increase program duration up to 20 min Standby consumption Left on mode consumption 5 W Off mode consumption 0 5 W PROGRAMS DESCRIPTION Instructions on wash cycle selection ECO Normally soiled crock...

Page 4: ...used in order to save water electricity and detergent SelecttheprogramandpresstheHALFLOAD button the indicator light will light up Press the HALF LOAD button to deselect this option Remember to halve the amount of detergent TABLET This setting allows you to optimize the performance of the program according to the type of detergent used Press the TABLET button the indicator light will light up if y...

Page 5: ...r sprays are stronger and allow a higher washing performance After loading the appliance make sure that the sprayer arms can rotate freely HYGIENE To avoid odour and sediment which can be accumulated in the dishwasher please run a high temperature program at least one a month Use a tea spoon of detergent and run it without the loading to clean your appliance UNSUITABLE CROCKERY Wooden crockery and...

Page 6: ...t three different heights to optimize the arrangement of crockery inside the rack Wine glasses can be placed safely in the foldable flaps by inserting the stem of each glass into the corresponding slots For optimum drying results incline the foldable flaps more To change the inclination pull up the foldable flap slide it slightly and position it as you wish LOWER RACK For pots lids plates salad bo...

Page 7: ... NEVER REMOVE the wash cycle pump protection black detail Fig 4 A A B C 2 1 4 3 After cleaning the filters re place the filter assembly and fix it in posi tion correctly this is essential for maintaining the efficient operation of the dishwasher CLEANING THE SPRAY ARMS On occasions food residue may become encrusted onto the spray arms and block the holes used to spray the water It is therefore rec...

Page 8: ...un new program without detergent The dishes are not clean The crockery has not been arranged properly Arrange the crockery correctly see LOADING THE RACKS The spray arms cannot rotate freely being hindered by the dishes Arrange the crockery correctly see LOADING THE RACKS The wash cycle is too gentle Select an appropriate wash cycle see PROGRAMS TABLE An excessive amount of foam has been produced ...

Reviews: