background image

CARE AND CLEANING

(continued)

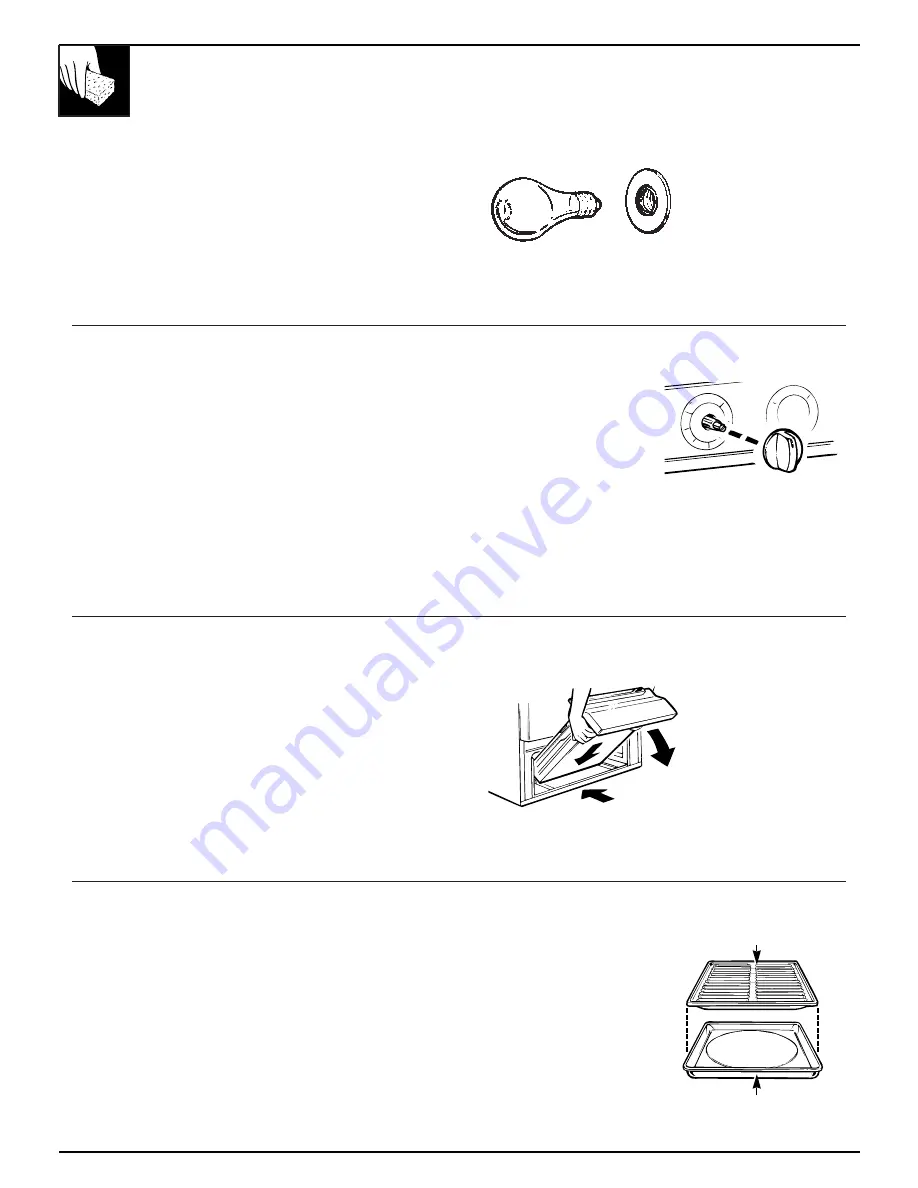
Oven Light Bulb 

(on some models)

The light bulb is located in the upper left corner 
of the oven. Before replacing your oven light bulb,
disconnect the electrical power to the range at the
main fuse or circuit breaker panel or unplug the 
range from the electrical outlet. Let the bulb cool
completely before removing it. Replace the bulb with
a 40 watt appliance bulb only. Do not touch a hot bulb
with a damp cloth as the bulb will break.

Control Panel and Knobs

It’s a good idea to wipe the control panel after each
use of the oven. Clean with mild soap and water or
vinegar and water, rinse with clean water and polish
dry with a soft cloth.
Do not use abrasive cleansers, strong liquid cleaners,
plastic scouring pads or oven cleaners on the control
panel—they will damage the finish. A 50/50 solution
of vinegar and hot water works well.

The control knobs may 
be removed for easier
cleaning. To remove 
knob, pull it straight 
off the stem.
Wash the knobs in soap
and water or a vinegar 
and hot water solution 
but do not soak. 
Metal parts can be cleaned with soap and water. 
Do not use steel wool, abrasives, ammonia, acids 
or commercial oven cleaners. Dry with a soft cloth.

Removable Broiler Drawer 

(on some models)

To remove:
1. 
When the broiler is cool, remove the grid and pan.
2. Pull the broiler drawer out until it stops, then push

it back in about one inch.

3. Grasp the handle, lift and pull broiler drawer out.

Clean the broiler drawer with hot soapy water.

To replace:
Hold the broiler drawer in the raised position as you
slide it partway into the range. Then lower the drawer
and push it completely closed.

Broiler Pan and Grid

After broiling, remove the broiler pan. Remove the
grid from the pan. Carefully pour out grease from the
pan into a proper container. Wash and rinse the broiler
pan and grid in hot water with a soap-filled or plastic
scouring pad.
If food has burned on, sprinkle the rack with detergent
while hot and cover with wet paper towels or a
dishcloth. Soaking the pan will remove burned-on foods.

Both the broiler pan 
and grid can also be
cleaned in a dishwasher.
Do not store a soiled
broiler pan and grid
anywhere in the range.
CAUTION: Do not clean
the broiler pan or grid in a
self-cleaning oven.

26

Pan

Grid

Summary of Contents for RGB501

Page 1: ...king 16 17 Broiling Broiling Guide 21 22 Control Settings 14 Door Removal 27 Light Bulb Replacement 14 26 Oven Bottom 25 Oven Vents 15 29 Roasting Roasting Guide 19 20 Shelves 7 15 19 27 Power Outage 14 Safety Instructions 2 7 Surface Cooking 11 13 Burners 11 13 Control Settings 12 Cooktop Comparison 11 Cookware Tips 13 Flame Size 13 Lighting Instructions 11 12 Warranty Back Cover GE Answer Center...

Page 2: ...u the range Save time and money Before you request service Check the Before You Call for Service section in the back of this guide It lists causes of minor operating problems that you can correct yourself Do not store or use gasoline or other flammable vapors and liquids in the vicinity of this or any other appliance WHAT TO DO IF YOU SMELL GAS Do not try to light any appliance Do not touch any el...

Page 3: ...r than a yellow flame will minimize incomplete combustion Exposure to these substances can be minimized by venting with an open window or using a ventilation fan or hood Fluorescent light bulbs and safety valves on standing pilot ranges contain mercury If your model has these features they must be recycled according to local state and federal codes When You Get Your Range Have the installer show y...

Page 4: ...cidental tipping of the range attach it to the wall and floor by installing the Anti Tip device supplied To check if the device is installed and engaged properly carefully tip the range forward The Anti Tip device should engage and prevent the range from tipping over If you pull the range out from the wall for any reason make sure the device is properly engaged when you push the range back against...

Page 5: ...Surface Cooking Always use the LITE position on electric ignition models or the HI position on standing pilot models when igniting the top burners and make sure the burners have ignited Never leave the surface burners unattended at high flame settings Boilovers cause smoking and greasy spillovers that may catch on fire Adjust the top burner flame size so it does not extend beyond the edge of the c...

Page 6: ...sing glass cookware make sure it is designed for top of range cooking Keep all plastics away from the top burners Do not leave plastic items on the cooktop they may melt if left too close to the vent Do not leave any items on the cooktop The hot air from the vent may ignite flammable items and will increase pressure in closed containers which may cause them to burst To avoid the possibility of a b...

Page 7: ...ctions Use only glass cookware that is recommended for use in gas ovens Always remove the broiler pan from range as soon as you finish broiling Grease left in the pan can catch fire if oven is used without removing the grease from the broiler pan When broiling if meat is too close to the flame the fat may ignite Trim excess fat to prevent excessive flare ups Make sure the broiler pan is in place c...

Page 8: ...y Sealed Burners Your range is equipped with one of the two types of surface burners shown above Standard Twin Burners Burner Cap Burner Head Drip Pan on some models Drip Pan on some models Burner TIMER ON OFF CLOCK 1 2 3 4 6 7 5 9 11 16 15 13 12 10 14 8 ...

Page 9: ...wer 4 5 7 21 22 26 8 Broiler Pan and Grid 7 19 21 22 26 9 Model and Serial Numbers located on front frame of range 2 behind broiler drawer 10 Lift Off Oven Door 21 22 27 11 Anti Tip Device Lower right rear corner on range back 2 4 31 40 See the Installation Instructions 12 Oven Bottom 25 28 13 Oven Shelves number of shelves varies 7 15 19 27 14 Oven Interior Light on some models 14 26 15 Oven Ligh...
Page 10: ...eft without pushing in until the pointer reaches the number of minutes or hours you want to time At the end of the set time a buzzer sounds to tell you time is up Turn the knob without pushing in until the pointer reaches OFF and the buzzer stops OFF 12 9 3 6 0 4 3 2 1 30 20 10 To Set the Timer To Change or Cancel the Timer Setting 1 Press the TIMER ON OFF pad 2 Use the UP and DOWN pads to set the...

Page 11: ...e heat of the pan but cooking stops right away Electric Coil Flattened metal Heats by direct contact with the pan and by heating the air under the pan For best tubing containing cooking results use good quality pans Electric coils are more forgiving of electric resistance warped pans than radiant or solid disks Heats up quickly but does not change wire suspended heat settings as quickly as gas or ...

Page 12: ... setting The right front burner is higher powered than the others and will bring liquids to a boil quicker natural gas installations only To Light a Surface Burner Electric Ignition Models Push the control knob in and turn it to LITE You will hear a little clicking noise the sound of the electric spark igniting the burner Standing Pilot Models Push control knob in and turn it to HI position The bu...

Page 13: ... alone has poor heating properties and is usually combined with copper aluminum or other metals for improved heat distribution Combination metal skillets usually work satisfactorily if they are used with medium heat as the manufacturer recommends Stove Top Grills on models with sealed burners Wok This Way on models with sealed burners Do not use stove top grills on your sealed gas burners If you u...

Page 14: ...s the oven burner The pilot port is at the back about one inch below the burner 4 Using a long match or match holder reach in and light the oven pilot To light the oven burner turn the OVEN CONTROL knob to the desired temperature The burner should light within 60 seconds Proper flame configuration While using the oven burner visually check the burner flame in the broiler compartment If flame does ...

Page 15: ... it is important that the flow of hot air from the oven and fresh air to the oven burners be uninterrupted The vent openings and nearby surfaces may become hot Do not touch them Handles of pots and pans on the cooktop may become hot if left too close to the vent Metal items will become very hot if they are left on the cooktop and could cause burns Do not leave any items on the cooktop The hot air ...

Page 16: ...r C Cookies or cupcakes B or C Brownies B or C Layer cakes B or C Bundt or pound cakes A or B Pies or pie shells B or C Frozen pies A on cookie sheet Casseroles B or C Roasting B or R D E C B A R Preheating Pan Placement Preheat the oven if the recipe calls for it Preheat means bringing the oven up to the specified temperature before putting the food in the oven To preheat set the oven at the corr...

Page 17: ...king cakes warped or bent pans will cause uneven baking results and poorly shaped products A cake baked in a pan larger than the recipe recommends will usually be crisper thinner and drier than it should be If baked in a pan smaller than recommended it may be undercooked and batter may overflow Check the recipe to make sure the pan size used is the one recommended Baking Pans Don t Peek Use the pr...

Page 18: ...k at the back side To make adjustment loosen approximately one turn but do not completely remove the two screws on the back of the knob With the back of the knob facing you hold the outer edge of the knob with one hand and turn the front of the knob with the other hand To raise the oven temperature move the top screw toward the right You ll hear a click for each notch you move the knob To lower th...

Page 19: ...d 1 Position oven shelf at B position for small size roast 3 to 5 lbs and at R position for larger roasts 2 Check the weight of the roast Place the meat fat side up or the poultry breast side up on the roasting grid in a shallow pan The melting fat will baste the meat Select a pan as close to the size of meat as possible Broiler pan with grid is a good pan for this 3 Turn the OVEN CONTROL knob to ...

Page 20: ...oasts under 5 pounds more time for larger roasts Make sure poultry is thawed before roasting Unthawed poultry often does not cook evenly Some commercial frozen poultry can be cooked successfully without thawing Follow directions given on package label Oven Approximate Roasting Time Internal Type Temperature Doneness in Minutes per Pound Temperature F Meat 3 to 5 lbs 6 to 8 lbs Tender cuts rib high...

Page 21: ...nt Placing food closer to the flame increases exterior browning of the food but also increases spattering and the possibility of fats and meat juices igniting 5 Close the oven and broiler compartment door 6 Turn the OVEN CONTROL knob to BROIL 7 Turn OVEN CONTROL knob to OFF Remove the broiler pan from the broiler compartment and serve food immediately Leave the pan outside the range to cool Use of...

Page 22: ...s take Well Done 1 2 to 3 4 inch thick about same time Beef Steaks Rare 1 inch thick C 9 7 Steaks less than 1 inch thick will Medium 1 to 11 2 lbs C 12 5 6 cook through before browning Well Done B 13 8 9 Rare 11 2 inches thick C 10 6 7 Slash fat Medium 2 to 21 2 lbs C 12 15 10 12 Well Done B 25 16 18 Chicken 1 whole A 30 35 15 Brush each side with melted butter 2 to 21 2 lbs Broil with skin side d...

Page 23: ... the burner head back shake out excess water and then dry it thoroughly by setting it in a warm oven for 30 minutes Replace the burner caps Make sure that caps are replaced on the correct size burner There is one small 2 medium and one large cap NOTE On some models the caps are all the same size and can be used in any of the 4 needed locations The electrode of the spark igniter is exposed when the...

Page 24: ... surface burners routinely especially after bad spillovers which could clog these holes Wipe off surface burners If heavy spillover occurs remove the surface burners from range Burners lift out for cleaning Lift up the cooktop and then lift out the surface burners To remove burned on food soak the surface burner in a solution of mild liquid detergent and hot water Soak the surface burner for 20 to...

Page 25: ...ould cause a dull spot if allowed to set When the surface has cooled wash and rinse For other spills such as fat spatterings etc wash with soap and water once the surface has cooled Then rinse and polish with a dry cloth Be careful when you clean the cooktop because the area over the pilot will be hot on models with standing pilots The oven bottom has a porcelain enamel finish To make cleaning eas...

Page 26: ...r solution but do not soak Metal parts can be cleaned with soap and water Do not use steel wool abrasives ammonia acids or commercial oven cleaners Dry with a soft cloth Removable Broiler Drawer on some models To remove 1 When the broiler is cool remove the grid and pan 2 Pull the broiler drawer out until it stops then push it back in about one inch 3 Grasp the handle lift and pull broiler drawer ...

Page 27: ... When surface is cool clean and rinse Do not use oven cleaners cleansing powders or harsh abrasives on the outside of the door Lift Off Oven Door With proper care the porcelain enamel interior will retain its attractive finish for many years Soap and water will normally do the job Heavy spattering or spillovers may require cleaning with a mild abrasive cleanser Soapy wet pads may also be used Do n...

Page 28: ...ving dishes and food to avoid scratching rubbing or otherwise damaging the porous finish on the oven walls To Clean the Continuous Cleaning Oven 1 Let range parts cool before handling We recommend rubber gloves be worn when cleaning 2 Remove shelves and cookware 3 Soil visibility may be reduced by operating the oven at 400 F Close the door and turn the OVEN CONTROL knob to 400 F Time for at least ...

Page 29: ...ave dual support rods that will hold the cooktop up while you clean underneath it After cleaning under the cooktop with hot soapy water and a clean cloth lower the cooktop Be careful not to pinch your fingers Lower cooktop gently to avoid blowing out pilot flames on standing pilot models Never block the vents air openings of the range They provide the air inlet and outlet that are necessary for th...

Page 30: ...es between the range and adjacent combustible surfaces Product Height 36 RGB501 40 RGB508 44 RGB524 RGB525 461 2 RGB526 RGB530 RGB533 RGB628 RGB528 RGB532 RGB535 MASK FOR SHELVES electric ignition OFF LI T E H I L O W OFF LI T E H I L O W OFF LI T E H I L O W OFF LI T E H I L O W SET TIME 281 4 Glass Door 271 2 Porcelain Door Depth with Door Closed Includes Door Handle 30 Product Height see chart ...

Page 31: ...talling your range on linoleum or any other synthetic floor covering make sure the floor covering can withstand 180 F without shrinking warping or discoloring Do not install the range over carpeting unless a sheet of 1 4 thick plywood or similar insulator is placed between the range and carpeting Make sure the wall coverings around the range can withstand heat generated by the range up to 200 F Av...

Page 32: ...r floor covering will withstand 180 F See the Important Safety Instructions section of the Installation Instructions MODEL AND SERIAL NUMBER LOCATION Depending on your range you ll find the model and serial numbers on a label on the front frame of the range behind the storage drawer kick panel or broiler drawer TOOLS YOU WILL NEED Phillips and flat blade screwdrivers Pencil and ruler Two pipe wren...

Page 33: ...n 4 and 13 of water column For LP gas the pressure supplied must be between 10 and 13 of water column When checking for proper operation of the regulator the inlet pressure must be at least 1 greater than the operating manifold pressure as given above The pressure regulator located at the inlet of the range manifold must remain in the supply line regardless of whether natural or LP gas is being us...

Page 34: ...r of the location of the gas shut off valve 1 2 or 3 4 Gas Pipe Adapter Gas Shut off Valve Pressure Regulator 90 Elbow provided Nipple Union 90 Elbow Black Iron Pipe Union Nipple Gas Shut off Valve 1 2 or 3 4 Gas Pipe Gas Flow into Range Installer Inform the consumer of the location of the gas shut off valve Installer Inform the consumer of the location of the gas shut off valve Manifold Pipe Adap...

Page 35: ...off valve in the gas line in an easily accessed location outside of the range Make sure everyone operating the range knows where and how to shut off the gas supply to the range 2 Install male 1 2 flare union adapter to the 1 2 NPT internal thread elbow at inlet of regulator On models equipped with standard twin burners install the male pipe thread end of the 1 2 flare union adapter to the 1 2 NPT ...

Page 36: ...nector and pull out of range back B Usage Situations where Appliance Power Cord will be Disconnected Infrequently An adapter may be used only on a 15 amp circuit Do not use an adapter on a 20 amp circuit Where local codes permit a TEMPORARY CONNECTION may be made to a properly grounded two prong wall receptacle by the use of a UL listed adapter available at most hardware stores The larger slot in ...

Page 37: ...pilot at the back of the broiler compartment The pilot is attached to the left side of the oven burner 3 Light the pilot with a match No adjustments are required for natural gas If range is connected to LP gas contact the person who installed your range or made the conversion LIGHT THE PILOTS for models equipped with standing pilots The range should be installed in its permanent position before an...

Page 38: ...l operate until the set temperature is reached The oven burner will continue to cycle on and off as necessary to maintain the oven at the temperature indicated by the OVEN CONTROL knob 5 Stand by pilot flame Heater pilot flame Quality of Flames The combustion quality of burner flames needs to be determined visually If burner flames look like A call for service Normal burner flames should look like...

Page 39: ...with water on one of the oven shelves If using a spirit level take two readings with the level placed diagonally first in one direction and then the other 6 Adjust the leveling legs until the range is level 7 After the range is level slide the range away from the wall so that the Anti Tip device can be installed 9 ADJUSTING THE OVEN BURNER AIR ADJUSTMENT SHUTTER To determine if the oven burner fla...

Page 40: ...convert back to natural gas NOTE You will need to buy kit WB28K0085 to convert the top burners of the RGB508 INSTALLING THE ANTI TIP DEVICE 1 Mark the wall where the RIGHT EDGE of the range is to be located Be sure to allow for the countertop overhang if you intend to install the range next to cabinets 2 Locate the outside edge of the device 21 8 toward the center of the range from the marked edge...

Page 41: ... SURFACE BURNERS The oven gas shut off valve may have accidentally been moved during LIGHT BUT OVEN cleaning or moving DOES NOT To check the oven gas shut off valve on standard twin burner models raise the cooktop and look for the gas shut off lever at the extreme right rear corner Standing pilot models do not have a gas shut off valve on the regulator Follow the directions in box A or B that matc...

Page 42: ...osition FOOD DOES NOT Oven controls not properly set See the Broiling section BROIL PROPERLY Oven door and or broiler drawer not closed Improper shelf position being used See the Broiling section Food is being cooked on a hot pan Cookware is not suited for broiling Aluminum foil used on the broiler pan grid has not been fitted properly and slit as recommended Oven bottom not securely seated in pos...

Page 43: ...courteously And you can call any time GE Answer Center service is open 24 hours a day 7 days a week Service Contracts 800 626 2224 You can have the secure feeling that GE Consumer Service will still be there after your Hotpoint product warranty expires Purchase a GE contract while your warranty is still in effect and you ll receive a substantial discount With a multiple year contract you re assure...

Page 44: ...u may also have other rights which vary from state to state province to province To know what your legal rights are in your state province consult your local or state provincial consumer affairs office or your state s Attorney General Warrantor In the United States General Electric Company If further help is needed concerning this warranty write Manager Consumer Affairs GE Appliances Louisville KY...

Reviews: