background image

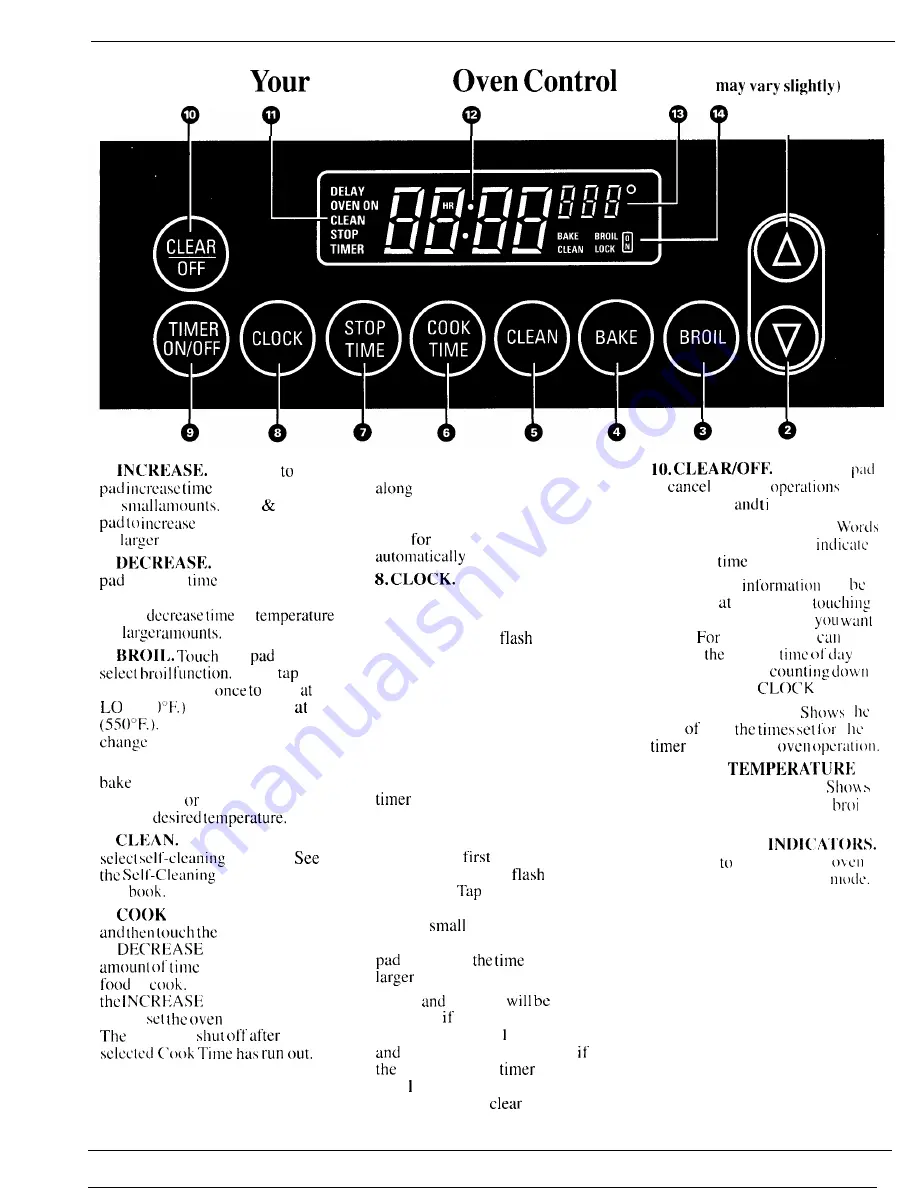
Features of 

 Electronic 


 (appearance 


 ?

1. 

 Short taps   this


 or temperature

by 


 Press   hold


 time or temperature

by 

 amounts.

2. 

 Short taps to this

 decrease 

 or temperature

by small amounts. Press & hold
pad to 


 or 

by 


3. 


 this 

 to


 Then 

INCREASE pad 

   broil 

 (450 

 or twice to broil   HI

 Tap DECREASE pad to

 back to LO broil.

4. BAKE. Touch this pad to select

 function. Then tap or press

INCREASE 

 DECREASE pad to

display 


5. 

 Touch this pad to


 function. 


 Instructions in

this 

6. 

 TIME. Touch this pad


 INCREASE

or 

 pad to set the


 you want your

 to 

 Touch BAKE and


 or DECREASE

pad to 


 temperature.

 oven will 


 the


7. STOP TIME. Use this pad

 with COOK TIME and

INCREASE or DECREASE pad to
set the oven to start automatically,

cook 

 a specified time and stop

 at a time you select.


 Touch this pad before

setting the clock.

To set clock, first touch CLOCK
pad. “TIME” will 

 in the

display. Tap INCREASE or

DECREASE pad to change the
time of day by small amounts.
Press & hold INCREASE or
DECREASE pad to change the

time of day by larger amounts.

9. TIMER ON/OFF. Touch this
pad to select timer function. The

 does not control oven

operations. The timer can time up
to 9 hours and 55 minutes.

To set timer, 

 touch TIMER

pad. “TIMER” will 

 in

the display. 

 INCREASE or

DECREASE pad to change the
time by 

 amounts. Press &

hold INCREASE or DECREASE

 to change 


 by

 amounts.

Hours 

 minutes 


displayed   the time set on the
timer is more than   hour. Minutes

 seconds will be displayed 

 time set on the 

 is less

than   hour. Press and hold
“TIMER” pad to 

 timer.


 Touch this 

to 

 all oven 

except clock 

   trier.

11. PROGRAM STATUS. 
light up in the display to 

what is in 

 display,

Programmed 

 can 

displayed   anytime by 
the pad of the operation 


to see. 

 example, you 

display 

 current 


while the timer is 


by touching the 

 pad.

12. TIME DISPLAY. 

 t 

time 

 day, 


 t 

 or automatic 


13. OVEN 

AND BROIL DISPLAY. 


the oven temperature or the 

 I

setting selected.

14. FUNCTION 
Lights up   show whether 

 is

in bake. broil or sell’-clcat] 

6

Summary of Contents for RJ734GP

Page 1: ...rol Seltings 6 15 Door Removal 16 Electronic Oven Control 6 Energy Saving Tips 4 Features 5 6 Light Bulb Replacement 16 Model tind Serial Numbers 2 Power Outage 7 Preheating 4 I I Problem Solver 22 Ro...

Page 2: ...to follow for further help FIRST contact the people who serviced your appliance Explain why you are not pleased In most cases this will solve the problem NEXT if you are still not pleased write all t...

Page 3: ...grease or other flammable materials accumulate in or near the oven Do not use water on grease fires Flame in oven can be smothered by completely closing door and pressing oven CLEAWOFF pad or use dry...

Page 4: ...starting the self cleaning operation If You Need Service c Read the Problem Solver in the back of this book Don t attempt to repair or replace any part of your range unless it is specifically recommen...

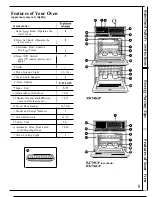
Page 5: ...control interior oven lights 5 Grille l 6 Oven Interior Light I 16 18 7 Oven Shelf Supports 8 Oven Shelves I 8 11 14 15 9 Bake Unit 1 Removable Oven Door I 16 21 RK746GP I I Broiler Pan and Rack Do n...

Page 6: ...clock first touch CLOCK pad TIME will tlash in the display Tap INCREASE or DECREASE pad to change the time of day by small amounts Press hold INCREASE or DECREASE pad to change the time of day by lar...

Page 7: ...the TIMER pad Step 2 Press INCREASE or DECREASE pad to set the amount of time on timer The timer will start automatically within a few seconds of releasing the pad The timer as you are setting it will...

Page 8: ...ven This will eliminate reaching into the hot oven while the LIppcI oven is on To remove the shelves from the The lower oven has a standard oven Dull them toward you tilt porcelain finish See the Care...

Page 9: ...that are highly perishable such as milk eggs fish stuffings poultry and pork should not be allowed to sit out for more than one hour before or after cooking Room temperature promotes the growth of ha...

Page 10: ...s Stop Time by adding the Cook Time to the time of day In this example the time of day is 2 00 and the Cook Time is 3 hours Adding 3 hours to the time of day equals 5 00 Step 6 Change Stop Time from 5...

Page 11: ...roffs Sheff B may be used Plain rolfs Sweet rolls Cakes without shortening Angef food Ieffy rolf sponge Cakes Bundt cakes Tupcakes t ruitcakts Shiny Obfong or Muffin Pans Shiny Obfong or Muffin Pans...

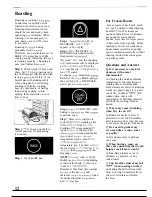
Page 12: ...e will rise about 5 to OOF to COI1lPCIISL1 C for temperature rise il desired remove the roast from oven sooner at 5 to 100F less than cmperature in the Roasting uidc NOrrk YOLI tllay wish 10 TfME BAKE...

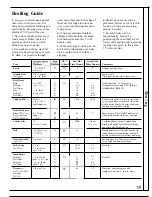
Page 13: ...stuffing Type Meat Tender cuts rib high quality sirloin tip rump or top round Lamb leg or bone in shoulder Veal shoulder leg or loin Pork loin rib or shoulder Ham precooked For boneless rolled roasts...

Page 14: ...t on broiler rack Step 8 Whctl Broiling is in broiler piul which comes with Q When hroiting is it neccssarj r ulgc Alwi ys LISC rack so fat compteted touch CLEAR OFF Serve food inlmeditltcly uld lc t...

Page 15: ...same time Steaks less than 1 in thick cook through before browning Pan frying is recommended Slash fat I HI 8 9 I Beef Steaks Rare Medium Well Done Rare Medium Well Done HI 9 12 13 13 10 15 25 I in t...

Page 16: ...t electric power to the oven at the main fuse or circuit breaker panel Let the bulb cool completely before removing it Do not touch a hot bulb with a damp cloth If you do the bulb will break The oven...

Page 17: ...tery Locate the molded rib inside the container in a cold oven overnight knob Fit the molded rib of the knob The ammonia fumes will help into the groove on the knob stem loosen the burned on grease an...

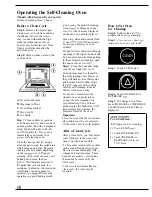
Page 18: ...ugh openings in the top of the door B To help prevent water from getting in these slots when cleaning open the door as far as it will go Step 4 Close the door and make sure the oven light D is off Ove...

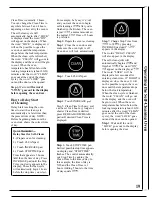
Page 19: ...re finished in the kitchen The oven is just soiled a normal amount so the normal Clean Time of 3 hours is preferred Step 1 Prepare the oven for cleaning Step 2 Close the oven door and make sure the ov...

Page 20: ...a damp sponge or cloth Q My oven shelves do not slide easily What is the matter A After many cleanings oven shelves may become so clean they do not slide easily If you wish shelves to slide more easi...

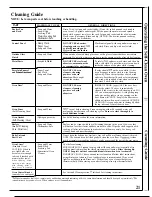
Page 21: ...t away When the surface has cooled wash and rinse For other spills such as fat smatterings etc wash with soap and water when cooled and then rinse Polish with dry cloth DO NOT USE oven INSIDE OF DOOR...

Page 22: ...this check before calling for service Oven controls not properly set Aluminum foil being used improperly in oven Incorrect cookware being used Check each cooking section for cookware tips Electronic...

Page 23: ...sunlel Service will still be there idier your Hotpoillt produ t wal r lnty exrircs Purchase a hl co ltr act while youl warranty is still in t f i ct and vOLL 11 r ecei e a sut s nt id disco utlt Writl...

Page 24: ...r Use and Care material If you then have any questions about operating the product please contact your dealer or our Consumer Affairs office at the address below or call toll free GE Answer Center 800...

Reviews: