background image

2

GB

PLEASE PHONE US TO REGISTER YOUR APPLIANCE AND ACTIVATE YOUR PARTS GUARANTEE ON 08448 24 24 24

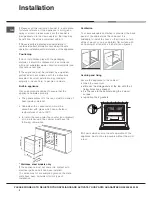
Ventilation

To ensure adequate ventilation is provided, the back
panel of the cabinet must be removed. It is
advisable to install the oven so that it rests on two
strips of wood, or on a completely flat surface with
an opening of at least 45 x 560 mm (

see figures).

Centring and fixing

Secure the appliance to the cabinet:
• Open the oven door.

• slide out the side gaskets at the top until the 2

fixing holes are exposed;

• Fix the oven to the cabinet using the 2 wood

screws.

• reposition the 2 gaskets.

!

 All parts which ensure the safe operation of the

appliance must not be removable without the aid of
a tool.

!

 Please keep this instruction booklet in a safe place

for future reference. If the appliance is sold, given
away or moved, please make sure the booklet is
also passed on to the new owners so that they may
benefit from the advice contained within it.

!

 Please read this instruction manual carefully: it

contains important information concerning the safe
operation, installation and maintenance of the appliance.

Positioning

!

 Do not let children play with the packaging

material; it should be disposed of in accordance
with local separated waste collection standards (

see

Precautions and tips).

!

 The appliance must be installed by a qualified

professional in accordance with the instructions
provided. Incorrect installation may damage
property or cause harm to people or animals.

Built-in appliance

Use an appropriate cabinet to ensure that the
appliance operates properly:

• The panels adjacent to the oven must be made of

heat-resistant material.

• Cabinets with a veneer exterior must be

assembled with glues which can withstand
temperatures of up to 100°C.

• to install the oven under the counter (

see diagram)

or in a kitchen unit, the cabinet must have the
following dimensions:

* Stainless steel models only

!

 The appliance must not come into contact with

electrical parts once it has been installed.
The indications for consumption given on the data
plate have been calculated for this type of
installation.

Installation

560 mm.

45 mm.

590 mm.

595 mm.

22,5 mm.*

20,5 mm.

550 mm.

570 mm.

20 mm.

575-585 mm.

45 mm.

560 mm.

550 mm.

min.

Summary of Contents for SX 896L PX S

Page 1: ...s Programming cooking Practical cooking advice Cooking advice table Precautions and tips 11 General safety Disposal Respecting and conserving the environment Care and maintenance 12 14 Switching the a...

Page 2: ...tains important information concerning the safe operation installation and maintenance of the appliance Positioning Do not let children play with the packaging material it should be disposed of in acc...

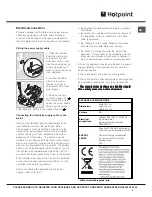
Page 3: ...as been performed and that it is fully compliant with safety regulations Before connecting the appliance to the power supply make sure that the appliance is earthed and the plug is compliant with the...

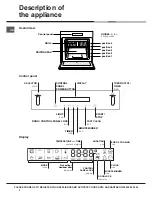
Page 4: ...ption of the appliance Overall view Control panel Display SELECTOR knob THERMOSTAT TIMER knob DISPLAY TIMER icon FAST CLEAN icon MINUTE MINDER icon DOOR CONTROL PANEL LOCK icon LIGHT icon CONTROL PANE...

Page 5: ...ards see figure KO KO OK OK Setting the clock The clock can only be set when the oven is switched off If the oven is in standby mode pressing the button once will display the current time setting Pres...

Page 6: ...g fan blows a stream of air between the control panel and the oven door as well as towards the bottom of the oven door In the FAST COOKING mode the fan is activated automatically after ten minutes At...

Page 7: ...ooking advice FAST COOKING mode This mode is particularly suitable for cooking pre packed food quickly frozen or pre cooked The best results are achieved using one cooking rack only LOW TEMPERATURE mo...

Page 8: ...pan remember to pour 100 ml of cold water into the baking tray in position 5 The dough must be left to rise at room temperature for 1 1 hours depending on the room temperature or until the dough has d...

Page 9: ...duration the cooking end time and the set temperature alternately 5 Press the button to activate the programmed mode Programming has been set when the and buttons are illuminated The DISPLAY shows the...

Page 10: ...0 Pre cooked food Golden chicken wings 0 4 2 1 200 20 25 Fresh Food Biscuits shortcrust pastry Sponge cake made with yoghurt Cheese puffs 0 3 0 6 0 2 2 2 2 1 1 1 200 180 210 15 18 45 10 12 Low tempera...

Page 11: ...ins If the event of malfunctions under no circumstances should you attempt to perform the repairs yourself Contact an authorised Service Centre see Assistance Do not rest objects on the open oven door...

Page 12: ...ishwasher safe We recommend that detergents are not sprayed directly onto the control panel but that a sponge is used instead Never use steam cleaners or pressure cleaners on the appliance Cleaning th...

Page 13: ...again The display will show the duration the cleaning end time and the set cleaning level alternately 4 Press the button to activate the programmed mode Programming has been set when the and buttons a...

Page 14: ...o cancel programming press the button Once the automatic cleaning cycle is over Before you can open the oven door you will have to wait for the icon to switch off this indicates the oven temperature h...

Page 15: ...y Clock button is lit The appliance is in standby mode Press any button to exit standby mode An automatic mode has been selected Hot appears on the display and cooking does not start The temperature i...

Page 16: ...d and functioning efficiently throughout its life UK 08448 225 225 Republic of Ireland 0818 313 413 www hotpointservice co uk Appliance Registration We want to give you additional benefits of Hotpoint...

Page 17: ...ortation improper use neglect or interference or as a result of improper installation Replacement of any consumable item or accessory These included but not limited to plugs cables batteries light bul...

Page 18: ...18 GB PLEASE PHONE US TO REGISTER YOUR APPLIANCE AND ACTIVATE YOUR PARTS GUARANTEE ON 08448 24 24 24...

Page 19: ...19 GB PLEASE PHONE US TO REGISTER YOUR APPLIANCE AND ACTIVATE YOUR PARTS GUARANTEE ON 08448 24 24 24...

Page 20: ...20 GB PLEASE PHONE US TO REGISTER YOUR APPLIANCE AND ACTIVATE YOUR PARTS GUARANTEE ON 08448 24 24 24 03 2011 195087019 00 XEROX FABRIANO...

Reviews: