background image

4

GB

Installation

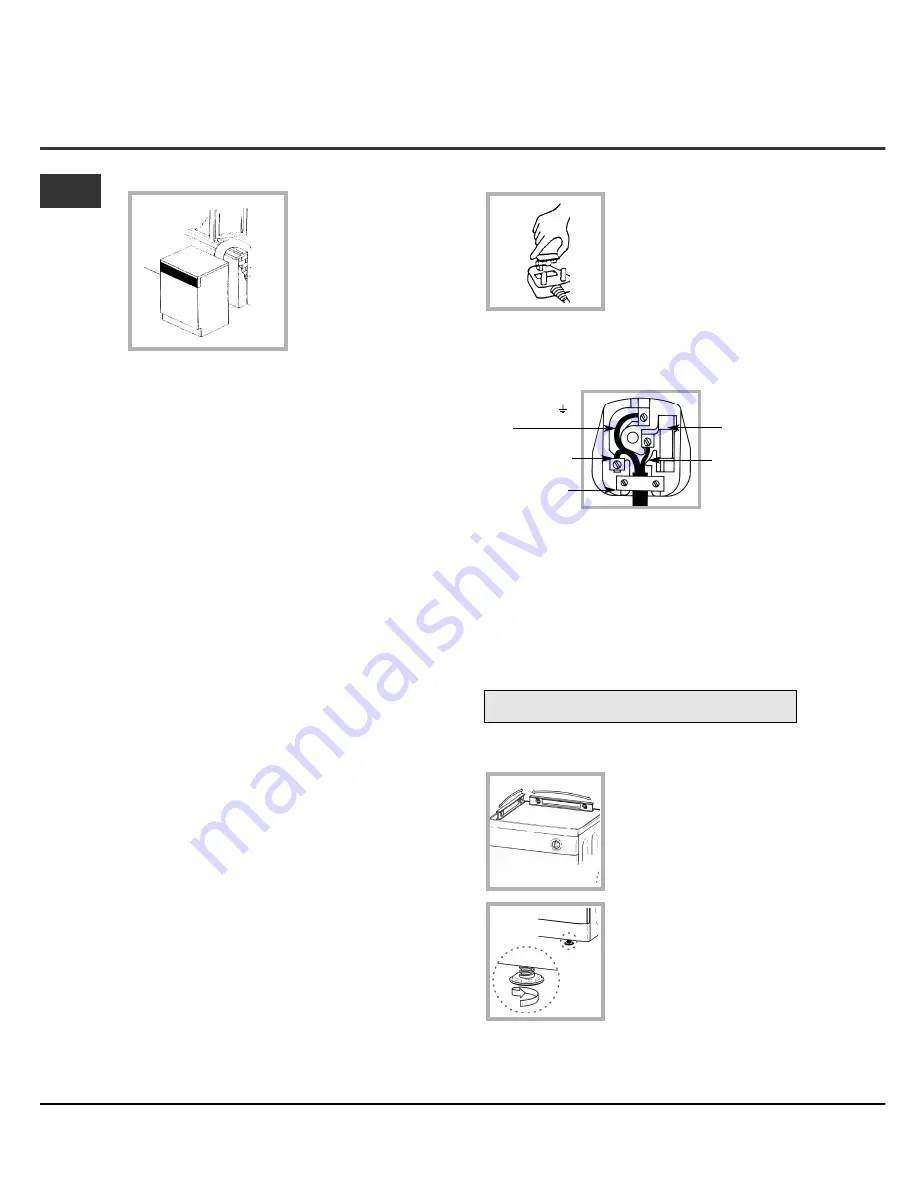
Open window venting

The end of the tube
should be directed 
downwards, to prevent
warm moist air from 
condensing in the room or
in the dryer.

!

Ensure that the dryer is adequately ventilated and

that the end of the vent tube is not directed towards
the air intake duct.

!

The vent tube must always be fitted for optimum 

performance.

!

Make sure that the vent tube and air intake vents are

not obstructed or blocked.

!

The dryer must not recycle exhaust air.

!

Misusing a tumble dryer may create a fire hazard.

!

Do not discharge exhaust air into a flue which is

used for exhaust fumes from other appliances that
burn gas or other fuels.

!

Do not discharge exhaust air into an extraction 

system or any duct with an extractor fan. This will
affect the way the thermal controls operate and can
result in a fire hazard.

Electrical connections

Make sure of the following before you insert the plug
into the the electrical socket:

The socket must be grounded.

The socket must be able to sustain the machines 
maximum power, which is indicated on the rating 
label (

see Dryer Description

).

Power voltage must be within the values indicated 
on the rating label (

see Dryer Description

).

The socket must be compatible with the dryers 
plug. Should this not be the case, replace the 
plug or the socket.

!

The dryer must not be installed outdoors, even if the

space is sheltered. It can be very dangerous if it is
exposed to rain or storms.

!

Once installed, the dryers electrical wire and plug

must be within easy reach.

!

Do not use extension cords.

!

The power cord must not be bent or squashed.

!

The power cord supplied is fitted with a BS1363 plug

and a 13 amp BS1362 fuse. If you need to replace the
fuse, use only those rated at 13 amp (13A) and ASTA
approved to BS1362.

Moulded plug 

!

The plug must not be used

without the fuse cover in place. If
a replacement fuse holder/cover is
required, it must be of the same
colour coding or wording as
shown on the base of the plug.
Replacements are available from
authorised dealers.

Green and Yellow
(Earth) wire to terminal
marked ‘E’, symbol     ,
or coloured green and
yellow.

13A ASTA approved
fuse to BS1362.

Brown (Live) wire to
terminal marked ‘L’ or
coloured red.

Blue (Neutral) wire to
terminal marked ‘N’ or
coloured black.

Cord clamp

Changing the plug

The wires in the power cord are coloured in accordance
with the following:

!

If the plug being replaced is a non-rewirable type,

then the cut-off plug must be disposed of safely. DO
NOT leave it where it can be inserted into a socket
and create a shock hazard.

!

The power supply cord should be checked periodically

and replaced by a cord specially prepared for this
dryer and fitted only by authorised technicians (

see

Service

). New or longer power cords are supplied at

an extra charge by authorised dealers.

!

The manufacturer denies any responsibility should

any of these rules not be followed.

!

If in doubt about any of the above consult a qualified

electrician.

Levelling your dryer

The dryer must be installed level for correct operation.

When you have installed your
dryer in its final location check
that it is level first side to side,
then front to back.

If the dryer is not level, use a
wooden block to 
support it while adjusting the two
front legs up or down, until your
dryer is level.

Before you start using your dryer

Once you have installed your dryer and before you
use it, clean the inside of the drum to remove any dust
that could have accumulated during transport.

Summary of Contents for TVFG 65C Futura

Page 1: ...Where to put your dryer Ventilation Electrical connection Levelling your dryer Before you start using your dryer Dryer description 5 The front The back Control panel The Display 6 Start and programmes 7 11 Choosing a programme Programmes and Tables The controls Laundry 12 13 Sorting your laundry Wash care labels Special clothing items Drying times Warnings and Suggestions 14 General safety Saving ...

Page 2: ...fluff deposits from the filter mesh For your Venting dryer to operate efficiently you must follow the regular maintenance schedule shown below STEP 4 Refit the filter with the curved side towards you STEP 5 Make sure the filter is pushed fully home NEVER run the dryer without the filter in position You MUST clean fluff build up around the filter housing and the vent tube periodically EVERY two or ...

Page 3: ...etween the sides and lateral furnishings or walls This is to ensure proper air circulation Make sure that the back vents are not obstructed Make sure you put your dryer in an environment that is not damp and has proper air circulation throughout the dryer will not operate efficiently in an enclosed space or cupboard We do not recommend that the dryer is installed in a cupboard but the dryer must n...

Page 4: ...363 plug and a 13 amp BS1362 fuse If you need to replace the fuse use only those rated at 13 amp 13A and ASTA approved to BS1362 Moulded plug The plug must not be used without the fuse cover in place If a replacement fuse holder cover is required it must be of the same colour coding or wording as shown on the base of the plug Replacements are available from authorised dealers Green and Yellow Eart...

Page 5: ... one beep and the progress lights will flash to confirm the action When a programme is running holding this button in pauses the programme and stops the dryer The light is green when programme is running flashing amber if the programme has been paused or flashing green if on standby waiting to start a programme see Start and Programmes Note This light also flashes amber during the Post Care phase ...

Page 6: ...ishes the delay icon is off and the Time to End is displayed 0 30 9 30 Time to End If the delay icon is off the time displayed is the Time to End for the programme running When timed programmes are selected the time displayed throughout the cycle is the actual time remaining When Automatic programmes are selected the time displayed is an estimate of the time remaining When the programme is selecte...

Page 7: ...ation of this programme will depend on the size of the load the dryness setting selected and the spin speed used in your washer see Laundry Note This tumble dryer in compliance with new energy saving regulations is fitted with an automatic standby system which is enabled after about 30 minutes if no activity is detected Press and hold the ON OFF button until the dryer reactivates your laundry and ...

Page 8: ...terials such as polyester and cotton It can be used for load sizes up to 3kg approximately 14 shirts The duration of this programme will depend on the size of the load the dryness setting selected and the spin speed used in your washer Loads dried using the Cupboard Dry setting are usually ready to wear the edges or seams may be slightly damp If this is the case try turning the shirts inside out a...

Page 9: ...ightly damp If this is the case try opening them out or turn items inside out and running the programme again for a short period Lingerie This is a programme for drying your very delicate lingerie including silk It can be used for load sizes up to 1kg close all hooks buttons or zips before drying The duration of this programme will depend on the size of the load the dryness setting selected and th...

Page 10: ... the fur Note For allergy protection just freeze cuddly toys for 24 hours then wash and dry them Repeat every 6 weeks Before drying remove accessories such as clothes collars or sound boxes and protect plastic eyes with masking tape after drying them with a cloth The programme time will vary dependant on the exact make up of the load The maximum load should not exceed 2 5kg and no individual item ...

Page 11: ...option enables both the pre and post care functions if appropriate and when selected the light in the button is lit Note If you have selected the Sound option this option is not available Heat Level buttons and lights Not all programmes allow you to change the heat level and some programmes allow all three heat level options Low Medium and High When the heat level options are available pressing th...

Page 12: ... Tea Towel 100g 3oz Bath Towel 700g 1lb 6oz Hand Towel 350g 12oz Double Sheet 500g 1lb 2oz Single Sheet 350g 12oz At the end of a drying cycle cottons could still be damp if you grouped cottons and synthetics together If this happens simply give them an additional short period of drying Wash Care Labels Look at the labels on your garments especially when tumble drying for the first time The follow...

Page 13: ...45 60 60 70 70 80 80 100 Synthetics Medium Heat Drying times on reduced spin in washing machine 1kg 2kg 3kg 20 40 30 50 40 70 Delicates e g Acrylics Low Heat Drying times on reduced spin in washing machine 1kg 2kg 50 70 90 130 Times are approximate and can vary depending upon Amount of water retained in clothes after spin cycle towels and delicates retain a lot of water Fabrics items that are the ...

Page 14: ...that have been spotted or soaked with vegetable or cooking oils this constitutes a fire hazard Oil affected items can ignite spontaneously especially when exposed to heat sources such as a tumble dryer The items become warm causing an oxidisation reaction with the oil Oxidisation creates heat If the heat cannot escape items can become hot enough to catch fire Piling stacking or storing oil effecte...

Page 15: ...yer uses special bearing components which do not need lubrication Have your dryer checked regularly by authorised technicians to ensure electrical and mechanical safety see Service Switching off the electricity Unplug your dryer when not using it when cleaning it and during all maintenance operations Clean the filter after each cycle The filter is an important part of your dryer it accumulates lin...

Page 16: ...ammes The filter has not been cleaned see Maintenance The correct programme has not been selected for the type of fabric you are drying see Start and Programmes The flexible vent tube is obstructed see Installation The air intake vent is obstructed see Installation The permanent ventilation flap on the storm cover is obstructed see Installation The items were too wet see Laundry The dryer was over...

Page 17: ...y and recycling of the materials they contain and reduce the impact on human health and the environment The crossed out wheeled bin symbol on the product reminds you of your obligation that when you dispose of the appliance it must be separately collected Consumers should contact their local authority or retailer for information concerning the correct disposal of their old appliance As part of our...

Page 18: ...18 ...

Page 19: ...as a result of improper installation Replacement of any consumable item or accessory These include but are not limited to plugs cables batteries light bulbs fluorescent tubes and starters covers and filters Replacement of any removable parts made of glass or plastic THE GUARANTEE WILL NOT APPLY IF THE APPLIANCE HAS BEEN USED IN COMMERCIAL OR NON DOMESTIC PREMISES Non Domestic Usage Policy Indesit ...

Page 20: ...ic of Ireland 0818 313 413 www hotpointservice co uk Appliance Registration We want to give you additional benefits of Hotpoint ownership To activate your FREE 5 year parts guarantee you must register your appliance with us Free phone UK 0800 519 2110 Republic of Ireland 1800 844 347 www hotpointservice co uk Extended Guarantees We offer a selection of protection plans that enable you to fully cov...

Reviews: