background image

GB

19

PLEASE PHONE US TO REGISTER YOUR APPLIANCE  AND ACTIVATE YOUR PARTS GUARANTEE ON 08448 24 24 24

GRILL

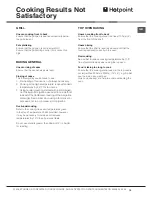
Uneven cooking front to back

Ensure that the grill pan is positioned centrally below 
the grill element.

Fat splattering

Ensure that the grill pan is not lined with foil.
Ensure that the grill setting control (A) is not set too 
high.

BAKING GENERAL

Uneven rising of cakes

Ensure that the oven shelves are level.

Sinking of cakes

The following may cause cakes to sink:

1.  Pre-heating of fan ovens   not always necessary.
2.  Cooking at too high a temperature   reduce standard 

temperatures by 25°C for fan ovens.

3.  Using normal creaming method with a soft margari-

ne. If using soft margarine, use an all in one method 
instead of the traditional creaming of the margarine 
and sugar. Remember when using a food mixer or 
processor not to over-cream soft margarine.

Over/undercooking

Refer to the cooking times and temperatures given 
in the Oven Temperature Charts provided, however, 
it may be necessary to increase or decrease 
temperatures by 10°C to suit personal taste.

Do not use utensils greater than 56mm (2l4”) in height 
for roasting.

Cooking Results Not 

Satisfactory

TOP OVEN BAKING

Uneven cooking front to back

Ensure that the cooking utensil is at least 100mm (4”) 
from the front of the shelf.

Uneven rising

Ensure that the shelf is level (as above) and that the 
food is positioned correctly in the oven.

Overcooking

Remember to reduce cooking temperatures by 10°C 
from standard recipes when using the top oven.

Food is taking too long to cook

Ensure that the cooking utensil used in the top oven is 
not larger than 300mm x 225mm (12”x 9”), e.g. Do Not 
use the main oven meat pan.
Only cook one item at a time to avoid overloading the 
oven.

Summary of Contents for UD53X

Page 1: ...e Main Oven for Fan Cooking 13 Using the Main Oven for Other Functions 14 15 Temperature Conversion Chart 16 Oven Temperature Chart Meat 17 Oven Temperature Charts Baking 18 Cooking Results Not Satisf...

Page 2: ...ontinuously supervised This appliance can be used by children aged from 8 years and above and persons with reduced physical sensory or mental capabilities or lack of experience and knowledge if they h...

Page 3: ...riod of use To help remove the new smell heat up the empty ovens to maximum temperature for a minimum of two or three hours keeping the oven doors closed Ensure that the room is well ventilated e g op...

Page 4: ...PAN WITH A FIRE BLANKET OR DAMP CLOTH this will smother the flames and extinguish the fire 3 LEAVE THE PAN TO COOL FOR AT LEAST 60 MINUTES BEFORE MOVING IT Injuries are often caused by picking up a ho...

Page 5: ...Setting Control Grill Element Stay Clean Liners Wirework Shelf Supports Stay Clean Liners Wirework Shelf Support Oven Fan Top Oven Door Oven Light Oven Light Grill Pan Food Support Inner Door Glass Ov...

Page 6: ...this can be used for slow cooking keeping food warm and warming plates for a short period Element and Fan Cut Off The oven is fitted with a safety device which disconnects the heating element and oven...

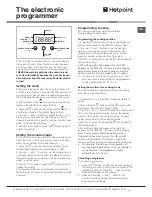
Page 7: ...ctivated Programming cooking A cooking mode must be selected before programming can take place Programming the cooking duration 1 Press the button several times until the icon and the three digits on...

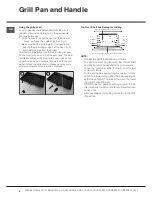
Page 8: ...Pouring a little water into the grill pan will make the collection of grease particles more efficient and prevent the formation of smoke 1 2 Top Oven Shelf Positioning for Grilling DO NOT PLACE FOOD...

Page 9: ...grill or anti clockwise for HALF grill to select the Grill Setting MIN MAX Grill Controls Example High Grill Setting NOTE Do not grill with the grill top oven door closed Step 3 After use turn the gri...

Page 10: ...0 25 minutes Grill pan and food support Chops etc Gammon steaks Setting MAX 4 Setting MAX for 10 minutes then reduce to lower setting 20 35 minutes Grill pan and food support Fish Whole Fillets Finger...

Page 11: ...above As a guide the front of the utensil should be approx 100mm 4 from the front of the shelf Note Charts are a guide only to suit personal taste and requirements it may be necessary to increase or d...

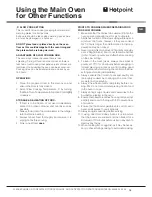
Page 12: ...nd on during cooking as the oven thermostat maintains the correct tempera ture Step 4 Place the food on the shelf directly below the element ensuring the oven door is closed NOTE At the end of your co...

Page 13: ...15 x12 Baking Trays larger than325mm x 250mm 13 x10 TEMPERATURE TIME When two shelves are in use to cook large quantities of food it may be necessary to increase the cooking times given in the temper...

Page 14: ...be defrosted using the fan only setting where possible it is recommended that the food should be small and thin The items should be placed so that the maximum amount of surface area is exposed to the...

Page 15: ...Make sure that the dishes to be used will fit into the oven ensuring enough room for air to circulate 2 All dishes cooked on the slow setting will require a minimum of 6 hours however if they are cook...

Page 16: ...CTIVATE YOUR PARTS GUARANTEE ON 08448 24 24 24 Temperature Conversion Chart Gas Mark F Main Conventional Oven Main Fan Oven 250 120 100 1 275 140 120 2 300 150 130 3 325 160 140 4 350 180 160 5 375 19...

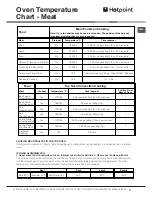
Page 17: ...spaced Meat Pre heat Temperature C Time approx Beef No 160 180 20 25 mins per 450g 1lb 20 mins extra Lamb No 160 180 20 30 mins per 450g 1lb 25 mins extra Pork No 160 180 20 30 mins per 450g 1lb 25 m...

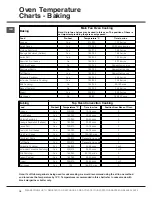
Page 18: ...rtcrust Pastry No 180 190 Depending on use Puff Pastry Yes 190 200 Depending on use Yorkshire Pudding Yes 180 190 30 45 mins Individual Yorkshire Pudding Yes 190 200 20 45 mins Milk Pudding No 130 140...

Page 19: ...ne and sugar Remember when using a food mixer or processor not to over cream soft margarine Over undercooking Refer to the cooking times and temperatures given in the Oven Temperature Charts provided...

Page 20: ...leaning operation to proceed during cooking However if higher cooking temperatures are not used regularly it may be necessary in order to prevent heavy soiling to run the ovens without shelves or meat...

Page 21: ...e ensure that the electricity supply to the appliance is switched off and the appliance is fully cold before removing the lamp lens Open the oven door and remove the oven shelves Using a thick cloth g...

Page 22: ...cept take care to support the weight of the inner glass when removing and refitting DROP DOWN DOORS Remove the door inner glass as follows 1 Open the door fully and unscrew the two screws securing the...

Page 23: ...er appliance that generates heat such as a plinth heater Note Due to many different types of installation a mains cable is not supplied with this product The installer will fit the correct type and le...

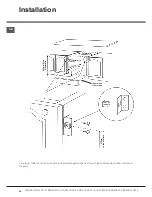
Page 24: ...PARTS GUARANTEE ON 08448 24 24 24 Installation 890mm Max 870mm Min 597mm min 720mm min 150mm min 170mm max 570mm to top of plinth 570 min 570mm A minimum distance of 25mm should be maintained between...

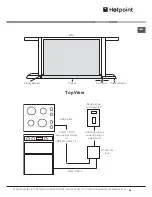
Page 25: ...YOUR PARTS GUARANTEE ON 08448 24 24 24 Wall Fixing Bracket Cabinet Doors Cooker 2 5mm heat resistant cable to BS 6141 Table 15 Cable size to suit current rating of appliance s Hob Cable Double pole co...

Page 26: ...at the main cooker wall switch is turned on ii Check other appliances to see if you have a power cut iii Check the main circuit breaker for the property Timer Display 0 00 AUTO The power supply to you...

Page 27: ...resulting from transportation improper use neglect or interference or as a result of improper installation Replacement of any consumable item or accessory These include but are not limited to plugs c...

Page 28: ...pply a full range of genuine replacement parts as well as accessory products that protect and hygienically clean your appliance to keep it looking good and functioning efficiently throughout its life...

Reviews: