background image

Satisfaction Guaranteed or Your
Money Back

Hotpoint gives you a unique ‘Satisfaction
Guaranteed’ promise – valid for ninety days after
you have purchased your Hotpoint product. If there is
a technical problem with your Hotpoint appliance, just
call Hotpoint Service (see back page). If necessary we
will arrange for an engineer to call. If the technical
problem is not resolved under this Guarantee,
Hotpoint will replace your appliance or, if you prefer,
give you your money back. Your statutory rights are
not affected, and the Guarantee is additional and
subject to the terms of Hotpoint’s Five Year Parts
Guarantee.

Hotpoint’s Free Five Year Guarantee

From the moment your appliance is delivered
Hotpoint guarantees it for FIVE YEARS.
•  In the Five Years all replacement parts are FREE

provided that they are fitted by our own 
Service Engineer. During the first year our 
Engineer’s time and labour is also free.

•  Our guarantee covers loss of food in our

refrigeration and freezer products up to £250
during the first year, subject to verification by 
one of our engineers.

•  After the first year we will charge for our

Engineer’s time and labour. We do, however,
operate a range of Service Plans (see opposite)
which, for an annual payment, enables you to
cover any repair costs which may be necessary.

•  All our service repairs are guaranteed for 

twelve months in respect of our labour and any 
parts fitted.

•  The appliance must be used in the United

Kingdom, and must not be tampered with or
taken apart by anyone other than our own
Service Engineers.

•  You may, however, buy parts which can be

safely fitted without specialist knowledge or
equipment. The correct fitting of such parts,
provided they are genuine Hotpoint spares, will not 
affect your Guarantee. Parts are available from 
our Hotpoint Spares Centres (see back page).

•  Our guarantee does not cover the cost of any

repair, or loss of food in refrigeration products,
due to power failure, accidents or misuse. Nor
does it cover the cost of any visits to advise 
you on the use of your appliance. Please read
thoroughly the instruction book supplied with 
this appliance.

•  If at any time during the Guarantee period we are 

unable to repair your appliance, we will refund any 
repair costs paid to us in the previous twelve 
months. We will also offer you a new appliance at a 
reduced charge instead of a repair.

•  Our Guarantee is in addition to and does not

affect your legal rights.

•  Should you need independent advice on your

consumer rights, help is available from your
Consumer Advice Centre, Law Centre, Trading
Standards Department and Citizens Advice
Bureau.

•  All Hotpoint servicing is carried out by our own

Service Organisation located throughout the
United Kingdom and Eire. We will be happy to
deal with any problems which you may have.

Hotpoint’s Extended Warranties

Whether you have just one or a number of Hotpoint
appliances in your kitchen, Hotpoint has a range of
Service Plans to give you complete peace of mind.
They enable you to extend your one year labour
guarantee so that you can have repairs completed
FREE during the membership period.

Service Cover

We offer a number of payment methods; cheque,
credit card or you can spread the cost and pay by
direct debit (full details can be obtained on Free
phone 0800 716356). This covers you for all repairs
during the period of cover, which can be from 1 to 4
years. Service Cover also includes loss of food, up
to the value of £250, in refrigeration appliances.
There is also an option of Service Cover with
Maintenance at an additional cost. This includes an
annual Electrical and Safety check and replacement
of any parts as necessary.

Kitchen Cover

An annual payment covers you for all repairs for all
your Hotpoint appliances which are less than ten
years old. It also covers the cost of loss of food up
to £250 in our refrigeration and freezer products.
There is also the option of Kitchen Cover with
Maintenance at an additional cost. Any additional
Hotpoint appliances purchased after you have
joined Hotpoint Kitchen Cover will automatically be
included during the annual period of cover without
further charge.

Appliance Registration

To ensure that you have the opportunity to benefit
from any of the above Service Schemes and other
offers you should complete and return immediately
the Appliance Registration Form/Questionnaire
supplied with this appliance. Full details and costs of
our Service Schemes, together with an application
form, will be sent to you at the end of the first year
of the guarantee.

Annual Safety/Maintenance Checks

Hotpoint strongly recommends that all its
appliances are regularly checked for electrical and
mechanical safety, whether or not they are covered
by a Service Plan. Worn door gaskets or hoses may
cause a leak on an appliance, which could become
dangerous if neglected.

Proof of Purchase

For future reference please attach your purchase
receipt to this booklet and keep it in a safe place.

Spares and Accessories

Spares and accessories can be ordered from your
local Hotpoint Spares Centre (see back page), using
the order form enclosed.
NOTE:

Our Engineers will use every effort to avoid

damage to floor coverings and adjacent units when
carrying out repairs/service work, but in locations
where the Engineer advises you that it will be
impossible to move appliances without risk of
damage, he will only proceed with your approval
that no liability is accepted.

Hotpoint Service Cover

35

Summary of Contents for UY46 Mk2

Page 1: ...k2 To the Installer Before installation fill in the product details on the back cover of this book The information can be found on the rating plate To the User You must read the instructions prior to...

Page 2: ...ven for other Functions 20 21 Temperature Conversion Chart 22 Oven Temperature Charts 23 24 Cooking Results not Satisfactory 25 Care and Cleaning 26 28 Installation Instructions 29 32 If Something Goe...

Page 3: ...e to the odour avoid any fumes It is suggested that any pets be removed from the room until the smell has ceased This odour is due to temporary finish on oven liners and elements and also any moisture...

Page 4: ...the main oven is in use as the contents may be hot Always keep the appliance clean as a build up of grease or fat from cooking can cause a fire Always follow the basic principles of food handling and...

Page 5: ...appliance Never operate the grill with the door closed as this will cause the appliance to overheat Never use the appliance as a room heater Never use the grill to warm plates Never dry any items on...

Page 6: ...LL PAN FOOD SUPPORT TOP OVEN DOOR OVEN LIGHT INNER DOOR GLASS OVEN SHELF DOOR SWITCH MODEL SERIAL NUMBER LABEL Record the Model No and the Serial No on KEY CONTACTS back page GRILL SETTING CONTROL GRI...

Page 7: ...he door is opened The heating element and oven fan will not operate until the oven door is closed Controls CONTROL MARKINGS Note It is advisable to check that all oven controls have been switched off...

Page 8: ...od 7 We advise that dishes containing left over cooked poultry or meat e g Shepherd s Pie should not be cooked automatically if there is to be a delay period 8 Ensure that delay start times are kept t...

Page 9: ...to cancel an Auto Cooking programme and return the oven s to Manual operation Used to adjust the various timer function settings Minute Minder Button Cook Period Button End Time Button Manual Button B...

Page 10: ...MINDER Step 1 Ensure the time of day is set correctly Step 2 Press and hold the Minute Minder button Step 3 With the Minute Minder button held in set the required Minute Minder period using the and bu...

Page 11: ...imer has been set for one oven it is possible to use the other oven only during the same Automatic programme At the end of the Automatic Cook Period the Auto Symbol will flash and an intermittent blee...

Page 12: ...il the timer is returned to Manual operation see below Step 6 Press the Manual button The audible tone will be cancelled and the oven s will be returned to Manual Step 7 Turn the oven control s to the...

Page 13: ...the sequence again 5 If at any time the display shows three flashing zero s 0 00 and Auto it is likely that the electricity supply to the oven has been interrupted Reset the timer to the correct time...

Page 14: ...with the door closed but may be stored in the top oven with the door closed when the top oven is not in use GRILL PAN FOOD SUPPORT Step 1 Step 2 Step 3 Step 4 a b c d NOTE Preheat the grill if indica...

Page 15: ...ckwise for HALF grill to select the Grill Setting MIN MAX Grill Controls Example High Grill Setting NOTE Do not grill with the grill top oven door closed Step 3 After use turn the grill control A to t...

Page 16: ...upport Grill pan and food support Grill pan and food support Grill pan and food support Grill pan and food support Grill pan and food support Dish placed directly on the shelf 10 25 minutes 20 35 minu...

Page 17: ...the shelf SHELF POSITIONING There should always be at least 25mm 1 inch between the top of the food and the grill element DO NOT PLACE FOOD UTENSILS DIRECTLY ON THE OVEN FLOOR ENSURE SHELVES ARE FITT...

Page 18: ...on the shelf directly below the element ensuring the oven door is closed PLATE WARMING Place the plates dishes on shelf position 1 from the base of the top oven and turn top oven temperature B to 100...

Page 19: ...in the main oven Food or utensils should never be placed directly on the floor of the oven for cooking MAIN OVEN UTENSILS Do Not Use Meat Pans larger than 375mm x 300mm 15 x12 Baking Trays larger than...

Page 20: ...fan only setting are cream cream cakes butter cream filled cakes gateaux cheese cakes iced cakes quiches pastries biscuits bread croissants fruit and many delicate frozen foods If fish meat and poult...

Page 21: ...hey are cooked for 1 2 hours longer then deterioration in their appearance may be noticed 3 Never cook joints of meat over 2 7kg 6 lb or poultry over 2 0kg 4lb 8oz We do not recommend that joints of m...

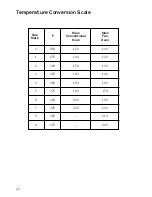
Page 22: ...erature Conversion Scale F Gas Mark 1 2 1 250 100 120 130 140 160 170 180 200 210 220 120 140 150 160 180 190 200 220 275 300 325 350 375 400 425 450 475 2 3 4 5 6 7 8 9 Main Conventional Oven Main Fa...

Page 23: ...pprox Position from Base of Oven Pre heat Yes Yes Yes Yes Yes Yes Yes 170 180 35 mins per 450g 1lb 35 mins over 1 1 1 1 1 1 1 35 mins per 450g 1lb 40 mins per 450g 1lb 40 mins over 40 mins per 450g 1l...

Page 24: ...vection Cooking Food Scones Small Cakes Victoria Sandwich Sponge Sandwich Fatless Swiss Roll Semi rich Fruit Cake Rich Fruit Cakes Shortcrust Pastry Puff Pastry Yorkshire Pudding Individual Yorkshire...

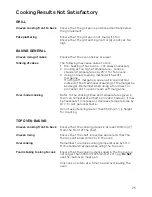
Page 25: ...mber when using a food mixer or processor not to over cream soft margarine Over undercooking Refer to the cooking times and temperatures given in the Oven Temperature Charts provided however it may be...

Page 26: ...cloth followed by a wipe with a clean damp cloth 2 CLEANING GRILL TOP OVEN AND MAIN OVEN a Base Rear of Top Oven and Base of Main Oven Wipe out the oven with a damp soapy cloth For more stubborn stai...

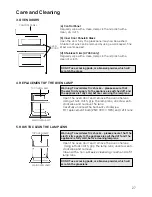
Page 27: ...5W 300 C SES and refit lens 5 HOW TO CLEAN THE LAMP LENS Open the oven door and remove the oven shelves Using a thick cloth grip the lamp lens unscrew anti clockwise and remove Clean with a non abrasi...

Page 28: ...s when removing and refitting DROP DOWN DOORS Remove the door inner glass as follows 1 Open the door fully and unscrew the two screws securing the glass panel so that the securing brackets can be turn...

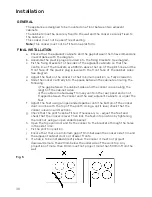
Page 29: ...the cable clamp and connect to the appropriate terminals provided Allow sufficient cable for any future servicing Tighten the screws on the cable clamp and replace the cover Make main connections in t...

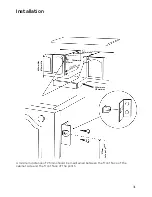
Page 30: ...owing i The gap between the cabinet sides and the cooker is even along the length of the cabinet sides ii The cable is routed away from any vents in the rear panel and is not trapped between the cooke...

Page 31: ...0mm Max 870mm Min 597mm min 720mm min 150mm min 170mm max 570mm to top of plinth 570 min 570mm A minimum distance of 25mm should be maintained between the front face of the cabinet side and the front...

Page 32: ...l Fixing Bracket Cabinet Doors Cooker 2 5mm2 85 C heat resistant cable to BS 6141 Table 15 Cable size to suit current rating of appliance s Hob Cable Double pole control switch Connector box 4mm2 Cabl...

Page 33: ...Symbol is not lit up and is not flashing See timer section for instructions on how to return timer to Manual Operating the cooker under the following conditions may cause a safety device to operate a...

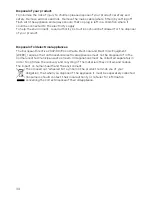
Page 34: ...nces The European Directive 2002 96 EC on Waste Electrical and Electronic Equipment WEEE requires that old household electrical appliances must not be disposed of in the normal unsorted municipal wast...

Page 35: ...g is carried out by our own Service Organisation located throughout the United Kingdom and Eire We will be happy to deal with any problems which you may have Hotpoint s Extended Warranties Whether you...

Page 36: ...UK 08709 066 066 Monday to Friday 8am to 7 30pm Saturday 8 30am to 5 30pm Sunday 9 30am to 3 30pm www hotpointservice co uk Republic of Ireland 0818 313 413 Note Our operators will require the follow...

Reviews: