background image

Page 26

Electrical Requirements

115 VOLT GFCI 

PACE

The Ground Fault Circuit Interrupter (GFCI) is a safety device that is 

designed to detect as little as 5 milliamps (±1mA) of electrical current 

leakage to ground. 

WATKINS WELLNESS

 recommends that the GFCI 

be tested  prior to each use to ensure it is functioning correctly. With 

the spa connected to the power supply, push the "Test" button. The spa 

should stop operating and the GFCI power indicator will go out. Wait 

30 seconds and then reset the GFCI by pushing the Reset button. The 

GFCI power indicator will turn on, restoring power to the spa. If the 

interrupter does not perform in this manner, it is 

an indication of an electrical malfunction and the 

possibility of an electric shock. Disconnect the 

plug from the receptacle until the fault has been 

identified and corrected.

IMPORTANT: 

Never use the GFCI as a means to 

disconnect power to the spa (always unplug it). 

If the GFCI is tripped while the spa is plugged in, 

and a power outage occurs, when power returns 

the GFCI will automatically reset and power will 

flow to the spa.

115 VOLT OPERATION (60Hz ONLY)

The spa must be connected to a dedicated 115 volt, 15 or 20 amp, 

GFCI protected, grounded circuit. The term “dedicated” means the 

electrical circuit is not being used or shared for any other electrical 

items (patio lights, appliances, garage circuits, etc.). If the spa 

is connected to a non-dedicated circuit, overloading will result in 

“nuisance tripping” at the main panel. This requires frequent resetting 

of the breaker switch at the house electrical breaker panel and 

introduces the possibility of damage or failure of spa equipment. 

NEVER CONNECT THE SPA TO AN 

EXTENSION CORD!

A pressure wire connector is provided on the exterior surface of the 

control box, inside the spa. This is to permit the connection of a ground 

bonding wire between this point and any metal equipment, enclosures, 

reinforced concrete pad, pipe, or conduit within 5 feet (1.5 m) of the 

spa (if needed to comply with local building code requirements). The 

bonding wire must be at least a #10-AWG solid copper wire. 

Bond the spa to all exposed metal equipment or fixtures, handrails, and 

concrete pad per N.E.C. Article 680 and all local codes.

INSTALLATION INSTRUCTIONS

All 115 volt


spa models come equipped with approximately 15 feet 

(15 m) of useable power cord (this is the maximum length allowed by 

Underwriters Laboratory and the National Electric Code). When the spa 

is installed, the power cord will come out of the bottom of the equipment 

compartment door. For your safety, when the electrician is installing the 

single electrical outlet and waterproof cover,  the outlet should be no 

closer than 5 feet (1.5 meters) and no farther than 10 feet from the spa 

[reference National Electrical Code 680-6a(1) and 680-41a].
The Ground Fault Circuit Interrupter (GFCI) is located at the end of the 

power cord. This device is for your protection. It is very important to 

protect it from rain and other moisture. Test once a month, with the plug 

connected to the power supply,
1.  Push the “TEST” button on the GFCI breaker. The spa should stop 

operating and the GFCI power indicator will go out. 

2.  Wait 30 seconds, then push the “RESET” button. Power will be 

restored to the spa and the GFCI power indicator will turn on.

If the GFCI fails to operate in this manner, your spa may have an 

electrical malfunction, and you may be risking electrical shock. Turn off 

all circuits and do not use the spa until the problem has been corrected 

by an authorized service agent.

WARNING:

 Removal of the GFCI from the spa’s power cord will 

result in an unsafe spa and will void the spa’s warranty.
IMPORTANT: Should you ever find the need to move or relocate 

your 

HOT SPRING

  spa, it is essential that you understand and apply 

these installation requirements. Your 

HOT SPRING

 spa has been 

carefully engineered to provide maximum safety against electric shock. 

Remember, connecting the spa to an improperly wired circuit will 

negate many of its safety features.

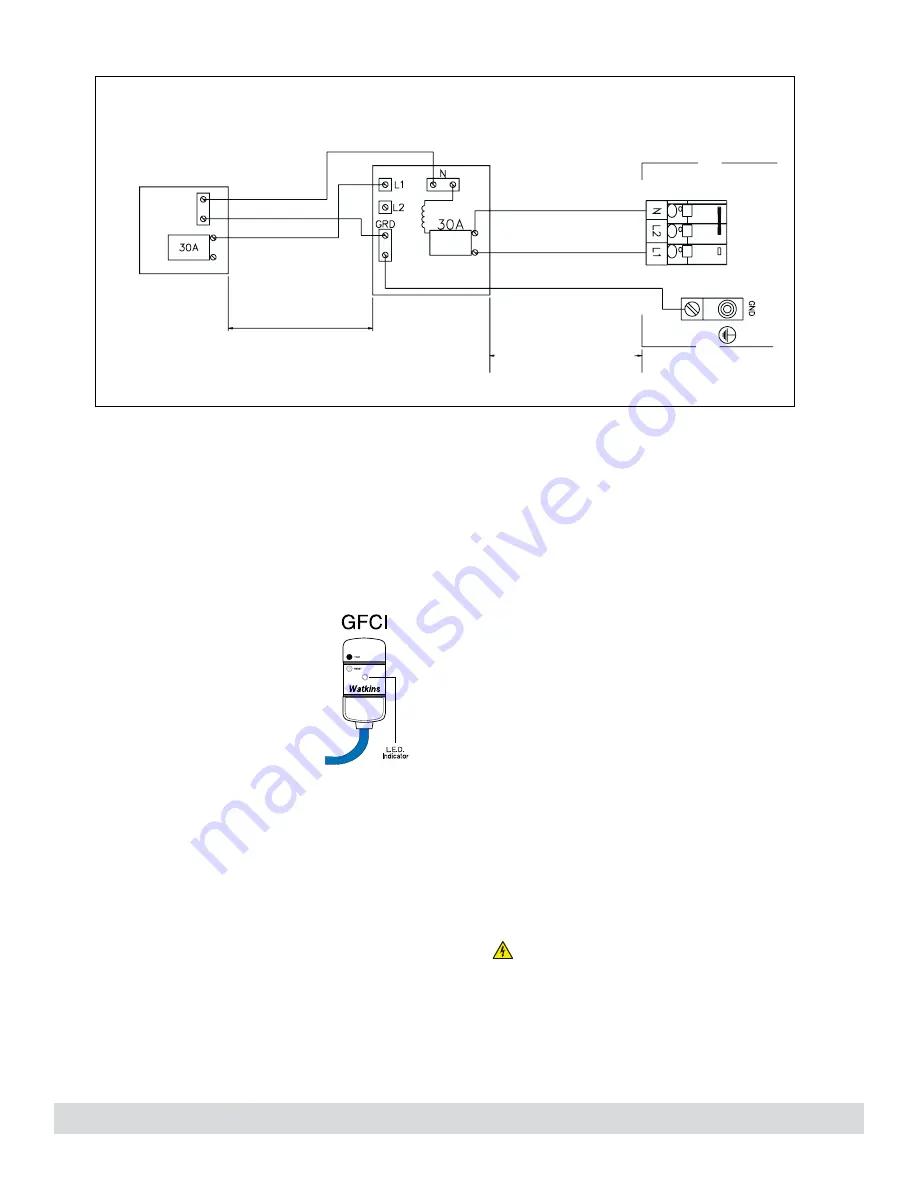
115VAC, 30 Amp Single 

Pole Circuit Breaker 

(Non GFCI)

Main Service 

Electrical Panel

Sub-Panel 

with GFCI 

Breaker

More than 5 feet (1.5 m)  

the Sub-Panel must be  

within sight of the spa  

Do Not Exceed 50 Feet (15 m)

Control Box

N, Neutral, #10AWG White

L1, Hot, #10AWG Black

Ground, #10AWG Green

Less Than 100 FT. 

(30 m)

 #10 AWG White, Neutral

 #10 AWG Green, Ground

 #10 AWG Black, L1

WIRING ILLUSTRATION  

PERMANENTLY CONNECTED FOR  

115 VAC, 30A, 60HZ, CONVERTED MODELS

Summary of Contents for HOT SPOT Pace

Page 1: ...HOT SPOT COLLECTION RELAY RHYTHM PACE 2020 OWNER S MANUAL...

Page 2: ...the right to change specifications or design without notification and without incurring any obligation In most cities and counties permits will be required for the installation of electrical circuits...

Page 3: ...NAL 16 RELAY MODEL REL 18 RHYTHM MODEL RHY 19 PACE MODEL PAC 20 SPA CARE AND MAINTENANCE DRAIN REFILL INSTRUCTIONS 21 PREVENTION OF FREEZING 21 FILTER SYSTEM 22 FILTER CARTRIDGES REMOVAL CLEANING 22 C...

Page 4: ...withArticle 810 of the National Electric Code ANSI NFPA70 WARNING To reduce the risk of electrical shock replace a damaged cord immediately Failure to do so may result in death or serious personal inj...

Page 5: ...rugs alcohol may cause unconsciousness with the possibility of drowning Persons using medications should consult a physician before using a spa some medication may cause a user to become drowsy while...

Page 6: ...y If you have an operational problem carefully go through the steps outlined in the Troubleshooting section If you are not able to resolve the problem contact your authorized HOT SPRING dealer Many pr...

Page 7: ...ary jet provides greater flow through one rotary opening creating a unique massage pattern 7 The Standard Rotary jet provides a strong unique massage 8 The Standard Directional jet with directional no...

Page 8: ...er all local codes this includes the location of the spa the foundation of the spa as well as the electrical installation of the spa Installation instructions in the form of a Pre Delivery Instruction...

Page 9: ...s see page 11 IF USING FROG Bromine Cartridge Canada Only Dial the cartridge to setting 3 and snap into the bottom section of the cartridge holder Leave the top section empty IMPORTANT With FROG Bromi...

Page 10: ...d remove the equipment compartment door Loosen the union on the top of the pump s to allow the air to escape When water is present hand tighten the union Turn power back on activate the pump and check...

Page 11: ...only a responsible person to handle spa chemicals Keep them out of the reach of children Accurately measure the exact quantities specified never more Do not overdose your spa Handle all containers wi...

Page 12: ...own sodium bisulfate To raise the pH level use FRESHWATER pH Alkalinity Up sodium carbonate Water Conditioners Spa fill water varies from location to location and user to user therefore it is importan...

Page 13: ...r from cartridge to ensure it is empty Discard in trash or recycle Set the blue Mineral Cartridge to 6 hold the bottom and turn the top until 6 appears in the window No further adjustments are necessa...

Page 14: ...ed Weekly Super Chlorinate Shock the spa to reactivate the silver ion cartridge allow the release of silver ions and quickly destroy any remaining contaminants Without this weekly shock treatment the...

Page 15: ...vailable to assist with the water maintenance draining or winterizing of the spa is recommended Spas equipped with our FRESHWATER III ozone system can extend this to 4 weeks The FRESHWATER III ozone s...

Page 16: ...rmulation of nitric acid a highly corrosive chemical is a byproduct of the ozone generating process Nitric acid is produced in very small quantities and is readily dissolved in the water stream with o...

Page 17: ...trol panel display Press the LIGHT button again to lower the intensity of the lights to the Medium position Press the LIGHT button again to lower the intensity even more placing the lights intensity i...

Page 18: ...s the button to deactivate the SPA LOCK feature LOCK OVERRIDE The Lock Override feature is for spa users who normally keep the set temperature locked Should the user wish to lock all spa controls temp...

Page 19: ...submenus C Press the MODE or button until LCD is displayed D Press the button to enter into the LCD menu E Using the or the button adjust the desired screen brightness AUDIO MENU OPTIONAL The followi...

Page 20: ...isplay BAS 4 Press the MODE button to display BAL 5 to 5 5 Press button to raise the Balance or press button to lower the Balance TO ADJUST SUBWOOFER From the SETUP screen 1 Press the button to displa...

Page 21: ...and 1 XL Directional Jet C 1 XL Rotary Jet D 1 Water feature E 6 PRECISION Jets F 2 PRECISION Jets Jet Pump 2 A 2 PRECISION Jets 2 Standard Rotary Jets and 1 XL Directional Jet B 6 PRECISION Jets C 2...

Page 22: ...jet and 1 XL Rotary jet B 4 PRECISION Jets and 1 Standard Directional Jet C 2 PRECISION Jets 2 Standard Rotary Jets and 1 XL Directional Jet D 1 Water feature E 2 PRECISION Jets Jet Pump 2 A 6 PRECISI...

Page 23: ...unge C 1 Water Feature D 2 Precision Jets 2 Standard Directional Jets and 1 XL Directional Jet E 1 Standard Rotary Jets A B C D E JET SYSTEM 2 A 4 Precision Jets and 1 XL Directional Jet B 2 Precision...

Page 24: ...gy efficiency NOTE When warmer weather returns approx 60 70 F 15 5 21 C the insulating kit must be removed to prevent overheating of the jet pump WINTERIZING YOUR SPA If you leave the spa unused for a...

Page 25: ...not overtighten WARNING Do not use the spa with the filter cartridge or filter standpipe removed CARE OF THE SPA PILLOWS The spa pillows will provide years of comfort if treated with care They have be...

Page 26: ...e required behind cover when open CoverCradle CoverCradle II 24 UpRite 7 Lift n Glide 14 HOW TO OPEN THE VINYL COVER IMPORTANT Never attempt to open or remove the vinyl cover by grasping or pulling on...

Page 27: ...with each 230 volt spa We recommend that this subpanel be used to supply power to the spa The subpanel requires a 50 amp single phase 230 volt four wire service two line one neutral one ground The gr...

Page 28: ...et 1 5 m away 50A 50A Main Service Electrical Panel 230VAC 30 50 Amp 2 Pole Circuit CIircuit Breaker Non GFCI WIRING ILLUSTRATION OPTIONAL 30 50A 230V SUBPANEL CONVERSION CONNECTION 230 VAC 24 40A 60H...

Page 29: ...etal equipment or fixtures handrails and concrete pad per N E C Article 680 and all local codes INSTALLATION INSTRUCTIONS All 115 volt spa models come equipped with approximately 15 feet 15 m of useab...

Page 30: ...ng If the spa is not connected to a dedicated circuit or is connected to an extension cord or the house wiring is undersized the pump may starve for voltage and therefore may draw more amperage and ge...

Page 31: ...NESS can be reached at 800 999 4688 Extension 8432 Monday through Friday 8 am to 5 pm Pacific Standard Time PST or e mail customerservice watkinsmfg com TROUBLESHOOTING Should you experience any probl...

Page 32: ...ompartment door 2 Loosen the union on the top of the pump s as seen on page 8 to allow the air to escape the hand tighten the union s 3 Turn power back on activate the pump and check to make sure unio...

Page 33: ...bs 2 295 kg 120 lbs ft 585 kg m 230 volt 30 50 amp Single phase GFCI protected circuit PACE Model PAC Seats 5 Adults 6 10 x 6 10 2 08 m x 2 08 m 33 84 cm 30 ft 1 000 or 4 000 300 gallons 1 135 liters...

Page 34: ...T 1 Raise Door Panel making sure it goes up behind Spa Shell then lower to rest on Spa Ledge making sure the Door Panel Clips are behind the Spa Clips and the Door Panel has the same spacing on each s...

Page 35: ......
Page 36: ...L REL RHYTHM MODEL RHY PACE MODEL PAC 2019 Watkins Wellness All Rights Reserved Hot Spot Relay Rhythm Pace Precision No Fault FreshWater FreshWaterAg Clean Screen and Vanishing Act are trademarks of W...

Reviews: