RUS
4
Внимание!
Прибор не предназначен для приведения в действие внешним таймером
или отдельной системой дистанционного управления.
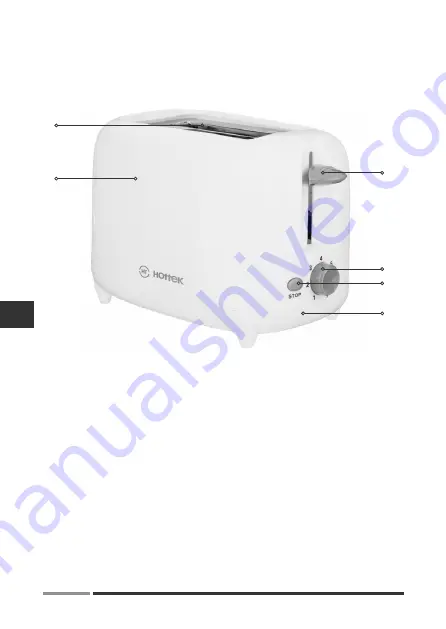
Обзор деталей прибора
1. Корпус прибора
2. Поддон для крошек
3. 2 отсека для тостов
4. Рычаг загрузки тостов
5. 7-ми позиционный таймер
6. Кнопка остановки
Перед первым использованием
• Извлеките прибор из упаковки и удалите все упаковочные материалы.
• Полностью размотайте сетевой шнур.
• Расположите прибор на сухой, ровной и устойчивой к нагреванию
поверхности.
• Перед включением убедитесь, что напряжение, указанное на шильдике
прибора, соответствует напряжению электрической сети.
• Включите прибор в сеть. Прибор готов к использованию.
4
5
6
3
2
1
Summary of Contents for HT-979-100
Page 1: ...RUS 1 HT 979 100 750 220 240 50 60 I HT 979 100 www hottek ru RUS...
Page 2: ...RUS 2...
Page 3: ...RUS 3 0 C 2...
Page 4: ...RUS 4 1 2 3 2 4 5 7 6 4 5 6 3 2 1...
Page 5: ...RUS 5 5 3 7 5 1 2 3 4 5 7 4 6 1 4 4 6 4...
Page 6: ...RUS 6 2 2 1 2 40 70 1...
Page 7: ...RUS 7 CE 2 107 7 495 204 17 75 0319 2019...
Page 13: ...KAZ 13 HT 979 100 HT 979 100 750 220 240 B i i i 50 60 I www hottek ru...
Page 14: ...KAZ 14...
Page 15: ...KAZ 15 0 2 1 2 3 2 4 5 7 6...
Page 16: ...KAZ 16 5 3 7 5 1 2 3 4 5 7 4 6 1 4 4 6 4 2 2...
Page 17: ...KAZ 17 1 2 40 70 1...
Page 18: ...KAZ 18 2 0319 2019...
Page 19: ......
Page 20: ...www hottek ru...


