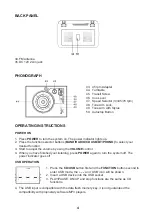
background image

2

PREPARATION FOR USE

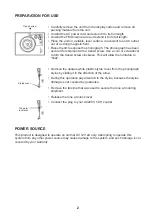
Transit screw

Stylus cover

Tone arm 

lock lever

• 

Carefully remove the unit from the display carton and remove all 

packing material from the unit.

• 

Unwind the AC power cord and extend it to its full length.

• 

Unwind the FM Antenna wire and extend it to its full length.

• 

Place the unit on a stable, level surface, convenient to an AC outlet 

out of a strong magnetic field.

• 

Raise the lid to expose the phonograph. The phonograph has been 

secured for shipment with a transit screw. Use a coin or screwdriver 

to turn the transit screw clockwise. This will allow the turntable to 

“float”.

• 

Remove the opaque white plastic stylus cover from the phonograph 

stylus by sliding it in the direction of the arrow.

• 

During this operation pay attention to the stylus, because the stylus 

damage is not covered by guarantee.

• 

Remove the twist-tie that was used to secure the tone arm during 

shipment.

• 

Release the tone arm lock lever.

• 

Connect the plug to your AC220 V 50 Hz outlet.

POWER SOURCE

This product is designed to operate on normal DC 12V 2A only. Attempting to operate this 

system from any other power source may cause damage to the system, and such damage is not 

covered by your warranty.

Summary of Contents for MT-02

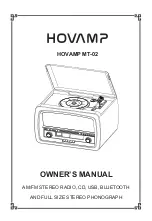
Page 1: ...HOVAMP MT 02 OWNER S MANUAL AM FM STEREO RADIO CD USB BLUETOOTH AND FULL SIZE STEREO PHONOGRAPH ...

Page 2: ... in this manual 2 Clean only with dry cloth 3 Do not block any ventilation openings Install in accordance with the manufacturer s instructions 4 Do not install near any heat sources such as radiators heat registers stoves or other apparatus including amplifiers that produce heat 5 Protect the power cord from being walked on or pinched particularly at plugs convenience receptacles and point where t...

Page 3: ... Use a coin or screwdriver to turn the transit screw clockwise This will allow the turntable to float Remove the opaque white plastic stylus cover from the phonograph stylus by sliding it in the direction of the arrow During this operation pay attention to the stylus because the stylus damage is not covered by guarantee Remove the twist tie that was used to secure the tone arm during shipment Rele...

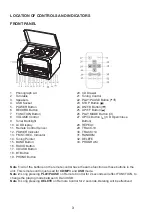
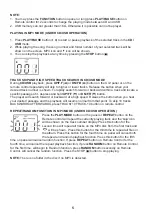
Page 4: ... Tuning Control 22 PLAY PAUSE Button 23 STOP Button 24 DN F R Button 25 UP F F Button 26 PLAY MODE Button 27 OP CL Button CD Open Close Button 28 REPEAT 29 TRACK 10 30 TRACK 10 31 RANDOM 32 DELETE 33 PROGRAM Note 1 All of the buttons on the remote control have the same function as these buttons in the unit This remote control just used for CD MP3 and USB mode Note 2 Long pressing PLAY PAUSE on Rem...

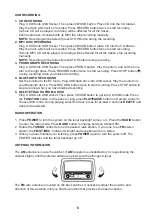
Page 5: ...O to select your desired function 3 Start to adjust the volume by using the VOLUME control 4 When you have finished your listening press POWER again to turn the system off The power indicator goes off USB OPERATION 1 Press the CD USB button first and the FUNCTION button second to enter USB mode the and USB icon will be shown 2 Insert a USB device into the USB socket 3 PLAY PAUSE DN UP and stop fun...

Page 6: ...h forward or backward at a high speed Release the button when you hear your desired passage and the playback will resume normal from that point To skip 10 tracks BACKWARDS AFTERWARDS press TRACK 10 TRACK 10 button on remote control REPEAT RANDOM FUNCTION IN MP3 MODE UNDER CD USB OPERATION Press the PLAY MODE button on the panel or REPEAT button on the Remote control will repeat the currently playi...

Page 7: ...y the audio from your Bluetooth device Press RECORD button twice to start recording Press STOP button to stop recording when you have finished recording 5 DELETE TRACKS FROM U DISK Plug U DISK into USB socket Then press CD USB button to get into CD USB mode Press the FUNCTION button on the panel or long press PLAY PAUSE button on Remote control to choose USB mode During playing select the track pr...

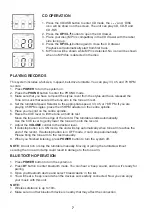
Page 8: ... 5 Place your record on the centre spindle 6 Raise the CUE lever to lift the tone arm off its rest Move the tone arm to the edge of the record The turntable starts automatically Use the CUE lever to gently lower the tone arm onto the record 7 Adjust the VOLUME control to the desired level 8 If Autostop button is in ON mode the unit will stop automatically when tone arm reaches the end of the recor...

Page 9: ...cloth Never use detergents or abrasive cleaners to clean the disc If necessary use a CD cleaning kit Never write on or affix labels to the surface of compact discs RECORD HANDLING Do not touch the grooves on the record Only handle records by the edges or the label Make sure your hands are clean Skin oils from even clean hands can leave a residue on the record surface that will gradually deteriorat...

Page 10: ... is over please deliver the product or battery if it is enclosed to the respective collection point where the electrical appliances or batteries will be recycled The places where the used electrical appliances are collected exist in the European Union and in other European countries as well By proper disposal of the product you can prevent possible negative impact on environment and human health w...

Reviews: