background image

Rotavator 300

19

ENGLISH

Fig. 8

X

Fig. 9

ROTOR AND BLADES

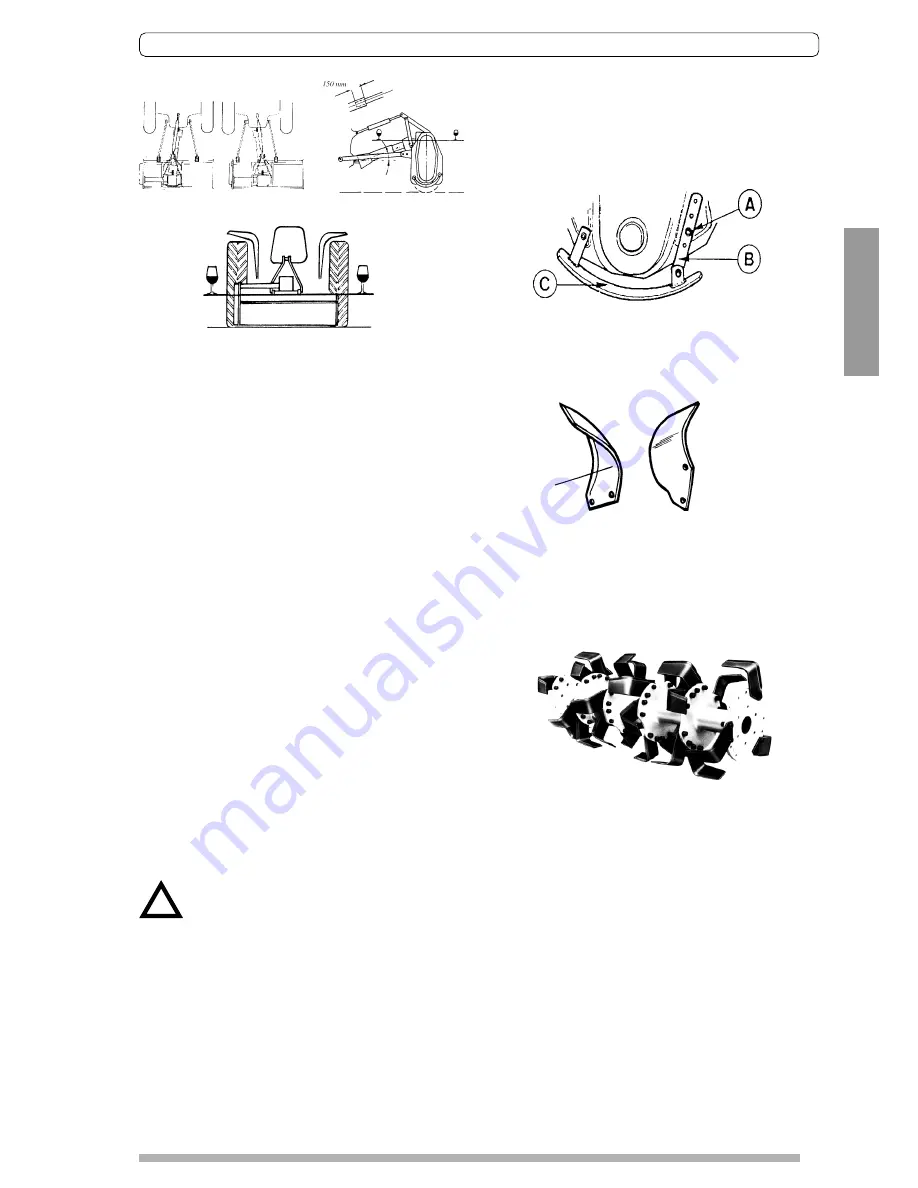
R300 Rotavators are fitted with original HOWARD BLADES
model 665149/150. See fig. 8 where the left blade is marked
with X. Use always only ORIGINAL HOWARD BLADES
and HOWARD.blade bolts.

!

Fig. 4

Fig. 5

Fig. 6

Fig. 7

ATTACHING THE ROTAVATOR TO THE
TRACTOR

All models have dual mounting position, i.e. central or off-
set to the right. Offset mounting is achieved by repositioning
the lower link mounting brackets. (fig.4)
The PTO drive shaft must be set to a safe working length to
ensure the male shaft does not “bottom“ or separate from
the female tube under all conditions of use and transport.

To determine the correct mounting position: with the
Rotavator on a firm level surface the Depth Control
equipment should be adjusted until the gearbox input shaft
is horizontal (fig.5). Position the tractor at a distance from
the Rotavator to give 150 mm (6“) minimum engagement
of the male half of the PTO drive shaft in the female tube
when connected to the tractor. This establishes the safe
working length of PTO drive shaft for connection to the trac-
tor.

Position the tractor lower link ball joints in line with the
mounting pins. Connect the tractor lower links. Fit the trac-
tor upper link and secure. Attach the PTO dirve shaft  to the
pressure plate by the studs and tighten the nuts. Attach the
PTO drive shaft guard chains to the tractor and Rotavator.

Attach stabilizer bar or check chains to limit sway to 50 mm
(2”). Adjust tractor linkage to level Rotavator laterally and
longitudinally (fig. 5 and 6). Before engaging the tractor
PTO, lift the Rotavator on the hydraulic lift linkage until the
PTO dirve  shaft attains an angle of 40 º and set the limit
stop on the hydraulic lift control quadrant. (fig. 5)

ATTENTION! : THE PTO DRIVE SHAFT
ANGLE MUST NEVER EXCEED 40º.

Finally check that during transport and use the PTO drive
shaft does not “bottom“ or separte and that the maximum
angle of 40 º is not exceeded. Should it not be possible to
obtain the aforementioned setting with your tractor, SEEK
ADVICE, it may be necessary to reduce the length of the
PTO drive shaft by cutting.

Depth control

Fig. 7 illustrates how to adjust the depth control skids.

The blades must form a «scroll» patern (fig. 9). This ensure
that they enter the soil at regular intervals to even out the
load on the transmission.

When replacing worn blades, remove one blade and fit the
new one in its place before proceeding to the next. This will
ensure that the blade «scroll» patern is mantained.

Summary of Contents for ROTAVATOR 300

Page 1: ...ROTAVATOR 300 R 300 Operating Instructions ...

Page 2: ...nufactured as a tractor driven ground cultivator no other use is intended Please read and understand this manual before operating the Rotavator Warranty The warranty applicable to your machine is detailed on separate documentation which should accompany this manual If this is missing please contact your dealer Serial Number The Serial Number and Model are stamped on the Identification Plate attach...

Page 3: ...nance personnel and bystanders This is the SAFETY ALERT symbol and means ATTENTION SAFETY ISSUE Failure to comply with the given instruction could result in severe injury or death If you have questions not answered in this manual please contact your dealer or distributor IF YOU REQUIRE MORE COPIES OF THIS MA NUAL PLEASE CONTACT YOUR DEALER ALTERNATIVELY YOU ARE WELCOME TO COPY AND DISTRIBUTE THIS ...

Page 4: ...actor and Rotavator to an emergency stop if so required Progress slowly initially and check stability steering and braking are satisfactory Ensure the work area is clear especially of children or animals Inspect the work area for hidden obstructions which may constitute a hazard DURING OPERATION Ensure the work area is clear especially of children or animals Do not attempt to start the tractor or ...

Page 5: ...mpted fitment Fasteners Fit only the correct replacement fasteners and tighten fasteners to the torque specified in the manual Incorrect too weak fasteners may break when torqued to the required setting or if too strong may induce failures in other components Follow safe workshop practices during any maintenance Keep working area clean dry and in particular free of oil spills Ensure the workshop i...

Page 6: ...UITABILITY TO APPLICATION Rotavators have been designed and manufactured as a tractor driven ground cultivator no other use is intended However over the years some models have been adapted for new uses such as road base preparation and semi industrial mixing operations Before beginning work it is necessary to assess the effect of the machine on the safety of both the operator and any potential bys...

Page 7: ...s the guards are undamaged securely fifted correctly seated on the shaft grooves and the restraining chains attached to the tractor and implement Should the guards be broken damaged or badly fitted the implement must no be used damaged parts habe been replaced and or bad fitting corrected Always ensure the guard tubes do not separate at tthe PTO Drive Shaft s longest working or transport lengh or ...

Page 8: ...C Side drive G Trailing board D Rotor H Depth control skids R300 are designed for 15 to 45 HP tractors with cat I and II linkage The drive is by a PTO shaft from a 540 tpm The gearbox is single The jackshaft transmit the power from the gearbox via the side chain or via the side gear train An overload clutch provides protection for the transmission The normal tillage depth of 5 to 18 cm is regulate...

Page 9: ... with the mounting pins Connect the tractor lower links Fit the trac tor upper link and secure Attach the PTO dirve shaft to the pressure plate by the studs and tighten the nuts Attach the PTO drive shaft guard chains to the tractor and Rotavator Attach stabilizer bar or check chains to limit sway to 50 mm 2 Adjust tractor linkage to level Rotavator laterally and longitudinally fig 5 and 6 Before ...

Page 10: ...10 Conversely coarse tilths are produced by fast tractor speeds and a raised trailing board fig 11 Intermediate grades of tilth from coarse to fine can be obtained by Adjusting the pressure on the trailing board which by impact shatters the blade cut clods Raised the trailing board also deposit weeds and trash on the surface to wither With the trailing board completely pressured trush is buried an...

Page 11: ...Rotavator Bumping on Ground a obstacles entangled in blades b blades incorrectly mounted with no scroll effect or blades fitted with blunt edge leading or broken blades Obvious Points a ROTAVATOR not level cutting too deep on right side Shorten right hand tractor lift rod or adjust depth control wheel b Not overlapping drive closer to last run c Working on hillsides Work up the slope if possible I...

Reviews: