background image

34_

Built-In 

Appliances

08 - Built-in Installation

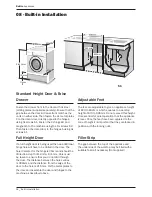
Standard Height Door & False 
Drawer 


Fasten the drawer front to the door with 2x steel 
jointing plates (supplied separately). Ensure that the 
gap between the door & drawer front matches the 
units on either side. Then fasten the 2x metal plates 
C to the décor door, directly opposite the hinges, 
using 4x screws S1. Fasten the 2x hinges B and 
magnets A to the machine using the 6 x screws S2. 
Then fasten the décor-door to the hinges A using 4x 
screws S1  

Full  Height  Door 


If a full height door is being used then an additional 
hinge hole will have to be drilled in the door. The 
hole diameter for the hinge is 35mm and should be 
drilled to a depth of 12mm +0/-1mm. Care must 
be taken to ensure that you do not drill through 
the door. The distance between the hole centres 
is 384mm and the distance from the edge of the 
door to the hole is 21.5mm. Fix the metal plates to 
the door and assemble the door and hinges to the 
machine as described above.

Adjustable  Feet 


The feet are adjustable to give an appliance height 
of 820 to 842mm, which equates to a worktop 
height of 874 to 896mm. Do not exceed this height. 
It is essential for quiet operation that the appliance 
is level. Once the feet have been adjusted to the 
correct height it is important that they are locked in 
position with the locking nuts.

Filler  Strip 


The gap between the top of the appliance and 
the underside of the worktop may be 

fi

 lled with a 

suitable fascia if necessary (Not supplied)

20-842mm

11mm

541mm

591mm

151mm

51mm

820mm

!

!

!

!

S1

580 min

Built-in Installation

Summary of Contents for HJA8501

Page 1: ...User installation Guide HJA8501 HJA8511 Integrated Washing Machine ...

Page 2: ...azardous situations with regard to life and property Warning for electric shock This appliance s packaging material is recyclable Help recycle it and protect the environment by dropping it off in the municipal receptacles provided for this purpose Your appliance also contains a great amount of recyclable material It is marked with this label to indicate the used appliances that should not be mixed...

Page 3: ... Loading the laundry 14 Detergents and softeners 14 Tips for efficient washing 16 05 Selecting a Programme Operating Your Machine 17 Control panel 17 Display symbols 18 Turning the machine on 18 Programme selection 18 Main Programmes 18 Additional programmes 19 Special programmes 20 Temperature selection 20 Spin Speed selection 20 Programme and consumption table 21 Auxiliary functions 22 Time disp...

Page 4: ...l Power W 2200 2200 Spin Speed rpm max 1600 1400 Stand by Mode Power W 1 40 1 40 Off Power Mode W 0 20 0 20 Technical specifications may be changed without prior notice to improve the quality of the product Figures in this manual are schematic and may not match the product exactly Values stated on the product labels or in the documentation accompanying it are obtained in laboratory conditions in a...

Page 5: ...y may come out hot at the end of the washing process and may wear out faster If the fuse or circuit breaker is less than 16 Amperes please have a qualified electrician install a 16 Ampere fuse or circuit breaker Please be sure that the tap water supply and water drainage systems are appropriate If they are not call a qualified plumber to have any necessary arrangements carried out Intended use Thi...

Page 6: ...ne unplug it turn off the water tap and contact an authorized service agent If there are children in your house Electrical appliances may be dangerous for the children Keep children away from the machine when it is operating Do not let them tamper with the machine Close the door when you leave the area where the machine is located Store all detergents in a safe place out of reach of the children W...

Page 7: ...l as the power cable are not folded kinked or crushed while pushing the product into its place after installation or cleaning procedures Appropriate installation location Place the machine on a rigid floor Do not place it on a long pile rug or similar surfaces Total weight of the washing machine with full load is approx 80 kilograms Place the product on a solid and flat floor that has sufficient l...

Page 8: ...dels with a single water inlet should not be connected to the hot water tap In such a case the laundry will get damaged or the product will switch to protection mode and will not operate Do not use old or used water inlet hoses on the new product It may cause stains on your laundry 1 Connect the special hose supplied with the product to the water inlet on the product Ensure that the cold water con...

Page 9: ...f dirty water back into the machine and to allow for easy discharge do not push waste hose too far into waste pipe and ensure an S bend is formed with the hose The end of the hose should not be bent it should not be stepped on and the hose must not be kinked between the drain and the machine If the hose is too short it may be extended to a Max Length of 3 2m Ensure all joints are tight to avoid le...

Page 10: ...y the old plug which is cut off as a plug with a bared cord could cause a shock hazard if inserted into a socket elsewhere in the house The moulded plug on this appliance incorporates a 13A fuse Should the fuse need to be replaced an ASTA approved BS1362 fuse of the same rating must be used Do not forget to refit the fuse cover In the event of losing the fuse cover the plug must not be used until ...

Page 11: ...way from reach of the children Packaging materials of the product are manufactured from recyclable materials Dispose of them properly and sort in accordance with recycled waste instructions Do not dispose of them with normal domestic waste Transportation of the product 1 Drain any remaining water in the product completely see Draining remaining water and cleaning the pump filter 2 Install transpor...

Page 12: ...vily soiled or stained If you plan to dry your laundry in a dryer select the highest spin speed recommended during washing process Do not use detergent in excess of the amount recommended on the detergent package Sorting the laundry Sort laundry according to type of fabric colour and degree of soiling and allowable water temperature Always obey the instructions given on the garment tags 04 Prepara...

Page 13: ...able for machine wash Always follow the instructions on the package Wash trousers and delicate laundry turned inside out Keep laundry items made of Angora wool in the freezer for a few hours before washing This will reduce piling Laundry that are subjected to materials such as flour lime dust milk powder etc Intensely must be shaken off before placing into the machine Such dusts and powders on the...

Page 14: ...1 Left compartment with number II Main wash compartment for powder detergent or powder bleach stain remover 2 Left compartment with number II Main wash compartment for liquid detergent or liquid stain remover 3 Middle compartment with number I pre wash compartment for powder detergent powder stain remover or liquid bleach liquid bleach must be added either during the pre wash or during the first r...

Page 15: ...Programme Bleach must be removed from the laundry with rinsing otherwise it may cause itching on the skin Read the dosage instructions and label of your garments carefully before using the liquid bleach Starch Add liquid starch powder starch or the dyestuff into the softener compartment as instructed on the package Never use fabric softener and starch together in the same washing cycle Wipe the in...

Page 16: ...d at dosages recommended for heavily soiled clothes Prefer liquid detergents produced for delicate clothes Woollen and silk clothes must be washed with special woollen detergents Normally Soiled For Example Stains Caused By Body On Collars And Cuffs Powder and liquid detergents recommended for whites can be used at dosages recommended for normally soiled clothes Powder and liquid detergents recomm...

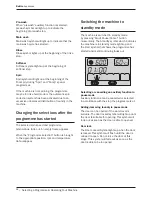
Page 17: ...ur Machine Control panel 1 6 7 2 3 4 5 8 1 Spin Speed Adjustment Button 2 Display 3 Temperature Adjustment Button 4 Programme Selection Knob 5 On Off Button 6 Time Delaying Button 7 Auxiliary Buttons 8 Start Pause Cancel Button Selecting a Programme Operating Your Machine ...

Page 18: ...nsing and if required spin cycles When selecting the programme you are going to use always consider type of fabric colour degree of soiling and permissible water temperature Always select the lowest required temperature Higher temperature means higher power consumption For further programme details see Programme Selection Table Cottons You can wash your durable clothes with this programme Your lau...

Page 19: ...s and etc Used only once Darkcare This programme can be used to wash dark coloured laundry which you want to prevent from getting faded We recommend you use liquid detergent or woollen shampoo with this programme Mixed Fabrics You can use this programme to wash cottons and synthetics together There is no need to sort them Shirts You can use this programme to wash the shirts made of cotton syntheti...

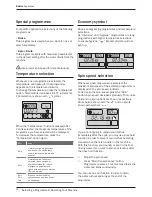
Page 20: ...othes Ex underwear 40 ºc 30 ºc Cold Blended clothes including synthetics and woollens as well as dedicates Economy symbol Shows energy saving programmes and temperature selections As Intensive and Hygiene programmes are long programmes with higher temperature selections to ensure hygiene Economy Symbol will not light up Spin speed selection Whenever a new programme is selected the maximum spin spe...

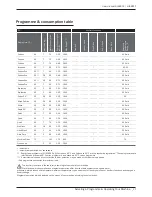
Page 21: ...3 5 38 0 70 1600 60 Cold Cottons Eco 40 7 64 0 72 1600 60 Cold Synthetics 60 3 45 1 00 1200 60 Cold Synthetics 40 3 45 0 45 1200 60 Cold Cotton 20 20 3 5 39 0 16 1600 20 Mixed Fabrics 40 3 5 45 0 55 1200 40 Cold Shirts 40 3 5 45 0 55 800 60 Cold Rapid 30 30 2 35 0 10 1400 30 Cold Quick 90 7 60 2 00 1400 90 Cold Quick 60 7 60 1 15 1400 90 Cold Quick 30 7 70 0 20 1400 90 Cold Woollens 40 1 5 56 0 30...

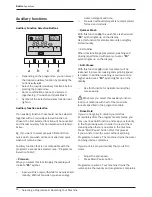
Page 22: ...r Wash With this function b the wash time is shortened F2 symbol lights up on the display Use this function for smaller amounts or slightly soiled laundry Extra Rinse When this function c is selected washing and rinsing is performed with plenty of water F3 symbol lights up on the display Anti Crease With this function d drum movement will be lessened to prevent creasing and spinning speed is limit...

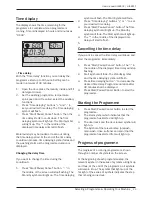
Page 23: ...tons or to set your desired time delay 3 Press Start Pause Cancel button The Time delaying symbol will light up The Standby symbol will fade The Start symbol will light up 4 The in the middle of the displayed time delay will start to flash 5 Cancelling the time delay If you want to cancel the time delay countdown and start the programme immediately 1 Press Start Pause Cancel button The in the midd...

Page 24: ...rame appears When the Programme selection button is brought to the appropriate position rpm and temperature data reappear Switching the machine to standby mode The machine is switched to standby mode by pressing Start Pause Cancel button momentarily The Standby symbol which indicates the machine is in standby mode lights up and the start symbol that shows the programme has started and is still con...

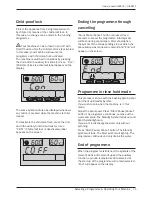
Page 25: ... programme through cancelling Start Pause Cancel button is pressed for 3 seconds to cancel the programme Start symbol will flash during cancellation After cancellation the symbol of the corresponding step at which the cancellation was made will remain lit and End will appear on the screen Programme in rinse hold mode This process is shown with the flashing Spin Symbol and the lit up Standby Symbol...

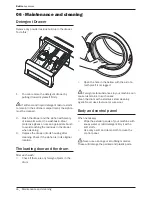
Page 26: ... cleaning 3 Replace the drawer into its housing after cleaning Check if the siphon is in its original location The loading door and the drum After each wash Check if there are any foreign objects in the drum Open the hole in the bellow with the aid of a toothpick if it is clogged Foreign metal substances in your machine can cause rust stains In such cases Clean the drum with a stainless steel clea...

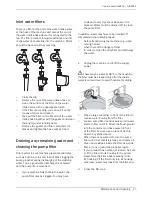
Page 27: ...to drain the water the pump filter may be clogged You may have to clean it every 2 years or whenever it is blocked Water must be drained off to clean the pump filter In addition water may have to be drained off completely in the following cases before transporting the machine e g when moving house when there is the danger of frost In order to clean the dirty filter and discharge the water 1 Unplug...

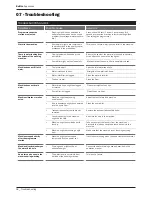
Page 28: ... Door Machine does not drain water Water drain hose might be clogged or twisted Clean or streighten the hose Pump filter is clogged Clean the pump filter Machine vibrates or makes noise Machine might be standing unbalanced Adjust the feet to level the machine A hard substance might have entered into the pump filter Clean the pump filter Transportation safety bolts are not removed Remove the transp...

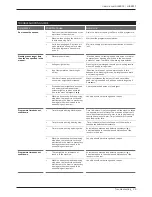
Page 29: ...much detergent usage Use recommended amount of detergent Machine does not switch to spinning step when the laundry is not evenly distributed in the drum to prevent any damage to the machine and to its surrounding environment Laundry should be rearranged and re spun Programme time does not countdown Timer may stop during water intake Timer indicator will not countdown until the machine takes in ade...

Page 30: ...ergent is used Use the recommended amount of detergent appropriate for water hardness and the laundry Regular drum cleaning is not applied Clean the drum regularly For this please see Cleaning the door and the drum Washing performance is poor Stains persist or the laundry is not cleaned Insufficient amount of detergent is used Use recommended amount of detergent appropriate for the laundry Excessi...

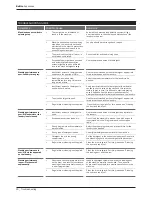
Page 31: ...s kinked Check the drain hose Laundry became stiff after washing Insufficient amount of detergent is used Using insufficient amount of detergent for the water hardness can cause the laundry to become stiff in time Use appropriate amount of detergent according to the water hardness Detergent is put in the wrong compartment If detergent is put in the prewash compartment although prewash cycle is not...

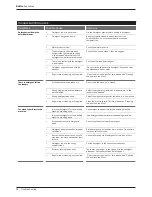
Page 32: ...re were selected Select the proper programme and temperature for the laundry to be washed Wrong detergent was used Select the proper detergent for the laundry to be washed Regular drum cleaning is not applied Clean the drum regularly For this please see Cleaning the door and the drum Too much foam forms in the machine Improper detergents for the washing machine are being used Use detergents approp...

Page 33: ... the machine and to its surrounding environment Laundry should be rearranged and re spun Machine doesn t work Nothing is displayed on the screen The plug might not be plugged in the mains outlet Check the plug Fuse may have blown Check the fuse Electricity may be cut off Check the supply power The On Off button might not have been pressed Press this button The machine did not start after the progr...

Page 34: ... depth of 12mm 0 1mm Care must be taken to ensure that you do not drill through the door The distance between the hole centres is 384mm and the distance from the edge of the door to the hole is 21 5mm Fix the metal plates to the door and assemble the door and hinges to the machine as described above Adjustable Feet The feet are adjustable to give an appliance height of 820 to 842mm which equates t...

Page 35: ..._ 35 User manual HJA8501 HJA8511 Fittings S2 x6 S1 x8 A X2 B x2 C x2 1 Prepare the door Or 2 Attach Door Fittings B S1 C 3 Connect Brackets S2 A A 4 Connect Brackets Built in Installation ...

Page 36: ... operated in accordance with the manufacturer s instructions and used for normal domestic purposes This guarantee does not cover accidental damage misuse or alternations which are likely to affect the product The guarantee is invalid if the product is tampered with or repaired by any unauthorised person The guarantee in no way affects your statutory or legal rights What to do if you need to report...

Page 37: ..._ 37 User manual HJA8501 HJA8511 ...

Page 38: ...38_ Built In Appliances Notes ...

Page 39: ..._ 39 User manual HJA8501 HJA8511 Notes ...

Page 40: ...If supplied please stick your self adhesive product rating plate here or make a note of the product serial number below in the box below for future reference Serial Number ISSUE v1 170712 ...

Reviews: