ISRB
2005 GEA 20260
Page 4 of 24
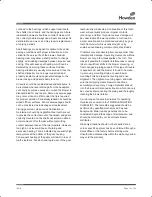
Speed
– These blowers & exhausters may be
operated at speeds up to the maximum listed for the
various frame sizes.
They may be direct coupled to suitable constant
speed drivers if pressure/temperature conditions are
also within limits. At low speeds, excessive
temperature rise may be a limiting factor.
Special Note: The listed maximum allowable
temperature rise for any particular blower &
exhauster may occur well before its maximum
pressure or vacuum rating is reached.
This may occur at high altitude, low vacuum or at
very low speed. The units’ operating limit is always
determined by the maximum rating reached fi rst. It
can be any one of the three: Pressure, Temperature
or Speed.
Operation
Before operating a blower under power for the fi rst
time, recheck the unit and the installation thoroughly
to reduce the likelihood of avoidable troubles. Use
the following procedure check list as a guide, but
consider any other special conditions in the
installation.
1.
Be certain that no bolts, tools, rags, or debris
have been left in the blower air chamber or
piping.
2.
If an outdoor intake without filter is used, be sure
the opening is located so it cannot pick up dirt
and is protected by a strong screen or grille. Use
of the temporary protective screen as described
under INSTALLATION is strongly recommended.
3.
Recheck blower leveling, drive alignment and
tightness of all mounting bolts if installation is not
recent. If belt drive is used, adjust belt tension
correctly.
4.
Turn drive shaft by hand to make sure impellers
still rotate without bumping or rubbing at any
point.
5.
Ensure oil levels in the main oil sumps are
correct.
6.
Check lubrication of driver. If it is an electric
motor, be sure that power is available and that
electrical overload devices are installed and
workable.
7.
Open the manual unloading valve in the
discharge air line. If a valve is in the inlet piping,
be sure it is open.
8.
Bump blower a few revolutions with driver to
check that direction of rotation agrees with arrow
near blower shaft, and that both coast freely to a
stop.
After the preceding points are cleared, blower is
ready for trial operation under “no-load” conditions.
The following procedure is suggested to cover this
initial operation test period.
a. Start blower, let it accelerate to full speed, then
shut off. Listen for knocking sounds, both with power
on and as speed slows down.
b. After blower comes to a complete stop, repeat
above, but let blower run 2 or 3 minutes. Check for
noises, such as knocking sounds.
c. After blower comes to a complete stop, operate
blower for about 10 minutes unloaded. Check oil
levels.
Observe cylinder and headplate surfaces for
development of hot spots such as burned paint,
indicating impeller rubs. Be aware of any noticeable
increase in vibration.
Assuming that all trials have been satisfactory, or that
necessary corrections have been made, the blower
should now have a final check run of at least one
hour under normal operating conditions. After blower
is restarted, gradually close the discharge unloading
valve to apply working pressure. At this point it is
recommended that a pressure gauge or manometer
be connected into the discharge line if not already
provided, and that thermometers be in both inlet and
discharge lines. Readings from these instruments will
show whether pressure or temperature ratings of the
blower are being exceeded.
During the final run, check operating conditions
frequently and observe the oil levels at reasonable
intervals. If excessive noise or local heating
develops, shut down immediately and determine the
cause. If either pressure rise or temperature rise
across the blower exceeds the limit specified in this
manual, shut down and investigate conditions in the
piping system. Refer to the TROUBLESHOOTING
ISRB 2005 GEA 20260.indd 4
17/09/2015 12:53
Summary of Contents for Roots 2500 Series WHISPAIR MAX
Page 14: ...ISRB 2005 GEA 20260 Page 14 of 24 Troubleshooting Checklist...
Page 15: ...ISRB 2005 GEA 20260 Page 15 of 24 2500 Series WHISPAIR Max Blowers...
Page 20: ...ISRB 2005 GEA 20260 Page 20 of 24...
Page 21: ...ISRB 2005 GEA 20260 Page 21 of 24 Assembly of 2500 Series WHISPAIR Max Blower...
Page 22: ...ISRB 2005 GEA 20260 Page 22 of 24 Assembly of 2500 Series DVJ Blower...


