4
GEA30580_Rev_11.15
Installation
Do not V-belt drive the 827 DVJ which is Gear End
driven� The addition of belt forces could cause
undesired and uneven gear contact and damage the
blower�
A temporary cover is installed on one jet port along
with a permanent cover on the other at the factory�
A silencer must be installed in place of the temporary
cover before operating the blower; however, the
permanent cover and silencer locations may be
exchanged if required by the installation�
The permanent cover must be removed, both jet
plenums inspected and cleaned for foreign material,
then the permanent cover and silencer installed in the
desired locations before operating the blower� Full
size jet and discharge silencers are desirable, however
the jet silencer may be reduced one nominal size
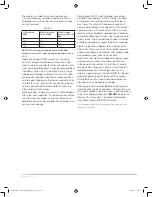
providing either the vacuum level less than 18�5 “Hg
or if the operating speed is below 60% of maximum
blower speed� Both jet and discharge silencers may
be reduced one nominal size in applications with
vacuum levels is less than 18�5 “Hg and speed is less
than 60% of maximum blower speed�
Avoid opening blower protective covers until ready to
start installation, as protection will be lost quickly by
evaporation�
If internal protection is required due to rust or
corrosion, removal of the blower from service, or
the internal protection furnished by factory at time
of shipment has been removed do not use a liquid
preservative of any kind on the coated surfaces�
Capsules of vapor inhibitor such as ZeRust VC1-1
may be used internally by sealing all machine openings
with vapor barrier paper or tape�
Blowers in long storage should be not subject to
excessive vibration and the blower drive shaft should
be rotated 3 to 4 revolutions every two weeks� Prior
to start-up, remove flange covers on both inlet and
discharge and inspect internals to insure absence of
rust or debris�
This blower has several coats of a fine-grained, natural
graphite coating applied to the internal surfaces� The
coating is applied after the machine’s internal clear-
ances and impeller timing are established� The effect
of coating is to close up internal clearances, decrease
slip, and increase flow and efficiency at any given
speed� Exhaust air may carry some coating particles�
Blowers with internal abradable coating are for use
with clean, dry air only�
After coating, it is not practical to try to measure
clearances involving these surfaces before or after
running the blower� After coating and before running
some coated surfaces may even be touching� After
running the coated surfaces may have abraded areas
and scratches, due to run-in contact between the
surfaces�
Do not attempt to measure clearances involving
coated surfaces as a basis of setting impeller in rela-
tion to the cylinder bore, head plates, or each other
(fronts and backs)� Clearance settings can be made
accurately only with uncoated parts�
Where internal inspection indicates a need for cleaning
coated surfaces of dirt, dust, etc�, wipe clean only
with a clean dry rag� Do not use a solvent or cleaner
of any kind or allow solvent or cleaner to reach these
surfaces while cleaning uncoated surfaces�
Cleaning, coating & curing procedure for applying
abradable coating
General: These procedures are for coating new
uncoated repair parts, spot repair of coating, or
renewal� If setting clearances and timing are involved,
this should be done before the new parts are coated�
Subsequent cleaning and coating may involve at
least partial disassembly for proper cleaning without
damaging the coating of other original parts still
coated, and to apply coating properly�
Normally, for new uncoated surfaces, three coats are
applied and each coat must cure properly�
Cleaning before coating
For new uncoated surfaces, apply cleaner with a
clean, “soaked” rag� Apply the cleaner liberally, allow
to set for a minute or two and wipe off� Avoid cleaning
surfaces not to be coated�
Spot repair to be done only with a clean dry rag�
Preparation and coating
Please follow the directions on the aerosol graphite
lubricant container pertaining to preparation, applica-
tion, ventilation, and inflammability� Typically, one
coat is applied, but when multiple coats are necessary
each coat must be completely cured per the proce-
dure described below before the next application�
Each layer of coating should be applied as evenly as
possible� The best distance from the spray nozzle to
the surface should be 8 to 12 inches� Try to maintain
this distance wherever space conditions allow�”
Curing procedure
Note that coated parts may feel dry or “tack free” after
few minutes, but the coat will not have the proper cure
that is required�
GEA30580 Roots 827 DVJ IOM Manual_rev.02.16.indd 4
15/02/2016 12:15:34


