background image

INSTALLATION AND OPERATING
INSTRUCTIONS. READ INSTRUCTIONS

CAREFULLY BEFORE ATTEMPTING INSTALLATION.
KEEP THESE INSTRUCTIONS FOR FUTURE
REFERENCE

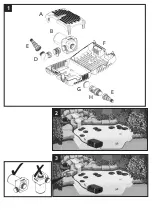
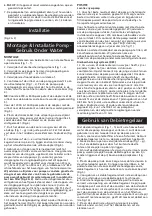
a. Wildlife Protection System 

b. Pump 

c. Outlet adaptor 

d. Ball Joint 

e. Hosetail & Nut 

f. Strainer Cage 

g. End Cap 

h. Flow Control 

The pump is electrically operated and is designed to pump
solid particles up to 10mm in diameter with minimal pre-
strainer maintenance. These types of pumps are
particularly suitable for pumping water to external filters
or for use in high flow waterfalls or watercourse
applications where low maintenance is important. The
pump does not use oil or grease for lubrication and can be
used safely in ponds containing fish or plants. The motor
consists of a sealed stator and water-cooled rotor. All
electrical components are isolated from the water.

ATTENTION

AUTOMATIC CUT-OUT 

To help ensure your pump’s long life and to prevent
damage, it is fitted with automatic thermal overload
protection. This switches off the pump if it overheats. If
this occurs, switch off the power at the mains supply to
the pump. Check for the cause. Usually it will be debris
blocking the inlets of the pump or obstructing the
impeller. Remove the obstruction and wait for the pump
to cool down. Then switch on the pump again.

Failure to observe the following notices may result in
injury, product damage or loss of fish.

1. This pump has been designed for the use with ponds

only. Only use this pump for the operation of pond
filter systems, water displays, waterfalls etc. Do not use
this pump for any other use (i.e. do not use this pump
in swimming pools, bathrooms, central heating systems
etc). Using the product for any other application may
result in injury or product damage.

2. This appliance is not intended for use by persons

(including children) with reduced physical, sensory or
mental capabilities, or lack of experience and
knowledge, unless they have been given supervision or
instruction concerning use of the appliance by a person
responsible for their safety. Children should be
supervised to ensure that they do not play with the
appliance. (

Australia & NZ only

) This appliance is not

intended for use by young children or infirm persons
unless they have been adequately supervised by a
responsible person to ensure that they can use the
appliance safely. Young children should be supervised
to ensure that they do not play with the appliance.

3. 

WARNING

: Always unplug or disconnect all appliances

in the pond from the electricity supply before putting
your hands in the water whilst equipment is being
installed, repaired, maintained or handled.

4.  Never use the mains supply cable to lift the pump, as

this may cause damage. We recommend fitting a lifting
cord to the handle on the strainer cage when the pump
is installed in deep water.

5.  Do not operate or leave the pump in freezing

conditions.

6.  Protect the pump from direct sunlight. Direct sunlight

may overheat the motor.

7.  Never allow the pump to run dry.

8.  Do not operate this pump without the strainer cage

properly attached. Using the pump without the strainer
cage may invalidate your guarantee.

9. 

ATTENTION

: This product is not suitable for water

temperatures above 35ºC.

10. 

ATTENTION

: Do not operate this product if the mains

supply cable or the motor has become damaged in any
way. The supply cable cannot be replaced as it is
permanently encased in the motor housing and should
therefore be disposed of according to local regulations.

11. If you live in a hard water area (water with high

calcium or limescale content), the pump, rotor assembly
and inside of motor should be cleaned at regular
intervals (See MAINTENANCE).

12. Only use accessories which have been designed for use

with this product. The use of any other accessories may
invalidate your guarantee.

1. 

WARNING

: Always unplug or disconnect all appliances in

the pond from the electricity supply before putting
your hands in the water whilst equipment is being
installed, repaired, maintained or handled.

2.  Check that the voltage marked on the unit corresponds

to the mains supply.

3.  The pump is supplied with 10m of 3 core electric cable

which is permanently connected and sealed to the
motor.

The supply cable cannot be replaced. If the cable is
damaged, the pump should be discarded.

The plug supplied with this product is not waterproof
and must be housed in a dry, waterproof enclosure.

4.  A 10mA or30mA Residual Current Device (RCD) must be

fitted to the mains supply.

5.  The installation must conform to the National and Local

wiring regulations which could include the use of
plastic or metal conduit to protect the cable.

6. 

WARNING

: This appliance must be connected to an

earthed supply.

7.  The pump cable (and extension cable) should be

positioned and adequately protected against damage
especially where contact with gardening equipment,
(lawn mowers, forks etc..) children and domestic
animals may occur.

8. Consult a qualified electrician or local authority if in

any doubt about wiring to the mains supply.
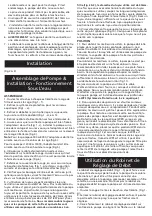
(Fig 2 & 3)

Introduction

General Safety Guidelines

Electrical Connections

Typical Installation

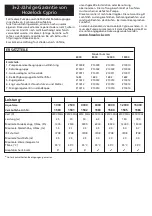
Summary of Contents for Aquaforce 12000

Page 1: ...Hozelock Ltd Midpoint Park Birmingham B76 1AB England Tel 44 0 121 313 1122 info hozelock com www hozelock com 43389 002 aquaforce 6000 8000 12000 15000 2823 1583 1584 1585 1586...

Page 2: ......

Page 3: ...2 3 3 7 A B E D F G H E 1...

Page 4: ...300mm 6 9 12 4 7 10 8 11 5 6000 8000 12000 15000 15 13 14 18 16 17...

Page 5: ...21 19 24 20 23 22 d c b a d c b a...

Page 6: ...ect all appliances in the pond from the electricity supply before putting your hands in the water whilst equipment is being installed repaired maintained or handled 4 Never use the mains supply cable...

Page 7: ...his possibility the Aquaforce range of pumps has a unique Wildlife Protection System WPS which reduces the inlet strainer hole size down to 2mm at this critical time in fishes life cycle To use this f...

Page 8: ...mber and screws and return the pump to the strainer cage Pump Dismantling Assembly 12000 15000 Fig23 1 Switch off the pump and remove the strainer cage as described above and remove the pump 2 Ensure...

Page 9: ...eplacement of a faulty pump This guarantee is not transferable It does not affect your statutory rights To obtain the benefits of the guarantee firstly contact Hozelock Cyprio Consumer Services who ma...

Page 10: ...ec l appareil Pour l Australie la Nouvelle Z lande seulement Cet appareil n est pas destin tre utilis par des jeunes enfants ou des personnes handicap es moins qu ils ne soient supervis s par une pers...

Page 11: ...queue de tuyau et fixez le l aide d une attache de tuyau appropri e puis positionnez la sortie de tuyau dans la position d sir e 10 Vissez directement la queue de tuyau sur le bossage de sortie du joi...

Page 12: ...nt tre retir e de l eau et plac e l endroit o elle fonctionnera de mani re amphibie en s assurant que l extr mit d entr e du tuyau reste immerg e 8 Pour viter des blocages dans la pompe connectez la c...

Page 13: ...e sortie 3 Assurez vous qu il n y a pas de blocage dans la chambre de la pompe 4 En cas d utilisation amphibique de la pompe s assurer que le joint sph rique n est pas utilis par contre v rifier que l...

Page 14: ...rodukt oder zum Verlust von Fischen f hren 1 Diese Pumpe wurde speziell f r Teiche entwickelt Die Pumpe nur f r den Betrieb von Teichfiltersystemen Wasserspielen Wasserf llen etc verwenden Die Pumpe n...

Page 15: ...UNG Dieses Ger t muss an eine geerdete Steckdose angeschlossen werden 7 Das Pumpenkabel und das Verl ngerungskabel sollten so verlegt werden dass sie angemessen vor einer Besch digung gesch tzt sind i...

Page 16: ...ng als Mengenregler die Endkappe auf das freie Ende des Mengenreglers schrauben 6 Griff auf die gew nschte Position drehen Hierdurch wird die ffnungsgr e am Mengenregler variiert Der Pfeil am Griff is...

Page 17: ...3 4 Posidrive Schrauben in der Kammer abschrauben 4 Pumpenkammer d so weit es geht drehen und die Kammer vorsichtig im rechten Winkel vom Motorgeh use a wegziehen Abb 23 5 Rotorbaugruppe c aus dem Mo...

Page 18: ...J hrige Garantie von Hozelock Cyprio Leistung Aquaforce 1000 2500 4000 6000 8000 12000 15000 Verk ufliche Art Nr 1580 1581 1582 1583 1584 1585 1586 Volt V 230V 50Hz 230V 50Hz 230V 50Hz 230V 50Hz 230V...

Page 19: ...nen tenzij een verantwoordelijke hun adequaat begeleidt om ervoor te zorgen dat zij het apparaat veilig kunnen gebruiken Er moet toezicht worden gehouden op jonge kinderen om ervoor te zorgen dat ze n...

Page 20: ...aat dient de pomp niet direct op de bodem van de vijver te worden geplaatst Wij adviseren om de pomp op een vlakke horizontale verhoging te installeren die ongeveer 300 mm boven de bodem van de vijver...

Page 21: ...dat de prestaties afnemen laag debiet dient u de zeefkooi schoon te maken Schoonmaakintervallen kunnen verschillen afhankelijk van de kwaliteit van het water in uw vijver Dit kan soms wekelijks zijn...

Page 22: ...r 5 jaar dient u zich te registreren op http register hozelock com Wij accepteren geen aansprakelijkheid voor schade vanwege ongelukken onjuiste installatie of onjuist gebruik Onze aansprakelijkheid b...

Page 23: ...I bambini vanno sempre supervisionati per assicurare che non giochino con l apparecchio 3 ATTENZIONE Staccare la spina o scollegare dalla rete elettrica tutte le apparecchiature nel laghetto prima di...

Page 24: ...to In questo modo si impedir che la pompa risucchi detriti dal fondo del laghetto e si assicurer che una quantit sufficiente di acqua rimanga nel laghetto nel caso di una perdita accidentale di acqua...

Page 25: ...otta pulire la gabbietta del filtro Gli intervalli di pulizia dipenderanno dalle condizioni dell acqua del laghetto Nei mesi estivi ci potrebbe essere anche settimanalmente Per pulire la gabbietta apr...

Page 26: ...ata in modo improprio Per estendere la garanzia triennale a 5 anni basta registrarsi presso http register hozelock com Non si accettano responsabilit per danni causati da incidenti installazione o uso...

Page 27: ...ara ser usado por ni os de corta edad ni por personas enfermas a menos que cuenten con supervisi n adecuada con el fin de asegurar que puedan usarlo sin peligro Se debe supervisar a los ni os de corta...

Page 28: ...ngitud correspondiente y suj telo con un gancho de manguera apropiado colocando la salida de la manguera en la posici n requerida 10 Atornille el acoplamiento de extremo de manguera directamente en la...

Page 29: ...be que la c mara de la bomba y la manguera est n llenos de agua y encienda la bomba Ahora se puede sacar la bomba del agua coloc ndola en su lugar de operaci n anfibia procurando que el extremo de ent...

Page 30: ...de di metro peque o 3 Procure que no exista ning n obst culo en la c mara de la bomba 4 Si usa la bomba en forma anfibia procure que no se use la articulaci n de r tula y al instalar el extremo de man...

Page 31: ...att anv ndas av personer inklusive barn med nedsatt fysisk sensorisk eller psykisk f rm ga eller bristande erfarenhet och kunskap s vida de inte vervakas eller har instruerats i pumpens anv ndning av...

Page 32: ...llt ver l nga slangl ngder Slanganslutningstappen som medf ljer pumpen kan ta 25 mm 32 mm och 40 mm slang samt en BSP skruvg nga f r montering av font ntillbeh r F r pumpar i den h r storleken rekomme...

Page 33: ...solljus n r den anv nds i amfibiefunktion Solljuset kan g ra att motorn verhettas 10 Kulleden r endast avsedd att anv ndas neds nkt i vatten Aquaforce pumparna i serien Hozelock Cyprio r konstruerade...

Page 34: ...eller byts ut gratis enligt v rt val s vida den inte enligt v r sikt har skadats eller missbrukats F r f rl ngning av denna 3 rsgaranti till 5 r var v nlig registrera detta p http register hozelock c...

Page 35: ...varmista ett he osaavat k ytt laitetta turvallisesti Pieni lapsia on valvottava ja estett v leikkim st laitteella 3 VAROITUS irrota kaikki lammessa olevat laitteet virtal hteest ennen k sien ty nt mis...

Page 36: ...pu asennetaan syv lle veteen El imist suojaava j rjestelm WPS 13 Jos lammessa on kaloja tai muita el imi ne kutevat tiettyin vuodenaikoina T n aikana kalanpoikaset ovat pieni ja saattavat imeyty pumpp...

Page 37: ...sta roottoriyksikk 6 Pese kaikki komponentit puhtaalla vedell l k yt puhdistusaineita tai muita kemiallisia aineita 7 Varmista ett o rengas b on alustallaan kuva 24 Aseta roottoriyksikk takaisin moott...

Page 38: ...2500 4000 6000 8000 12000 15000 Myyt v n osan numero 1580 1581 1582 1583 1584 1585 1586 J nnite V 230V 50Hz 230V 50Hz 230V 50Hz 230V 50Hz 230V 50Hz 230V 50Hz 230V 50Hz Teho w 25 30 50 65 95 130 180 En...

Page 39: ...ikke f leke med kj leskapet 3 ADVARSEL Alltid koble fra alle apparater i dammen fra elektrisiteten f r du tar hendene i vannet mens ustyret installeres repareres vedlikeholdes eller h ndteres 4 Bruk a...

Page 40: ...et for dyrevern 12 Hvis du har fisk eller annet dyreliv i dammen yngler de i visse perioder i ret P dette tidspunktet er fiskene sm og kan suges inn i pumpen Aquaforce pumper har et unikt system for d...

Page 41: ...n 6 Vask alle komponentene i rent vann Bruk ikke vaskemidler eller andre kjemiske rensemidler 7 Pass p at tetningsringen b er i setet fig 24 Skift ut rotorenheten i motorkroppen og pass p at hullene i...

Page 42: ...eller til brug i st rktstr mmende vandfald eller vandl bsapplikationer hvor minimalt vedligehold er vigtigt Pumpen bruger hverken olie eller sm refedt til sm ring og er derfor sikker at bruge i bassin...

Page 43: ...en er blevet beskadiget p nogen m de Str mkablet kan ikke udskiftes da det er permanent indkapslet i motorhuset og skal derfor bortskaffes i henhold til lokale forordninger 11 Hvis du bor i et omr de...

Page 44: ...mfibisk 1 bn buret og fjern endestykket Fig 1 g 2 Luk gennemstr mningskontrollen ved at dreje den yderste del indtil pilene er ud for hinanden 3 Skru gennemstr mningskontrollen helt fast p pumpeindl b...

Page 45: ...i pladen bag skovlhjulet lokaliseres p stifterne p motorhuset Genmont r pumpekammer og skruer og put pumpen tilbage i sifilterburet 4 Hvis du bor i et omr de med h rdt vand vand med et h jt indhold a...

Page 46: ...t rmica O elemento desliga a bomba em caso de sobreaquecimento Em tais casos deve se desligar a alimenta o el ctrica e determinar qual a causa do sobreaquecimento Geralmente o problema causado por det...

Page 47: ...sitos de cal a bomba o conjunto do rotor e o interior do motor devem ser limpos a intervalos regulares ver MANUTEN O 12 Utilizar apenas acess rios que tenham sido designados para serem utilizados com...

Page 48: ...r as 4 pernas do WPS na zona correspondente da caixa inferior conforme ilustrado na Fig 12 assegurando que o WPS fique virado para o lado correcto Fechar a tampa da caixa e prender os clipes Durante o...

Page 49: ...motor a Fig 22 5 Puxar pelo conjunto do rotor c at sair da parte principal do motor Importante Ter muito cuidado para n o deixar cair o conjunto do rotor 6 Lavar todas as pe as em gua limpa N o usar...

Page 50: ...l N o afecta os seus direitos estatut rios Para obter as vantagens desta garantia comece por contactar os Servi os ao Consumidor da Hozelock Cyprio que poder o pedir lhe para enviar directamente a bom...

Page 51: ...e u ywa y urz dzenia do zabawy Tylko Australia i NZ Z urz dzenia nie powinny korzysta dzieci ani osoby niepe nosprawne o ile nie znajduj si one pod nadzorem osoby odpowiedzialnej dbaj cej o ich bezpie...

Page 52: ...cze bezpo rednio z dna stawu i w przypadku wycieku wody ze stawu w stawie pozostanie wystarczaj ca ilo wody patrz rys 11 Nigdy nie nale y podnosi pompy za kabel zasilania mo e to doprowadzi do jej usz...

Page 53: ...niej raz w roku nale y ca kowicie zdemontowa pomp cznie z zespo em wirnika w spos b opisany poni ej i umy wszystkie jej podzespo y w czystej wodzie Wymieni wszystkie uszkodzone lub zu yte elementy Dem...

Page 54: ...ie gwarancyjne ogranicza si do wymiany wadliwej pompy Tej gwarancji nie mo na przenie na inne osoby Nie wp ywa to na prawa klienta wynikaj ce z przepis w Aby skorzysta z prawa gwarancyjnego najpierw n...

Page 55: ......

Page 56: ...pattumiera con la croce Non smaltire apparecchiature elettriche con i rifiuti domestici utilizzare strutture di raccolta separate Contattare le autorit locali per informazioni sui sistemi di raccolta...

Reviews:

Related manuals for Aquaforce 12000