operation
4.1 Ensure the Diverter Valve is turned to the pond
outlet (Fig. 12).
12
4.2 Connect the filter’s supply cord (See section 1 – Safety
& Electrical Connections). This switches on the UVC
lamp. You can check that the lamp is working by
looking for the blue glow in the UV lamp indicator lens
in the top housing (Fig. 3 (c)).
4.3 Switch on the pump.
4.4 Periods of Operation: Keep the filter working 24
hours a day. Ideally it should run all year round but at
least throughout the feeding season (ie until water
temperature falls below 10ºC). In winter, operating the
pump and filter will maintain a basic level of useful
bacteria in the Bioforce and will help prevent the pond
icing over. If you switch off the pump for winter, wash
the filter thoroughly before resuming filtration in the
spring (see “Winter Storage”, 11.0). Never feed your fish
when the filter is not in use.
Maturation
5.1 Biological maturation means that the filter has built
up enough nitrifying bacteria to convert harmful fish
and other organic waste (ie ammonia, nitrite) into
relatively harmless nitrate. The process normally takes
6-8 weeks, but depends on many factors such as water
temperature, feeding rate and stocking density. Speed
up maturation by adding a maturing agent such as
Hozelock Cyprio Filter Start.
Cleaning
When to clean your Bioforce Revolution.
Bioforce revolution filters deliver maximum performance with
minimum maintenance. If the pond is very dirty, the filter may
need cleaning every few days at first, as it takes up waste
matter very quickly. once the pond becomes clearer, there
will be less waste to remove, so the filter will need cleaning
less often. Pressurised filters are at their most efficient when
the foam becomes partly blocked. However, as blockage
increases, the flow rate drops as less water can flow through
the foam and cleaning becomes necessary.
6.1 Switch off the pump at the mains.
6.2 Connect a suitable length of hose to the waste outlet
(Fig. 10(iii)) using the hosetail provided and a hoseclip.
The end of the waste hose can positioned above a
drain or over a flowerbed. The waste water makes
excellent fertiliser.
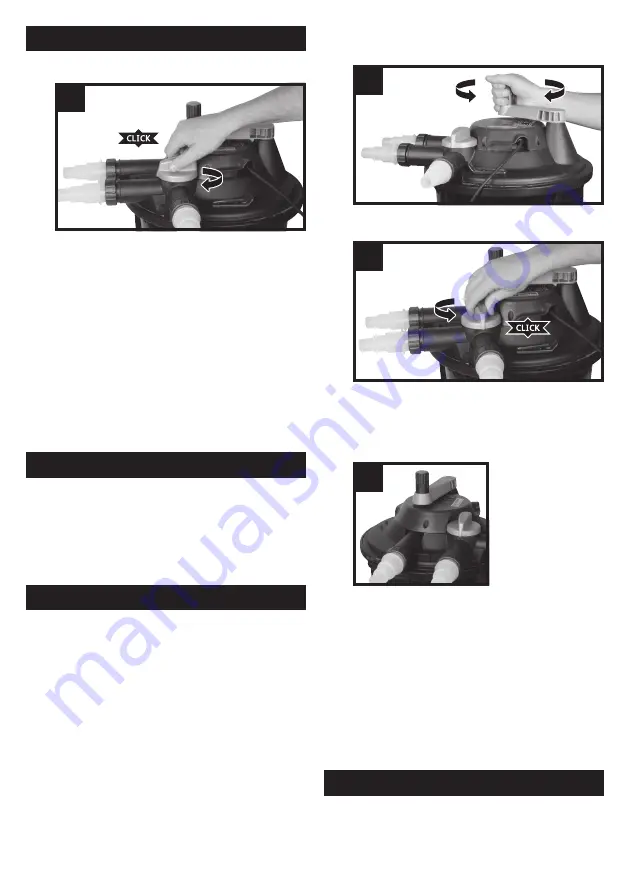
6.3 Wind the handle several times. We recommend
several revolutions in both clockwise and anticlockwise
directions (Fig. 13). As the handle is rotated, the yellow
cleaning blades (Fig. 2 (g)) will rotate breaking apart
and squeezing each foam cube releasing debris which
they have collected.
13
6.4 Turn the diverter valve to the waste position (Fig. 14).
You will hear a “click”.
14
6.5 Switch on the pump.
6.6 Continue winding the handle (complete revolutions
in both directions). Initially the waste water will be
an intense green or brown colour depending on your
pond’s set up.
15
After a short period of
time the intensity of
the colour of the waste
water fades and the
water will start to clear.
At this point, stop
winding and return the
handle to the stowage
position above the
main housing (Fig. 15).
Wait 5 seconds for the last bits of waste to be flushed
through and turn the diverter valve back to pond.
WARNING: Leaving the valve in the waste position
will empty the pond. Make sure it is switched back to
pond outlet.
6.7 The time required to clean your filter depends on
several factors, but the more regularly you clean your
filter, the shorter the cleaning time required. Typically
the cleaning will take a few minutes.
From time to time, you will need to top up your pond
to replace the waste water removed during cleaning.
Partial water changes are an important aspect of
maintaining a healthy pond water system.
Maintenance
Warning: Read these maintenance instructions before
opening the appliance.
Warning: do not attempt to remove the lid or electrical
housing when the pump and filter are in use. A slot for a
padlock is provided in the lid clamp to prevent accidental


