background image

opening and we recommend this is used where children are 

likely to be present.
7.1 

Replacing the UV lamp:


Warning: The appliance must be disconnected from 

the power supply before disconnecting the UV-C 

emitter.


A UV lamp’s effectiveness reduces significantly over 

time so you should replace your lamp every 12 months 

even if the lamp is still functioning. 

7.1.1  Switch off the power to the supply pump and filter.
7.1.2  Turn the diverter valve to waste. This allows the 

internal pressure to equalise with atmospheric pressure 

and allows easy removal of the electrical housing 

without water being drawn up onto the top surface of 

the lid.

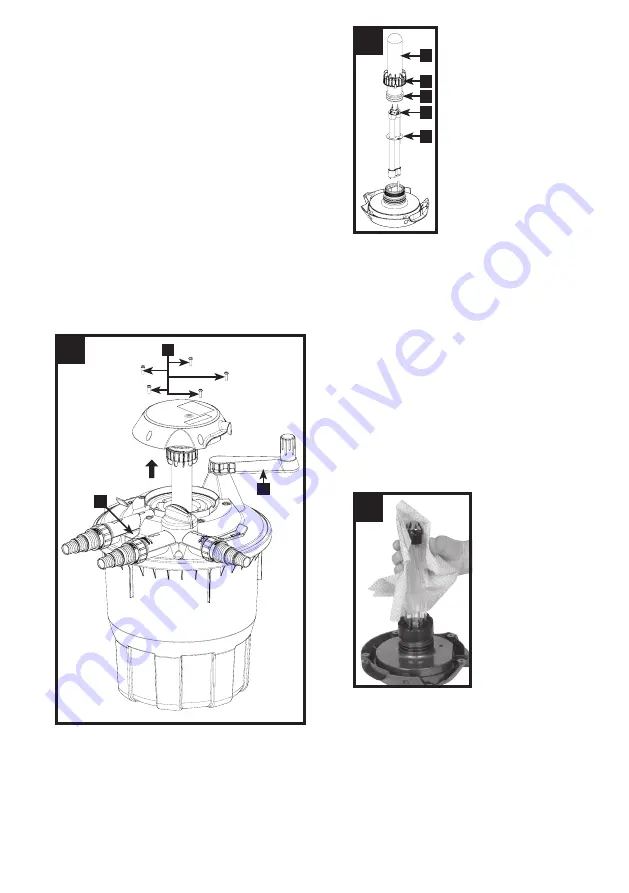
7.1.3  Wind the cleaning handle by half a turn so that it is out 

of the way of the electrical housing (Fig. 16 (i)).

7.1.4  Use a screwdriver to remove the 5 screws which secure 

the electrical housing to the lid. (Fig 16 (ii)). There is a 

pocket provided between the filter’s inlet and outlet 

to store the screws while you change the lamp (Fig. 16 

(iii)).


16

i

iii

ii

7.1.5  grip the electrical housing and gently pull up to remove 

the electrical housing. Turn the housing upside down 

and place on a dry level surface.

7.1.6 

17

ii

i

iii
iv

v

(Fig. 17) Unscrew the quartz tube 

locking collar (i). gently hold the 

quartz tube (ii), lift up and remove 

together with its o-rings (iii) and 

locking collar.

7.1.7 

remove the old lamp by gently 

pulling it from its holder and 

remove the black protection cap 

from the end of the lamp (Fig. 

17 (iv)) and remove the reflector 

plate (Fig. 17 (v)). Dispose of 

the old lamp according to local 

regulations and fit the new lamp.

7.1.8 

refit the reflector plate and push 

the black cap on to the end of the 

lamp.

7.1.9  Slide the quartz tube down over the lamp. Ensure that 

the two o-rings at the base of the quartz tube are clean 

and free from debris.

7.1.10 Slide the locking collar down over the quartz tube and 

screw down. You should screw down until the stop of 

the locking collar hits the stop of the housing so that 

the collar cannot be screwed down any more.

7.1.11  refit the electrical housing. The housing can only be 

fitted in one position so do not try to force it down. 

once in position, replace the 5 screws. The screws must 

be fully screwed down to ensure that the interlock 

switch is activated.

7.1.12  Turn the diverter valve back to pond and position the 

cleaning handle in the stowage position.

7.1.13  re-start the pump first checking for leaks, then switch 

on the UV lamp. Check for the bluish glow from UV 

indicator lens.

7.2  Care of UV quartz tube: 
 

18

Especially in hard water 

areas the quartz tube 

sheathing the UVC lamp 

may become covered in 

limescale. This will reduce 

the efficiency of the unit if 

it is allowed to build up. To 

clean, switch off the pump 

and the power supply to 

the UV, remove the 

electrical housing, as 

described in 7.1, and wipe 

the quartz tube with a soft 

cloth moistened with a 

gentle cleaning agent such 

as vinegar (See fig 18). You 

should wear protective clothing when cleaning the 

quartz tube such as safety glasses and gloves.

7.3  Cypricube foam replacement:
 

Inspect your foam annually. The frequency of foam 

replacement will depend on your pond’s set up. We 

recommend that foams are replaced during winter 

and before you start feeding the fish again at the 

start of the spring*. Changing the foam at other 

times of the year may cause the pond chemistry to 

alter and this may harm your fish.

Summary of Contents for 1352

Page 1: ...1352 1353 1354 Bioforce Revolution 6 9 14000 www hozelock com 2 Year guarantee Hozelock Ltd Midpoint Park Birmingham B76 1AB England Tel 44 0 121 313 1122 www hozelock com 33852 000 ...

Page 2: ...ical Housing b Lid assembly c UV lamp indicator lens d Cleaning Handle Knob e Cleaning Handle f Diverter Valve g Cleaning Fingers Yellow h UV Shroud i Foam Bucket j Cypricube Foam k Bio media l Vessel o ring seal m Filter Vessel n Lid Clamp o Bio trumpet p Hosetail Nut q Lever ...

Page 3: ...ECT ALL APPLIANCES IN THE POND FROM THE ELECTRICITY SUPPLY BEFORE PUTTING YOUR HANDS IN THE WATER WHILST EQUIPMENT IS BEING INSTALLED REPAIRED MAINTAINED OR HANDLED 1 2 This filter has been designed for the use with garden ponds only Do not use this filter for any other use i e do not use this filter in swimming pools etc Using the product for any other application may result in injury or product ...

Page 4: ...h the greater the demands on the filtration system In hot climates ie South Africa the Condition Factor is 35 In temperate climates ie Southern Europe the Condition Factor is 15 In a Northern European climate ie most areas of Great Britain the Condition Factor is 0 EXAMPLE You have a 2200 litre goldfish pond 0 75m deep Condition Factor 25 You live in London a Northern European climate Condition Fa...

Page 5: ...ur filter the excavation should be firmly back filled with compacted sand to support the unit If you choose this type of installation you should leave a minimum of a 50mm gap between the clamp and ground level ensuring it is easily removable for annual maintenance 3 4 Using small bore hoses leads to excessive restriction of the water flow The larger the diameter of hose that you use the better the...

Page 6: ...an flow through the foam and cleaning becomes necessary 6 1 Switch off the pump at the mains 6 2 Connect a suitable length of hose to the waste outlet Fig 10 iii using the hosetail provided and a hoseclip The end of the waste hose can positioned above a drain or over a flowerbed The waste water makes excellent fertiliser 6 3 Wind the handle several times We recommend several revolutions in both cl...

Page 7: ... reflector plate and push the black cap on to the end of the lamp 7 1 9 Slide the quartz tube down over the lamp Ensure that the two o rings at the base of the quartz tube are clean and free from debris 7 1 10 Slide the locking collar down over the quartz tube and screw down You should screw down until the stop of the locking collar hits the stop of the housing so that the collar cannot be screwed...

Page 8: ...ucket is correctly positioned to allow easy location of the lid 21 7 3 8 Fill the foam bucket with the recommended amount of replacement Cypricube foam Don t worry if the new dry foam cubes take up a little more space when they are new Ensure no foam falls down the central hole into the bio trumpet area Never squash down your foam to fit more in The dry foam should be loosely added and should not ...

Page 9: ...s not cover loss of water clarity when blanketweed as opposed to greenwater algae is the cause Hozelock Cyprio 2 Year Guarantee If this Bioforce Revolution excluding Lamp becomes unserviceable within 2 years of the date of purchase it will be repaired or replaced at our option free of charge unless in our opinion it has been damaged Liability is not accepted for damage due to accident improper ins...

Page 10: ......

Page 11: ......

Page 12: ...Hozelock Ltd Midpoint Park Birmingham B76 1AB England Tel 44 0 121 313 1122 www hozelock com 33852 000 ...

Reviews: