


*As pond water cools in the autumn, fish start slowing
down in preparation for a period of semi-dormancy.
Their digestive and immune systems slow down, and
they are not capable of digesting the same types of
foods that they can during the warmer months. If they
are hungry they will feed off more simple foods which
naturally occur in the pond environment. Therefore,
once the pond water temperature falls below 10°C for a
prolonged period of time, you should stop feeding your
fish. once the weather begins to warm at the start of
the spring, as the fish start to become more active you
can gradually start to feed your fish again.
7.3.1 Switch off the power to the supply pump and filter.
7.3.2 Turn the diverter valve to waste. This allows the
internal pressure to equalise with atmospheric pressure
and allows easy removal of the lid.
7.3.3
19
Unlatch the lid clamp
(Fig. 2(n)). gently release
and remove the lid by
using the 2 levers in
opposite slots (Fig. 19). It
may help if you remove
the attached hoses.
7.3.4 Lift and remove the foam bucket (Fig. 2(i)) and discard
the old foam. Empty the water from inside the filter
vessel collecting the bio-media in a net. The bio-media
does not require any maintenance.
7.3.5 If the bottom of the vessel is coated in a layer of
sludge, rinse out the bottom of the vessel with some
pond water.
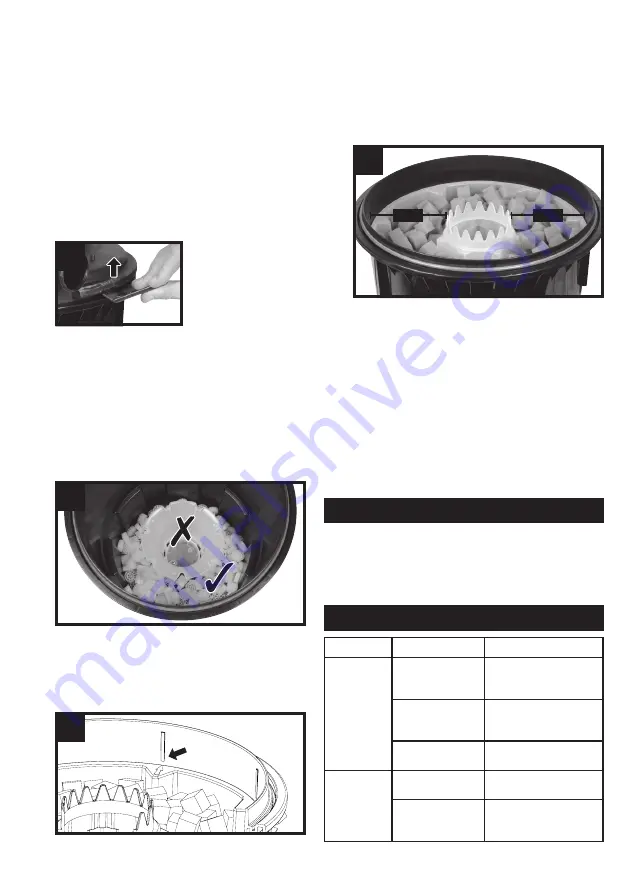
7.3.6 replace the bio-media ensuring it is located around
the bio-trumpet (Fig. 2(o)) at the bottom of the vessel.
There must be no bio-media inside the bio-trumpet
(Fig. 20).
20
7.3.7 Place the foam bucket into the vessel. rotate the foam
bucket until the small triangles at the top of the foam
bucket align with one of the vertical lines on the inside
of the filter vessel (Fig. 21). The foam bucket will drop
into place. Ensure that the foam bucket is correctly
positioned to allow easy location of the lid.
21
7.3.8 Fill the foam bucket with the recommended amount of
replacement Cypricube foam. Don’t worry if the new
dry foam cubes take up a little more space when they
are new. Ensure no foam falls down the central hole
into the bio-trumpet area.
Never squash down your foam to fit more in. The
dry foam should be loosely added and should not
fill higher than the filter vessel (Fig. 22). Adding too
much foam will make it harder to clean the filter.
22
MAX
MAX
7.3.9 Ensure that the seal (Fig. 2(l)) at the top of the filter
vessel is in position and free from dirt and debris. Add a
light coating of silicone grease to the seal if required to
help assembly. refit the lid. Slide the central black tube
which covers the UV lamp down through the central
hole.
7.3.10 re-fit the lid clamp. Ensure that there is no build up of
water beneath the band clamp and keep the hinged
lever lubricated using an oil based lubricant.
7.3.11 Turn the diverter valve back to pond and position the
cleaning handle in the stowage position.
7.3.12 re-start the pump first checking for leaks. Then switch
on the UV lamp. Check for the bluish glow from UV
indicator lens.
Winter Storage
8.1 In cold winter weather (when fish are inactive and
algae growth ceases) the unit may be switched off.
It should then be removed, thoroughly washed,
cleaned and dried and stored in a dry frost protected
area. Always store the unit with the lid off to ensure
adequate ventilation and drying.
Troubleshooting/FAQs
Problem
Possible cause
Remedy
No water
flow through
filter to
pond.
Supply pump not
switched on or not
working.
Check that the pump is
working and switched
on.
Supply hose
blocked.
Check supply hose and
pond return hose for
blockages.
Diverter valve set
to “Waste”
Turn diverter valve to
“Pond”.
reduced
flow through
filter
Foams are
blocked.
Clean filter
(See “Cleaning”).
Supply hose
blocked.
Check supply hose and
pond return hose for
blockages.


