


Installation
and
Calibration
HP
11757B
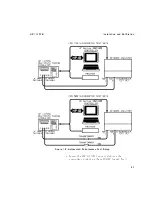
6.
Set
the
output
of
the
syn
thesized
sw
eep er
to
70
MHz
at
a
p o
w
er
lev
el
of
07
dBm.
Set
the
sw
eep er
for
a
span
of
at
least
625
MHz
(y
ou
may
set
a
start
and
stop
sw
eep
frequency
instead
of
cen
ter
frequency
and
span).
7.
Set
the
range
for
the
sp ectrum
analyzer
from
35
MHz
to
105
MHz.
Y
ou
should
b e
able
to
observ
e
a
20
dB
notc
h
at
70
MHz.
8.
Chec
k
the
Notc
h
F
requency
Sw
eep
function.
a.
Press
4
SET
ST
ART
5,
then
press
4
NOTCH
FREQ
5.
b.
Press
4
4
5
4
6
5
4
.
5
4
0
5
and
4
ENTER
5.
c.
Press
4
SET
STOP
5,
then
press
4
NOTCH
FREQ
5.
d.
Press
4
9
5
4
4
5
4
.
5
4
0
5
4
ENTER
5
4
SHIFT
5
4
ENTER
5
(EXIT).
e.
Press
4
SHIFT
5,
then
press
4
NOTCH
FREQ
5
(SWP
FREQ).
f.
The
sw
eep
time
preset
v
alue
is
5
seconds.
Y
ou
should
b e
able
to
view
the
sw
eep
taking
place
at
this
rate.
9.
Chec
k
the
Notc
h
Depth
Sw
eep
function.
a.
Press
4
SET
ST
ART
5
and
4
NOTCH
DEPTH
5
b.
Press
4
0
5
4
ENTER
5
4
SHIFT
5
4
ENTER
5
(EXIT)
c.
Press
4
SET
STOP
5
and
4
NOTCH
DEPTH
5
d.
Press
4
3
5
4
0
5
4
.
5
4
0
5
4
ENTER
5
4
SHIFT
5
4
ENTER
5
e.
Press
4
SHIFT
5
and
4
NOTCH
DEPTH
5
f.
Y
ou
will
see
the
Notc
h
Depth
and
Notc
h
F
requency
sw
eep
at
the
same
time.
If
y
ou
wish
to
see
just
the
Notc
h
Depth
sw
eeping,
press
4
SHIFT
5
4
NOTCH
FREQ
5.
This
will
turn
o
the
Notc
h
F
requency
Sw
eep.
10.
Chec
k
attenuation.
a.
Press
4
A
TTEN
5
b.
Press
4
2
5
4
0
5
4
.
5
4
0
5
and
4
ENTER
5
c.
Y
ou
will
see
the
at
fade
attenuation
of
20
dB
on
the
sp ectrum
analyzer.
d.
T
o
sw
eep
attenuation
press
4
SET
ST
ART
5
4
A
TTEN
5
24


