Optical drive
Description
Spare part number
DVD+/-RW Double-Layer SuperMulti Drive
920417-001
Optical drive bracket
925353-001
Optical drive bezel
Snow white
925337-001
Smoke gray
925338-001
Marine blue
925339-001
Pike/natural silver
925340-001
Silk gold
925341-001
Empress red
925658-001
Jack black
925336-001
Before removing the optical drive, follow these steps:
1.
Shut down the computer. If you are unsure whether the computer is off or in Hibernation, turn the
computer on, and then shut it down through the operating system.
2.
Disconnect all external devices connected to the computer.
3.
Disconnect the power from the computer by first unplugging the power cord from the AC outlet and then
unplugging the AC adapter from the computer.
4.
Remove the battery (see
).
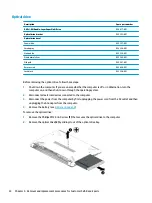
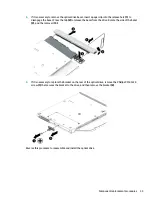
To remove the optical drive:
1.
Remove the Phillips PM2.5×6.0 screw (1) that secures the optical drive to the computer.
2.
Remove the optical drive (2) by sliding it out of the optical drive bay.
34
Chapter 5 Removal and replacement procedures for Customer Self-Repair parts
Summary of Contents for 14-BS0 Series
Page 1: ...HP 14 Laptop PC Intel HP 14g Laptop PC HP 14q Laptop PC Maintenance and Service Guide ...
Page 4: ...iv Safety warning notice ...
Page 8: ...viii ...
Page 14: ...Category Description AC adapter Battery Optical drive 6 Chapter 1 Product description ...
Page 34: ...26 Chapter 3 Illustrated parts catalog ...
Page 44: ...36 Chapter 5 Removal and replacement procedures for Customer Self Repair parts ...
Page 86: ...78 Chapter 6 Removal and replacement procedures for Authorized Service Provider parts ...
Page 94: ...86 Chapter 8 Backing up restoring and recovering ...
Page 102: ...94 Chapter 10 Specifications ...
Page 106: ...98 Chapter 11 Power cord set requirements ...
Page 108: ...100 Chapter 12 Recycling ...
Page 112: ...104 Index ...


