17.
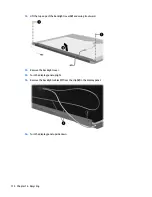
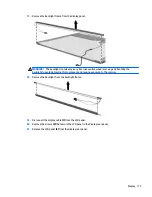
Remove the backlight frame from the display panel.
WARNING!
The backlight contains mercury. Exercise caution when removing and handling the
backlight to avoid damaging this component and causing exposure to the mercury.
18.
Remove the backlight from the backlight frame.
19.
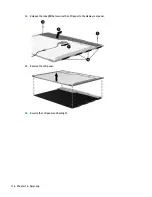
Disconnect the display cable
(1)
from the LCD panel.
20.
Remove the screws
(2)
that secure the LCD panel to the display rear panel.
21.
Release the LCD panel
(3)
from the display rear panel.
Display 115
Summary of Contents for 255 G3
Page 1: ...HP 255 G3 Notebook PC Maintenance and Service Guide ...
Page 4: ...iv Safety warning notice ...
Page 12: ...4 Chapter 1 Product description ...
Page 34: ...26 Chapter 3 Illustrated parts catalog ...
Page 46: ...38 Chapter 5 Removal and replacement procedures for Customer Self Repair parts ...
Page 80: ...72 Chapter 6 Removal and replacement procedures for Authorized Service Provider parts ...
Page 84: ...76 Chapter 7 Using Setup Utility BIOS and HP PC Hardware Diagnostics UEFI in Windows 8 1 ...
Page 88: ...80 Chapter 8 Using Setup Utility BIOS and System Diagnostics in Windows 7 ...
Page 114: ...106 Chapter 14 Statement of Volatility ...

