6.
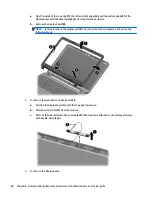
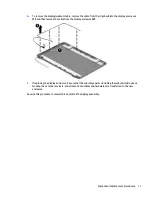
To remove the display/webcam cable, remove the cable from the clips built into the display enclosure
(1)
, and then remove the cable from the display enclosure
(2)
.
7.
If replacing the display enclosure, be sure that the subcomponents (including the webcam/microphone
module, the antenna receivers, and all associated cables and hardware) are transferred to the new
enclosure.
Reverse this procedure to reassemble and install the display assembly.
Component replacement procedures
71
Summary of Contents for 255 G3
Page 1: ...HP 255 G3 Notebook PC Maintenance and Service Guide ...
Page 4: ...iv Safety warning notice ...
Page 12: ...4 Chapter 1 Product description ...
Page 34: ...26 Chapter 3 Illustrated parts catalog ...
Page 46: ...38 Chapter 5 Removal and replacement procedures for Customer Self Repair parts ...
Page 80: ...72 Chapter 6 Removal and replacement procedures for Authorized Service Provider parts ...
Page 84: ...76 Chapter 7 Using Setup Utility BIOS and HP PC Hardware Diagnostics UEFI in Windows 8 1 ...
Page 88: ...80 Chapter 8 Using Setup Utility BIOS and System Diagnostics in Windows 7 ...
Page 114: ...106 Chapter 14 Statement of Volatility ...

