


v
Contents
1 HP 3000/9x9KS and HP 9000/K2x0/K4x0/Kx70/Kx80
Memory Upgrade Installation
Introduction . . . . . . . . . . . . . . . . . . . . . . . . . . . . . . . . . . . . . . . . . . . . . . . . . . . . . . . . . . . . . . . . . . . . . . . . .1-1
Contents of This Chapter . . . . . . . . . . . . . . . . . . . . . . . . . . . . . . . . . . . . . . . . . . . . . . . . . . . . . . . . . . . . .1-1
Required Tools . . . . . . . . . . . . . . . . . . . . . . . . . . . . . . . . . . . . . . . . . . . . . . . . . . . . . . . . . . . . . . . . . . . . .1-2
Installation Procedure (HP 3000/9x9KS and HP 9000/K2x0/K4x0/Kx70/Kx80) . . . . . . . . . . . . . . . . . . . .1-3
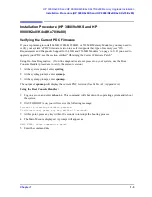
Verifying the Current PDC Firmware . . . . . . . . . . . . . . . . . . . . . . . . . . . . . . . . . . . . . . . . . . . . . . . . . . .1-3
Obtaining the Correct Firmware Patch . . . . . . . . . . . . . . . . . . . . . . . . . . . . . . . . . . . . . . . . . . . . . . . . .1-4
Downloading the Firmware Patch via the World Wide Web . . . . . . . . . . . . . . . . . . . . . . . . . . . . .1-4
Downloading the Firmware Patch using FTP . . . . . . . . . . . . . . . . . . . . . . . . . . . . . . . . . . . . . . . . .1-4
Checking Existing System Memory . . . . . . . . . . . . . . . . . . . . . . . . . . . . . . . . . . . . . . . . . . . . . . . . . . . . .1-6
After Rebooting Your System, Type "ma" to Get the Main Menu . . . . . . . . . . . . . . . . . . . . . . . . . . .1-7
System Shutdown . . . . . . . . . . . . . . . . . . . . . . . . . . . . . . . . . . . . . . . . . . . . . . . . . . . . . . . . . . . . . . . . . . .1-8
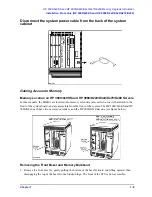
Gaining Access to Memory . . . . . . . . . . . . . . . . . . . . . . . . . . . . . . . . . . . . . . . . . . . . . . . . . . . . . . . . . . .1-9
Memory Location on HP 3000/9x9KS and HP 9000/K2x0/K4x0/Kx70/Kx80 Servers . . . . . . . . . . .1-9
Removing the Front Bezel and Memory Bulkhead . . . . . . . . . . . . . . . . . . . . . . . . . . . . . . . . . . . . . . .1-9
Removing Memory Extenders . . . . . . . . . . . . . . . . . . . . . . . . . . . . . . . . . . . . . . . . . . . . . . . . . . . . . .1-10
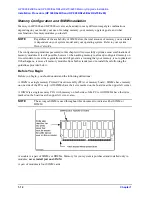
Memory Configuration and SIMM Installation . . . . . . . . . . . . . . . . . . . . . . . . . . . . . . . . . . . . . . . . . . .1-12
Before You Begin . . . . . . . . . . . . . . . . . . . . . . . . . . . . . . . . . . . . . . . . . . . . . . . . . . . . . . . . . . . . . . . .1-12
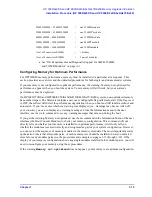
Configuring Memory for Optimum Performance. . . . . . . . . . . . . . . . . . . . . . . . . . . . . . . . . . . . . . . .1-13
Memory Optimization Procedure for Single Memory Extenders — Overview . . . . . . . . . . . . . . . . .1-14
Procedure for Single Memory Extenders — Detailed . . . . . . . . . . . . . . . . . . . . . . . . . . . . . . . . . . . .1-15
Memory Optimization Procedure for Dual Memory Extenders — Overview . . . . . . . . . . . . . . . . . .1-18
Procedure for Dual Memory Extenders — Detailed . . . . . . . . . . . . . . . . . . . . . . . . . . . . . . . . . . . . .1-19
If You Still Get Warning Messages... . . . . . . . . . . . . . . . . . . . . . . . . . . . . . . . . . . . . . . . . . . . . . . . . .1-22
SIMM Removal and Installation . . . . . . . . . . . . . . . . . . . . . . . . . . . . . . . . . . . . . . . . . . . . . . . . . . . . . . . .1-25
Removing SIMMs. . . . . . . . . . . . . . . . . . . . . . . . . . . . . . . . . . . . . . . . . . . . . . . . . . . . . . . . . . . . . . . . . .1-25
Installing SIMMs . . . . . . . . . . . . . . . . . . . . . . . . . . . . . . . . . . . . . . . . . . . . . . . . . . . . . . . . . . . . . . . . . .1-25
After All SIMMs Are Installed . . . . . . . . . . . . . . . . . . . . . . . . . . . . . . . . . . . . . . . . . . . . . . . . . . . . . . . .1-27
System Reassembly . . . . . . . . . . . . . . . . . . . . . . . . . . . . . . . . . . . . . . . . . . . . . . . . . . . . . . . . . . . . . . . . . .1-28
Reinstalling Memory Extender(s). . . . . . . . . . . . . . . . . . . . . . . . . . . . . . . . . . . . . . . . . . . . . . . . . . . . . .1-28
Reattaching the Memory Bulkhead and Front Bezel . . . . . . . . . . . . . . . . . . . . . . . . . . . . . . . . . . . . . . .1-29
2 HP 9000/K100 Memory Upgrade Installation
Introduction . . . . . . . . . . . . . . . . . . . . . . . . . . . . . . . . . . . . . . . . . . . . . . . . . . . . . . . . . . . . . . . . . . . . . . . . .2-1
Contents of This Chapter . . . . . . . . . . . . . . . . . . . . . . . . . . . . . . . . . . . . . . . . . . . . . . . . . . . . . . . . . . . . .2-1
Electrostatic Discharge (ESD) Precautions . . . . . . . . . . . . . . . . . . . . . . . . . . . . . . . . . . . . . . . . . . . . . . .2-2
Required Tools . . . . . . . . . . . . . . . . . . . . . . . . . . . . . . . . . . . . . . . . . . . . . . . . . . . . . . . . . . . . . . . . . . . . .2-2
Installation Procedure (HP 9000/K100) . . . . . . . . . . . . . . . . . . . . . . . . . . . . . . . . . . . . . . . . . . . . . . . . . . . .2-2
Checking Existing System Memory . . . . . . . . . . . . . . . . . . . . . . . . . . . . . . . . . . . . . . . . . . . . . . . . . . . . .2-2
Gaining Access to System Memory . . . . . . . . . . . . . . . . . . . . . . . . . . . . . . . . . . . . . . . . . . . . . . . . . . . . .2-5
Memory Location in HP 9000/K100 Servers . . . . . . . . . . . . . . . . . . . . . . . . . . . . . . . . . . . . . . . . . . . .2-5
Removing the Memory Bulkhead. . . . . . . . . . . . . . . . . . . . . . . . . . . . . . . . . . . . . . . . . . . . . . . . . . . . .2-5
Memory Configuration and SIMM Installation . . . . . . . . . . . . . . . . . . . . . . . . . . . . . . . . . . . . . . . . . . . .2-6
Configuring Memory . . . . . . . . . . . . . . . . . . . . . . . . . . . . . . . . . . . . . . . . . . . . . . . . . . . . . . . . . . . . . .2-6
Memory SIMM Rules . . . . . . . . . . . . . . . . . . . . . . . . . . . . . . . . . . . . . . . . . . . . . . . . . . . . . . . . . . . . . . . .2-6
Removing SIMMs. . . . . . . . . . . . . . . . . . . . . . . . . . . . . . . . . . . . . . . . . . . . . . . . . . . . . . . . . . . . . . . . .2-7
Installing SIMMs (HP 9000/K100) . . . . . . . . . . . . . . . . . . . . . . . . . . . . . . . . . . . . . . . . . . . . . . . . . . . . .2-8
Orient the SIMMs Correctly . . . . . . . . . . . . . . . . . . . . . . . . . . . . . . . . . . . . . . . . . . . . . . . . . . . . . . . . .2-8
Summary of Contents for 3000/939KS
Page 5: ...v ...
Page 8: ...vii Contents ...
Page 54: ...3 6 Chapter3 Power On and Verification Installation Verification ...


