background image


92 

Card model 

Name 

Description 

LSW1GP16P0 

16-port 100/1000Base-X SFP interface card 

Provides sixteen 100/1000 Mbps SFP 
copper/optical ports. 

LSW1GT16P 

16-port 10/100/1000Base-T Ethernet electrical 
interface card 

Provides sixteen 10/100/1000 Mbps 
Ethernet copper ports. 


For more information about the interface cards, see 

HP 5820X & 5800 Switch Series Interface Cards 

User Guide

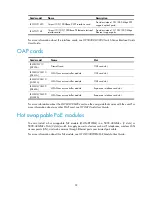
OAP cards 

Card model 

Name 

Slot 

LSWM1FW10 
(JD255A) 

Firewall card 

OAP card slot 

LSWM1WCM10 
(JD441A) 

WLAN access controller module 

OAP card slot 

LSWM1WCM10 
(JG261A) 

WLAN access controller module 

OAP card slot 

LSWM1WCM20 
(JD443A) 

WLAN access controller module 

Expansion interface card slot 

LSWM1WCM20 
(JG262A) 

WLAN access controller module 

Expansion interface card slot 


For more information about the LSWM1WCM20 card, see the user guide that comes with the card. For 
more information about any other OAP card, see 

HP OAP Cards User Guide

Hot swappable PoE modules 

You can install a hot swappable PoE module (LSW148POEM) in a 5800-48G-PoE+ (2 slots) or 

5800-48G-PoE+ TAA (2 slots) switch to supply power to devices such as IP telephones, wireless LAN 
access points (APs), and web cameras through Ethernet ports over twisted pair cable. 
For more information about this PoE module, see 

HP LSW148POEM PoE Module User Guide


Summary of Contents for 5800-24G

Page 1: ...HP 5820X 5800 Switch Series Installation Guide Part number 5998 1609 Document version 6W103 20140619 ...

Page 2: ...MATERIAL INCLUDING BUT NOT LIMITED TO THE IMPLIED WARRANTIES OF MERCHANTABILITY AND FITNESS FOR A PARTICULAR PURPOSE Hewlett Packard shall not be liable for errors contained herein or for incidental or consequential damages in connection with the furnishing performance or use of this material The only warranties for HP products and services are set forth in the express warranty statements accompan...

Page 3: ...ay 21 Installing a fan tray 21 Removing a fan tray 22 Installing removing a power supply 23 5800AF 48G 5820AF 24XG 23 5800 48G PoE 2 slots 5800 48G PoE TAA 2 slots 5800 24G SFP 1 slot 5800 24G SFP TAA 1 slot all the 5820X switches but the 5820AF 24XG 26 Connecting the power cord 28 Connecting an AC power cord to the switch 28 Connecting the switch to a 54 VDC output RPS 29 Connecting the switch to...

Page 4: ...he member switches 50 Planning the cabling scheme 51 Configuring basic IRF settings 54 Connecting the physical IRF ports 54 Verifying the IRF fabric setup 55 Maintenance and troubleshooting 56 Password loss 56 Console login password loss 56 Boot ROM password loss 56 Power supply failure 56 Built in power supply failure 56 Hot swappable power supply failure 58 OAP card failure 59 Failure of the OAP...

Page 5: ...oE module compatibility matrix only for the 5800 switches 87 OAP card compatibility matrix 87 RPS compatibility matrix 88 Hot swappable power supplies 89 Hot swappable fan trays 90 Interface cards 91 OAP cards 92 Hot swappable PoE modules 92 Appendix C Ports and LEDs 93 Ports 93 Console port 93 Management Ethernet port 93 USB port 93 10 100 1000Base T Ethernet port 94 100 1000Base X SFP port 94 SF...

Page 6: ...0 24G 5800 24G TAA 111 5800 24G PoE 5800 24G PoE TAA 112 5800 24G SFP 1 slot 5800 24G SFP TAA 1 slot 113 5820AF 24XG 114 5820X 24XG SFP 5820X 24XG SFP TAA 116 5820X 14XG SFP 2 slots 5820X 14XG SFP TAA 2 slots 117 Index 120 ...

Page 7: ...witch 5800 24G TAA JC099A HP 5800 24G PoE Switch 5800 24G PoE JG254A HP 5800 24G PoE TAA Switch 5800 24G PoE TAA JC103A HP 5800 24G SFP Switch with 1 Interface Slot 5800 24G SFP 1 slot JG256A HP 5800 24G SFP TAA Switch with 1 Interface Slot 5800 24G SFP TAA 1 slot JG225A HP 5800AF 48G Switch 5800AF 48G IMPORTANT For regulatory identification purposes the HP 5800AF 48G switch is assigned a regulato...

Page 8: ...od ventilation of the equipment room and keep the ventilation vents of the switch free of obstruction Connect the yellow green protection grounding cable before power on Make sure that the operating voltage is in the range labeled on the power supply of the switch To avoid electrical shocks do not open the chassis when the switch is operating or when the switch is just powered off When replacing F...

Page 9: ... over three days NOTE Dust diameter 5 μm The equipment room must also meet strict limits on salts acids and sulfides to eliminate corrosion and premature aging of components as shown in Table 4 Table 4 Harmful gas limits in the equipment room Gas Maximum concentration mg m3 SO2 0 2 H2S 0 006 NH3 0 05 Cl2 0 01 EMI All electromagnetic interference EMI sources from outside or inside of the switch and...

Page 10: ...itch has power The laser light emitted from the optical fiber might hurt your eyes The HP 5800 and HP 5820X switches are Class 1 laser devices Installation tools Flat blade screwdriver Phillips screwdriver ESD wrist strap All these installation tools are user supplied ...

Page 11: ...ng the switch CAUTION Keep the tamper proof seal on a mounting screw on the chassis cover intact and if you want to open the chassis contact HP for permission Otherwise HP shall not be liable for any consequence ...

Page 12: ... supplies Hot swap power supplies Yes No Operating correctly Power off the switch Troubleshoot the switch No Yes Hot swap cards Install PoE modules Install interface cards Install OAP cards Select cards Yes Operating correctly Troubleshoot the switch Verify card installation Yes No End No Hot swap fan trays Select and install fan trays Yes No Fan trays installed No Yes ...

Page 13: ...assis Mounting brackets Cable management brackets Bracket view All 5800 switches except the 5800 48G PoE 2 slots and 5800 48G PoE TAA 2 slots 5820AF 24XG 5820X 24XG SFP 5820X 24XG SFP TAA One pair of 1U mounting brackets supplied with the switch N A See Figure 2 5800 48G PoE 2 slots 5800 48G PoE TAA 2 slots 5820X 14XG SFP 2 slots 5820X 14XG SFP TAA 2 slots One pair of 2U mounting brackets supplied...

Page 14: ...G and 5820AF 24XG switches come with a pair of chassis rails and a pair of slide rails Figure 4 Rack mounting rail kit 1 Chassis rail 2 Slide rail Rack mounting procedures at a glance You can install the switch in a 19 inch rack by using different rack mounting positions Use Table 6 to identify the rack mounting procedure for your switch 1 2 1 2 ...

Page 15: ...assis rails and grounding cable to the chassis 5800AF 48G 5820AF 24XG 2 Rack mounting a 5800AF 48G 5820AF 24XG switch All other 5800 switches 5820X 24XG SFP 5820X 24XG SFP TAA Figure 7 1 Attaching the mounting brackets to the chassis for all the switches except the 5800AF 48G 5820AF 24XG 2 Rack mounting a 5800 5820X switch except the 5800AF 48G 5820AF 24XG Figure 5 Rack mounting procedure 1 Figure...

Page 16: ...liary grounding point 1 5 Front mounting position Attaching the mounting brackets and chassis rails to the chassis 1 Align the mounting brackets with the screw holes in the rear mounting position see Figure 9 or front mounting position see Figure 10 2 Use M4 screws supplied with the switch to attach the mounting brackets to the chassis 3 Align the chassis rails with the rail mounting holes in the ...

Page 17: ... grounding point 2 you must prepare a grounding cable yourself To connect the grounding cable to a chassis grounding point for example the primary grounding point 1 Choose a grounding point 2 Unpack the grounding cable and grounding screws You can use the cable and screws shipped with the switch only for connecting to the primary grounding point or auxiliary grounding point 1 3 Align the two hole ...

Page 18: ...s To attach the mounting brackets in one of these positions 1 Align one mounting bracket with the screw holes in the front mounting position Figure 11 mid mounting position Figure 12 or the rear mounting position Figure 13 These figures show attaching a 1U bracket to a 1U switch chassis To attach a 2U bracket to a 2U switch chassis see Figure 14 2 Use M4 screws supplied with the switch to attach t...

Page 19: ...ets in the front mounting position To install the 2U mounting brackets in the mid mounting position of a 2U switch chassis first use a screwdriver to loosen the three captive screws and separate the mounting brackets from the cable management brackets see Figure 15 Figure 15 Separating a cable management bracket from a mounting bracket 1 Captive screws 2 Cable management bracket 3 Mounting bracket...

Page 20: ...chassis rails Figure 16 Installing the slide rails Mounting the switch in the rack This task requires two people To mount the switch in the rack 1 Wear an ESD wrist strap and make sure it makes good skin contact and is correctly grounded 2 Verify that the mounting brackets and chassis rails have been securely attached on the two sides of the switch 3 Verify that the slide rails have been correctly...

Page 21: ...ide rails reach out of the chassis rails Figure 17 Mounting the switch in the rack 1 Figure 18 Mounting the switch in the rack 2 Rack mounting a 5800 5820X switch except the 5800AF 48G 5820AF 24XG This installation task requires two people To mount the switch in the rack ...

Page 22: ... holes in the rack posts 4 One person holds the switch chassis and aligns the mounting brackets with the mounting holes in the rack posts and the other person attaches the mounting brackets with screws user supplied to the rack 5 Verify that the switch chassis is horizontal and tighten the screws Figure 19 Mounting a 1U 5800 switch in a rack NOTE The procedure for rack mounting a 2U switch is the ...

Page 23: ... earth so the faradism and leakage electricity can be safely released to the earth to minimize EMI susceptibility of the switch You can ground a switch by using a grounding strip at the installation site or the AC power cord connected to the switch NOTE The power and grounding terminals in this section are for illustration only Grounding the switch with a grounding strip WARNING Connect the ground...

Page 24: ...u must prepare a grounding cable yourself The connection method is the same as connecting to the other two grounding points Grounding a 5800 5820X switch except the 5800AF 48G 5820AF 24XG All 5800 and 5820X switches except the 5800AF 48G and the 5820AF 24XG have a grounding point with a grounding sign on their rear panels To connect the grounding cable 1 Remove the grounding screw from the rear pa...

Page 25: ...sheath by using a wire stripper and insert the bare metal part through the black insulation covering into the end of the ring terminal The switch comes with two ring terminals Select the ring terminal appropriate to the size of the grounding post 7 Secure the metal part of the cable to the ring terminal with a crimper cover the joint with the insulation covering and heat the insulation covering wi...

Page 26: ...in the power outlet is securely connected to the ground in the power distribution room or on the AC transformer side The power cord is securely connected to the power outlet If the ground contact in the power outlet is not connected to the ground report the problem and reconstruct the grounding system Figure 23 Grounding through the PE wire of the AC power cord 1 Three wire AC power cable 2 Chassi...

Page 27: ...se operating requirements might void the warranty Installing a fan tray CAUTION To prevent damage to the fan tray or the connectors on the backplane insert the fan tray gently If you encounter resistance while inserting the fan tray pull out the fan tray and insert it again To install a fan tray 1 Wear an ESD wrist strap and make sure it makes good skin contact and is correctly grounded 2 Unpack t...

Page 28: ...e fan tray after the fans completely stop rotating To avoid an unbalanced fan causing loud noise do not touch the fans even if they are not rotating To remove a fan tray 1 Wear an ESD wrist strap and make sure it makes good skin contact and is correctly grounded 2 Loosen the captive screw of the fan tray with a Phillips screwdriver until it is fully disengaged from the switch chassis ...

Page 29: ...r two power supplies for these switches as needed For more information about the power supplies available for the switches see Hot swappable power supplies Figure 27 Installation procedure Figure 28 Removal procedure NOTE HP 58x0AF 650W AC power supply is referred to as 650 W AC power supply and HP 58x0AF 650W DC power supply is referred to as 650W DC power supply throughout this installation guid...

Page 30: ...ect the operation of the switch If the switch has only one power supply removing the power supply powers off the switch To remove a 650 W AC power supply 300 W AC power supply 650 W DC power supply or 300 W DC power supply from a 5800AF 48G or 5820AF 24XG switch 1 Wear an ESD wrist strap and make sure it makes good skin contact and is correctly grounded 2 Squeeze the tabs on the power cord connect...

Page 31: ...h off the power supply as described in the installation and removal procedures in Figure 27 and Figure 28 Figure 31 Removing the DC power cord 1 Press the tabs on the power cord connector with your thumb and forefinger 2 Pull the power cord connector out Figure 32 Removing the power supply 1 Pivot the latch to the right with your thumb 2 Pull the power supply out 1 2 ...

Page 32: ... power supply and verify that the power supply model is correct 5 Correctly orient the power supply with the power supply slot grasp the handle of the power supply with one hand and support its bottom with the other and slide the power supply slowly along the guide rails into the slot see callout 1 in Figure 34 or Figure 35 To prevent damage to the connectors inside the switch chassis insert the p...

Page 33: ...rewdriver until they are completely disengaged 4 Grasp the handle of the power supply with one hand and pull it out a little support the bottom with the other hand and pull the power supply slowly along the guide rails out of the slot 5 Put away the removed power supply in an antistatic bag for future use NOTE The PSR150 A PSR150 A1 PSR150 D and PSR150 D1 power supplies do not have a power switch ...

Page 34: ... supply PSR300 12D1 PSR300 12D2 48 VDC input Connecting the PSR300 12D1 PSR300 12D2 power supply to a 48 VDC power source 54 VDC input RPS powered Connecting the PSR300 12D1 PSR300 12D2 power supply to a 54 VDC output RPS PSR750 A Connecting the PSR750 A power supply 650 W AC power supply 300 W AC power supply Connecting the 650 W AC 300 W AC power supply 650 W DC power supply 300 W DC power suppl...

Page 35: ... VDC output 1 Unpack the RPS power cord identify the plug for connecting to the switch correctly orient the plug with the RPS receptacle on the switch chassis and insert the plug into the receptacle see callout 1 in Figure 38 If you cannot insert the plug into the receptacle re orient the plug rather than use excessive force to push it in 2 Tighten the screws on the plug with a flat blade screwdri...

Page 36: ...emove the RPS DC input power connector 2 Unpack the RPS power cord identify the plug for connecting to the switch correctly orient the plug with the RPS receptacle on the switch chassis and insert the plug into the receptacle see callout 1 in Figure 40 If you cannot insert the plug into the receptacle re orient the plug rather than use excessive force to push it in 3 Tighten the screws on the plug...

Page 37: ...re it makes good skin contact and is correctly grounded 2 Unpack the DC power cord correctly orient the plug at one end of the cable with the power receptacle on the power supply and insert the plug into the power receptacle see callout 1 in Figure 42 If you cannot insert the plug into the receptacle re orient the plug rather than use excessive force to push it in 3 Tighten the screws on the plug ...

Page 38: ... plug into the receptacle re orient the plug rather than use excessive force to push it in 2 Tighten the screws on the plug with a flat blade screwdriver to secure the plug in the power receptacle see callout 2 in Figure 42 3 Connect the other end of the power cord to the RPS Connecting the PSR300 12A PSR300 12A2 power supply 1 Verify that the AC power supply is off 2 Connect one end of the AC pow...

Page 39: ... the receptacle see callout 1 in Figure 44 If you cannot insert the plug into the receptacle re orient the plug rather than use excessive force to push it in 3 Tighten the screws on the plug with a flat blade screwdriver to secure the plug in the power receptacle see callout 2 in Figure 44 4 Connect the two wires at the other end of the power cord to the 48 VDC power source Identify the positive a...

Page 40: ... 2 in Figure 44 3 Connect the other end of the power cord to the RPS Connecting the PSR750 A power supply 1 Verify that the AC power supply is off 2 Connect one end of the AC power cord supplied with the power supply to the power receptacle on the power supply see Figure 45 3 Connect the other end of the power cord to an AC power outlet Figure 45 Connecting the PSR750 A power supply Connecting the...

Page 41: ...o the receptacle re orient the plug rather than use excessive force to push it in 2 Use a cable tie to secure the power cord to the handle of the power supply as shown in Figure 46 3 Connect the other end of the power cord to the DC power source Figure 47 Connecting the 650 W DC 300 W DC power supply Installing removing an interface card This section applies to the 5800 and 5820X switches that hav...

Page 42: ...rd slot 1 Phillips screwdriver 2 Chassis front panel 3 Filler panel 3 Put away the removed filler panel for future use 4 Unpack the interface card and make sure the ejector levers are perpendicular to the card panel 5 Gently push the interface card in along the slot guide rails until the interface card has good contact with the switch chassis and push the ejector levers inward Figure 49 Installing...

Page 43: ...talled install the filler panel to prevent dust and ensure good ventilation in the switch Figure 50 Removing an interface card 1 Chassis front panel 2 Interface card 3 Pull the ejector levers outward 4 Pull out the interface card Installing removing an OAP card Before you install an OAP card verify the compatibility of the OAP card with your switch and identify in which slot you can install the OA...

Page 44: ...npack the OAP card and verify that this OAP card can be installed in the OAP card slot 5 Hold the OAP card with the ejector levers on top push the OAP card slowly along the guide rails into the slot see callout 3 in Figure 52 and push the ejector levers inward to lock the OAP card in position see callout 4 in Figure 52 Figure 52 Installing an OAP card 1 OAP card 2 Chassis rear panel 3 Push the OAP...

Page 45: ...l all spring pressure is released Do not use excessive force 3 Pull the ejector levers outward see callout 3 in Figure 53 and pull out the OAP card slowly along the guide rails see callout 4 in Figure 53 4 If you do not install a new OAP card in the slot install a filler panel to prevent dust from entering the switch and ensure good ventilation in the switch Figure 53 Removing the OAP card 1 OAP c...

Page 46: ...nel 3 Put away the removed filler panel for future use 4 Unpack the PoE module 5 Push the PoE module slowly along the guide rails into the slot see callout 1 in Figure 54 and push the ejector levers inward to lock the PoE module in position see callout 2 in Figure 54 Do not use excessive force 6 Fasten the captive screws on the PoE module with a Phillips screwdriver to securely fix the PoE module ...

Page 47: ... the installation verify that There is enough space for heat dissipation around the switch and the rack or workbench is stable The grounding cable is securely connected The correct power source is used The power cords are correctly connected All the interface cables are cabled indoors If any cable is routed outdoors verify that the socket strip with lightning protection and lightning arresters for...

Page 48: ...erminal Connecting the console cable A console cable is an 8 core shielded cable with a crimped RJ 45 connector at one end for connecting to the console port of the switch and a DB 9 female connector at the other end for connecting to the serial port on the console terminal Figure 57 Console cable To connect a terminal for example a PC to the switch 1 Plug the DB 9 female connector of the console ...

Page 49: ... switch you must run a terminal emulator program on the console terminal The following are the required terminal settings Bits per second 9 600 Data bits 8 Parity None Stop bits 1 Flow control None Emulation VT100 To set terminal parameters for example on a Windows XP HyperTerminal 1 Select Start All Programs Accessories Communications HyperTerminal The Connection Description dialog box appears 2 ...

Page 50: ... by the HyperTerminal connection 4 Set Bits per second to 9600 Data bits to 8 Parity to None Stop bits to 1 and Flow control to None and click OK Figure 60 Setting the serial port parameters 5 Select File Properties in the HyperTerminal window ...

Page 51: ...45 Figure 61 HyperTerminal window 6 On the Settings tab set the emulation to VT100 and click OK Figure 62 Setting terminal emulation in Switch Properties dialog box ...

Page 52: ...et Power on the switch During the startup process you can access Boot ROM menus to perform tasks such as software upgrade and file management The Boot ROM interface and menu options vary by software versions For more information about Boot ROM menu options see the release notes for the switch software After the startup completes you can access the CLI to configure the switch For more information a...

Page 53: ...lled an IRF fabric for flattened network topology and high availability scalability and manageability NOTE You can set up a heterogeneous IRF fabric that has both 5800 and 5820X switches or a homogeneous IRF fabric that has only 5800 or 5820X switches IRF fabric setup flowchart Figure 63 IRF fabric setup flowchart To set up an IRF fabric ...

Page 54: ...es issues that an IRF fabric setup plan must cover Planning IRF fabric size and the installation site Choose switch models and identify the number of required IRF member switches depending on the user density and upstream bandwidth requirements The switching capacity of an IRF fabric equals the total switching capacities of all member switches A 5800 5820X IRF fabric can have up to 10 switches Whe...

Page 55: ... logical interfaces for the connections between IRF member switches Each IRF member switch has two IRF ports IRF port 1 and IRF port 2 To use an IRF port you must bind at least one physical port to it When connecting two neighboring IRF member switches you must connect the physical ports of IRF port 1 on one switch to the physical ports of IRF port 2 on the other switch The 5800 and 5820X switches...

Page 56: ... PoE TAA 1 slot Four fixed SFP ports on the front panel Ports on the expansion interface card on the rear panel All physical ports of an IRF port must be located on the front panel or the interface card on the rear panel 5800 24G 5800 24G TAA 5800 24G PoE 5800 24G PoE TAA Four fixed SFP ports on the front panel Ports on the expansion interface card on the rear panel An IRF port can use physical po...

Page 57: ... switches are all in one equipment room choose SFP cables Table 9 lists the SFP transceiver modules and SFP cables available for IRF connections Table 9 SFP transceiver modules and SFP cables available for IRF connections Product code Module description Central wavelength in nm Connector Cable fiber specifications Max transmission distance JD092B HP X130 10G SFP LC SR Transceiver 850 LC 50 125 μm ...

Page 58: ...IRF connection schemes and all these schemes use a ring topology IMPORTANT In these schemes all physical IRF ports are located on the same side If physical IRF ports are on different sides you must measure the distance between them to select an appropriate cable Connecting the IRF member switches in one rack Use short haul and long haul SFP cables to connect the IRF member switches 10 switches in ...

Page 59: ...53 Figure 66 Connecting the switches in one rack 1 2 3 4 5 6 7 8 9 10 ...

Page 60: ...h higher member priority than any other switch Bind physical ports to IRF port 1 on one switch and to IRF port 2 on the other switch You perform IRF port binding before or after connecting IRF physical ports depending on the software release To bind the ports on an interface card to an IRF port you must install the interface card first For how to install an interface card see HP 5820X 5800 Switch ...

Page 61: ...tion Guide 4 Verify that you can manage all member switches as if they were one node 5 Display the running status of the IRF fabric by using the commands in Table 10 Table 10 Displaying and maintaining IRF configuration and running status Task command Display information about the IRF fabric display irf Display all members IRF configurations that take effect at a reboot display irf configuration D...

Page 62: ...tch startup mode 0 Reboot Enter your choice 0 9 Enter 7 and restart the switch The switch reboots with empty configuration and you can log in through the console port without entering the password so you can check the configuration file for the user password Boot ROM password loss Contact HP Support for help Power supply failure Built in power supply failure The 5800 48G 1 slot 5800 48G TAA 1 slot...

Page 63: ...ly connected to the RPS The RPS is correctly working The operating temperature of the switch is in the normal range and the power supply has good ventilation Over temperature can cause the power supply to stop working and enter the protection state Concurrent RPS and AC inputs If the system status LED is off the AC power supply and the RPS both have an input failure Verify the following items The ...

Page 64: ... Guide and HP PSR750 A Power Supply User Guide Troubleshooting the PSR150 A PSR150 A1 PSR150 D PSR150 D1 PSR300 12A PSR300 12A2 PSR300 12D1 PSR300 12D2 PSR750 A power supply If the power supply system is correctly working the power supply status LEDs are steady green If the LEDs behave in any other way verify the following items The power supply is switched on Skip this step if the power supply ha...

Page 65: ...G SFP 2 slots and 5820X 14XG SFP TAA 2 slots switches and all 5800 switches but the 5800AF 48G You can use the LEDs on the OAP card to identify its operating status For more information about the LEDs see the user guide that comes with the card If your switch has a status LED for the expansion interface card slot you can also use the LED to identify the operating status of the card If the OAP card...

Page 66: ...AUTION You can replace a hot swappable fan tray without powering off the switch To prevent overheat replace the failed fan tray within 2 minutes for the 5800 48G PoE 2 slots 5800 48G PoE TAA 2 slots 5800 24G SFP 1 slot 5800 24G SFP TAA 1 slot 5820X 24XG SFP 5820X 24XG SFP TAA 5820X 14XG SFP 2 slots and 5820X 14XG SFP TAA 2 slots switches CAUTION The 5800AF 48G and 5820AF 24XG switches require two ...

Page 67: ...iguration terminal displays nothing when the switch is powered on verify the following items The power supply is supplying power to the switch The console cable is correctly connected The console cable has no problem and the terminal settings are correct Garbled terminal display If terminal display is garbled verify that the following settings are configured for the terminal for example HyperTermi...

Page 68: ...ng you will receive email notification of product enhancements new driver versions firmware updates and other product resources Related information Documents To find related documents browse to the Manuals page of the HP Business Support Center website http www hp com support manuals For related documentation navigate to the Networking section and select a networking category For a complete list o...

Page 69: ...parated by vertical bars from which you select one choice multiple choices or none 1 n The argument or keyword and argument combination before the ampersand sign can be entered 1 to n times A line that starts with a pound sign is comments GUI conventions Convention Description Boldface Window names button names field names and menu items are in bold text For example the New User window appears cli...

Page 70: ... a unified wired WLAN module or the switching engine on a unified wired WLAN switch Represents an access point Represents a mesh access point Represents omnidirectional signals Represents directional signals Represents a security product such as a firewall UTM multiservice security gateway or load balancing device Represents a security card such as a firewall load balancing NetStream SSL VPN IPS o...

Page 71: ...t 8 System status LED SYS 9 Power supply 1 status LED PWR1 10 Power supply 2 status LED PWR2 11 OAP card status LED SLOT3 12 PoE module status LED SLOT4 13 100 1000Base X SFP port LED 14 Port LED mode switching button 15 100 1000Base X SFP port 16 10 100 1000Base T auto sensing Ethernet port NOTE The 5800 48G PoE 2 slots and 5800 48G PoE TAA 2 slots switches come with the two expansion interface c...

Page 72: ... are installed in the slots These two switches also come with the PoE module slot and the OAP card slot covered by filler panels In this figure a PoE module is installed 5800 48G 1 slot 5800 48G TAA 1 slot Figure 71 Front panel 1 10 100 1000Base T auto sensing Ethernet port 2 10 100 1000Base T Ethernet port LED 3 Seven segment LED 4 Port mode LED 5 SFP port LED 6 Logo plate A console port and a US...

Page 73: ...go plate with excessive force 3 When closing the logo plate insert the pin on the left of the logo plate into the fastening hole in the front panel rotate the logo plate inward until the tab on the right aligns with the fastening slot on the front panel and slightly press the logo plate until the tab clicks into the hole If the tab is not fully engaged in the fastening slot make another try instea...

Page 74: ...e with the RPS receptacle covered by a protective cover 5800 48G PoE 1 slot 5800 48G PoE TAA 1 slot Figure 75 Front panel 1 10 100 1000Base T auto sensing Ethernet port 2 10 100 1000Base T Ethernet port LED 3 Seven segment LED 4 Port mode LED 5 SFP port LED 6 Logo plate A console port and a USB port are under this logo plate 7 System status LED SYS 8 RPS status LED RPS 9 Interface card status LED ...

Page 75: ...tches come with the expansion interface card slot covered by a filler panel In this figure an LSW1SP4P0 interface card is installed in the slot 5800AF 48G Figure 77 Front panel 1 10 100 1000Base T auto sensing Ethernet port 2 10 100 1000Base T Ethernet port LED 3 SFP port 4 Seven segment LED 5 Port LED mode switching button 6 Port mode LED 7 System status LED SYS 8 SFP port LED ...

Page 76: ...es with the power supply slots empty and the filler modules for the slots as accessory You can install one or two power supplies for the switch as needed In this figure two 650W AC power supplies are installed The 5800AF 48G switch also comes with the fan tray slots empty You must install two fan trays for the 5800AF 48G for adequate heat dissipation and their models must be the same In this figur...

Page 77: ...Interface card status LED SLOT1 11 Port LED mode switching button 12 SFP port Figure 81 Rear panel 1 AC input power receptacle 2 RPS receptacle 3 Grounding screw 4 Expansion interface card slot NOTE The 5800 24G and 5800 24G TAA switches come with the expansion interface card slot covered by a filler panel In this figure an LSW1SP4P0 interface card is installed in the slot These two switches also ...

Page 78: ... System status LED SYS 9 RPS status LED RPS 10 Interface card status LED SLOT1 11 Port LED mode switching button 12 SFP port Figure 83 Rear panel 1 RPS receptacle 2 AC input power receptacle 3 Grounding screw 4 Interface card slot NOTE The 5800 24G PoE and 5800 24G PoE TAA switches come with the expansion interface card slot covered by a filler panel In this figure an LSW1SP4P0 interface card is i...

Page 79: ... SFP port 12 Port LED mode switching button To use the console port and USB port open the logo plate as shown in Figure 72 and Figure 73 NOTE The 5800 24G SFP 1 slot and 5800 24G SFP TAA 1 slot switches come with the expansion interface card slot covered by a filler panel In this figure an LSW1SP4P0 interface card is installed in the slot Figure 85 Rear panel 1 Power supply slot 1 2 Power supply s...

Page 80: ...us LED SYS 10 Port mode LED 11 Seven segment LED 12 ACT LED for the management Ethernet port 13 LINK LED for the management Ethernet port Figure 87 Rear panel 1 Power supply slot 1 2 Power supply slot 2 3 Fan tray slot 1 4 Fan tray slot 2 5 Grounding screw auxiliary grounding point 2 NOTE The 5820AF 24XG switch comes with the power supply slots empty and the power filler modules as accessories You...

Page 81: ...2 Power supply 2 status LED PWR2 13 Port LED mode switching button 14 ACT LED for the management Ethernet port 15 LINK LED for the management Ethernet port NOTE The SFP ports are numbered from left to right and from top to bottom with you facing the front panel The first top left SFP port is numbered 1 the first bottom left SFP port is numbered 2 the second top left port is numbered 3 and so on Th...

Page 82: ...nsion interface card slot 2 Seven segment LED 3 Port mode LED 4 System status LED SYS 5 Power supply 1 status LED PWR1 6 Power supply 2 status LED PWR2 7 OAP card status LED SLOT3 8 Port mode LED switching button 9 USB port 10 Console port 11 10 100 1000Base T auto sensing Ethernet port 12 10 100 1000Base T Ethernet port LED 13 SFP port 14 SFP port LED NOTE The 5820X 14XG SFP 2 slots and 5820X 14X...

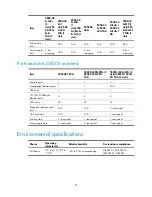
Page 83: ...h the OAP card slot covered by a filler panel Physical specifications Chassis dimensions and weights Chassis Dimensions H W D Weight 5800 48G PoE 2 slots 5800 48G PoE TAA 2 slots 86 1 440 465 mm 3 39 17 32 18 31 in 18 kg 39 68 lb 5800 48G 1 slot 5800 48G TAA 1 slot 43 6 440 367 mm 1 72 17 32 14 45 in 6 5 kg 14 33 lb 5800 48G PoE 1 slot 5800 48G PoE TAA 1 slot 43 6 440 427 mm 1 72 17 32 16 81 in 8 ...

Page 84: ...the front panel 1 rear panel 1 front panel 1 front panel 1 covered by the logo plate on the front panel Management Ethernet ports N A N A N A 1 on the rear panel N A N A 1 on the rear panel USB ports full speed 1 front panel 1 covered by the logo plate on the front panel 1 covered by the logo plate on the front panel 1 rear panel 1 front panel 1 front panel 1 covered by the logo plate on the front...

Page 85: ...24XG 5820X 24XG SFP 5 820X 24XG SFP TAA 5820X 14XG SFP 2 slots 5820X 14XG S FP TAA 2 slots Console ports 1 1 1 Management Ethernet ports 1 1 N A USB ports 1 1 1 10 100 1000Base T Ethernet ports 2 4 4 SFP ports 24 24 14 Expansion interface card slots N A N A 2 front panel OAP card slots N A N A 1 rear panel Fan tray slots 2 rear panel 1 rear panel 1 rear panel Power supply slots 2 rear panel 2 rear...

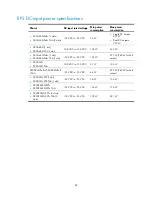
Page 86: ...800 48G PoE 1 slot 5800 48G PoE TAA 1 slot Rated voltage 100 VAC to 240 VAC 50 or 60 Hz Max voltage 90 VAC to 264 VAC 47 or 63 Hz 131 W 673 W 370 W for PoE output 5800AF 48G Rated voltage 100 VAC to 240 VAC 50 or 60 Hz Max voltage 90 VAC to 264 VAC 47 or 63 Hz 105 W 130 W 5800 24G 5800 24G TAA Rated voltage 100 VAC to 240 VAC 50 or 60 Hz Max voltage 90 VAC to 264 VAC 47 or 63 Hz 67 W 105 W 5800 24...

Page 87: ...to 240 VAC 50 or 60 Hz Max voltage 90 VAC to 264 VAC 47 or 63 Hz 105 W 245 W DC input power specifications Chassis DC input rated voltage Min power consumption Max power consumption 5800 48G PoE 2 slots 5800 48G PoE TAA 2 slots 48 VDC to 60 VDC 94 W Single DC output 227 W Dual DC outputs 237 W 5800AF 48G 40 VDC to 60 VDC 105 W 130 W 5800 24G SFP 1 slot 5800 24G SFP TAA 1 slot 48 VDC to 60 VDC 58 W...

Page 88: ...VDC to 13 2 VDC 102 W 163 W 5800 48G PoE 1 slot 5800 48G PoE TAA 1 slot 52 VDC to 55 VDC 107 W 973 W 740 W for PoE output 5800 24G 5800 24G TAA 10 8 VDC to 13 2 VDC 67 W 105 W 5800 24G PoE 5800 24G PoE TAA 52 VDC to 55 VDC 64 W 870 W 740 W for PoE output 5800 24G SFP 1 slot 5800 24G SFP TAA 1 slot 52 VDC to 55 VDC 58 W 136 W 5820X 24XG SFP 5820X 24XG SFP TAA 52 VDC to 55 VDC 124 W 176 W 5820X 14XG...

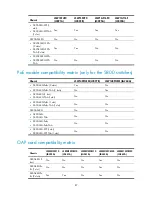
Page 89: ...witch You must separately purchase two fan trays for the 5800AF 48G or 5820AF 24XG switch All other 5800 or 5820X switches come with built in fans or a fan tray installed Power supply compatibility matrix Chassis PSR300 12A JC087A PSR30 0 12A2 JC087A PSR300 1 2D1 JC090A PSR300 12D2 JC090A PSR750 A JC089A HP 58x0AF 650W AC power supply JC680A HP 58x0AF 300W AC power supply JG900A HP 58x0AF 650W DC ...

Page 90: ...supply JG901A PSR150 A JD362A PSR150 A1 JD362A PSR150 D JD366A PSR150 D1 JD366A 5800 48 G PoE 1 slot 5800 48 G PoE TAA 1 slot No No No No No No No 5800AF 48 G No No No Yes Yes No No 5800 24 G 5800 24 G TAA No No No No No No No 5800 24 G PoE 5800 24 G PoE T AA No No No No No No No 5800 24 G SFP 1 slot 5800 24 G SFP TAA 1 slot No No No No No Yes Yes 5820AF 24 XG No No No Yes Yes No No 5820X 2 4XG SF...

Page 91: ...2A PSR300 12A2 PSR300 12D1 or PSR300 12D2 and a 750 W power supply PSR750 A For more information see Hot Swappable Power Supply Ordering Guide for HP 5800 48G PoE Switch with 2 Interface Slots The HP 5800AF 48G 5820AF 24XG switch does not support mix of a 650 W AC power supply and a 650 W DC power supply The HP 5800AF 48G 5820AF 24XG switch does not support mix of a 650 W power supply 650 W AC pow...

Page 92: ...lots Yes No No No 5820X 24XG SFP 5820X 24XG SFP TAA No No No Yes 5820AF 24XG No Yes Yes No Interface card compatibility matrix Chassis LSW1SP4P0 JC091A LSW1SP2P0 JC092B LSW1GP16P0 JC095A LSW1GT16P JC094A 5800 48G PoE 2 slots 5800 48G PoE TAA 2 slots Yes Yes Yes Yes 5800 48G 1 slot 5800 48G TAA 1 slot Yes Yes Yes Yes 5800 48G PoE 1 slot 5800 48G PoE TAA 1 slot Yes Yes Yes Yes 5800AF 48G No No No No...

Page 93: ...POEM JC097B LSW148POEM JG260A 5800 48G PoE 2 slots Yes No 5800 48G PoE TAA 2 slots No Yes 5800 48G 1 slot 5800 48G TAA 1 slot No No 5800 48G PoE 1 slot 5800 48G PoE TAA 1 slot No No 5800AF 48G No No 5800 24G 5800 24G TAA No No 5800 24G PoE 5800 24G PoE TAA No No 5800 24G SFP 1 slot 5800 24G SFP TAA 1 slot No No OAP card compatibility matrix Chassis LSWM1FW10 JD255A LSWM1WCM10 JD441A LSWM1WCM10 JG2...

Page 94: ...es 5800 24G Po E TAA No No No No Yes 5800 24G SF P TAA 1 slot No No No No Yes 5800 24G TAA No No No No Yes 5820AF 24X G No No No No No 5820X 24XG SFP No No No No No 5820X 24XG SFP TAA No No No No No 5820X 14XG SFP 2 slots Yes Yes No Yes No 5820X 14XG SFP TAA 2 slots No No Yes No Yes NOTE You install the LSWM1WCM20 JD443A JG262A card in the expansion interface card slot and all other OAP cards in t...

Page 95: ...ecifications Reference PSR150 A PSR150 A1 Rated input voltage range 100 VAC to 240 VAC 50 Hz or 60 Hz Max input voltage range 90 VAC to 264 VAC 47 Hz or 63 Hz Max output power 150 W HP PSR150 A PSR150 D Series Power Supplies User Guide PSR150 D PSR150 D1 Rated input voltage range 48 VDC to 60 VDC Max input voltage range 36 VDC to 72 VDC Max output power 150 W HP PSR150 A PSR150 D Series Power Supp...

Page 96: ...r Guide 300 W AC power Supply Rated input voltage range 100 VAC to 240 VAC 50 Hz or 60 Hz Max input voltage range 85 VAC to 264 VAC 47 Hz or 63 Hz Max output power 315 W HP 58x0AF 300W AC JG900A 300W DC JG901A Power Supplies User Guide 300 W DC power Supply Rated input voltage range 48 VDC to 60 VDC Max input voltage range 36 VDC to 72 VDC Max output power 315 W HP 58x0AF 300W AC JG900A 300W DC JG...

Page 97: ...wer supply side to the network port side Input voltage 12 V Maximum power consumption 19 5 W Documentation reference HP LSWM1FANSC LSWM1FANSCB Fan Assemblies Installation LSWM1FANSCB Fans Two 40 40 28 mm 1 57 1 57 1 1 in fans Fan speed 18500 R P M Max airflow 45 CFM Airflow direction Front to back fans draw air from the network side to the power supply side Input voltage 12 V Maximum power consump...

Page 98: ...WLAN access controller module OAP card slot LSWM1WCM20 JD443A WLAN access controller module Expansion interface card slot LSWM1WCM20 JG262A WLAN access controller module Expansion interface card slot For more information about the LSWM1WCM20 card see the user guide that comes with the card For more information about any other OAP card see HP OAP Cards User Guide Hot swappable PoE modules You can i...

Page 99: ...es have one management Ethernet port You can connect this port to a PC or management station for loading and debugging software or remote management Table 14 Management Ethernet port specifications Item Specification Connector type RJ 45 Connector quantity 1 Port transmission rate 10 100 1000 Mbps half full duplex Transmission medium and max transmission distance 100 m 328 08 ft over category 5 tw...

Page 100: ...gory 5 or above twisted pair cable Standards IEEE 802 3i 802 3u 802 3ab 100 1000Base X SFP port The 5800 48G PoE 2 slots 5800 48G PoE TAA 2 slots 5800 24G SFP 1 slot and 5800 24G SFP TAA 1 slot switches have 100 1000Base X SFP ports and you can install the 1000 Mbps SFP transceiver modules in Table 16 and the 100 Mbps SFP modules in Table 17 in the ports Table 16 1000 Mbps SFP transceiver modules ...

Page 101: ...D090A HP X110 100M SFP LC LH40 transceiver 1310 9 125 40 km 24 86 miles JD091A HP X110 100M SFP LC LH80 transceiver 1550 9 125 80 km 49 71 miles NOTE To guarantee the functionality of the SFP ports use only HP SFP transceiver modules The SFP transceiver modules available for this switch series are subject to change over time For the most up to date list of SFP transceiver modules consult your HP s...

Page 102: ... 125 500 550 m 1804 46 ft JD061A HP X125 1G SFP LC LH40 1310nm transceiver 1310 9 125 N A 40 km 24 86 miles JD062A HP X120 1G SFP LC LH40 1550nm transceiver 1550 9 125 N A 40 km 24 86 miles JD063B HP X125 1G SFP LC LH70 Transceiver 1550 9 125 N A 70 km 43 50 miles Table 19 10 Gbps SFP transceiver modules available for the SFP ports Product Code Module description Central wavelength nm Fiber diamet...

Page 103: ...ft JC784C HP X240 10G SFP SFP 7m Direct Attach Copper Cable 7 m 22 97 ft NOTE To guarantee the functionality of the SFP ports use only HP SFP or SFP transceiver modules The SFP and SFP transceiver modules available for this switch series are subject to change over time For the most up to date list of SFP transceiver modules consult your HP sales representative or technical support engineer For the...

Page 104: ...lot SFP port LED Both 5800 and 5820X series but 5800 48G PoE 2 slots and 5800 48G PoE TAA 2 slots Management Ethernet port LEDs 5800AF 48G 5800 24G SFP 1 slot 5800 24G SFP TAA 1 slot 5820AF 24XG 5820X 24XG SFP 5820X 24XG SFP TAA OAP card status LED 5800 48G PoE 2 slots 5800 48G PoE TAA 2 slots 5820X 14XG SFP 2 slots 5820X 14XG SFP TAA 2 slots PoE module status LED 5800 48G PoE 2 slots 5800 48G PoE...

Page 105: ...lot 2 or no power is input RPS status LED The RPS status LED shows the status of the RPS DC input Table 24 describes the RPS status LED behaviors for the 5800 24G 5800 24G TAA 5800 48G 1 slot and 5800 48G TAA 1 slot switches Table 25 describes the RPS status LED behaviors for the 5800 24G PoE 5800 24G PoE TAA 5800 48G PoE 1 slot and 5800 48G PoE TAA 1 slot switches Table 24 RPS status LED descript...

Page 106: ...so show the total PoE output power as a percentage of the maximum PoE output power that a PoE capable switch can supply see Table 28 The PoE switches include 5800 48G PoE 2 slots 5800 48G PoE TAA 2 slots 5800 48G PoE 1 slot 5800 48G PoE TAA 1 slot 5800 24G PoE and 5800 24G PoE TAA Table 27 Seven segment LED description I System status LED SYS status Seven segment LED Unit status Description Flashi...

Page 107: ...of the maximum PoE output power 10 100 1000Base T Ethernet port LED Each 10 100 1000Base T auto sensing Ethernet port has a status LED to show port operating status and activities The port mode LED indicates the type of port status information for example port rate or duplex mode that the port LEDs are showing You can use the port LED mode switching button to change the type of displayed port info...

Page 108: ...of information for example port rate or duplex mode that the port LEDs are showing You can use the port LED mode switching button to change the type of displayed port information Table 30 100 1000Base X SFP port LED description Port mode LED Mode status Port LED status Description Steady green rate mode Steady green The port is operating at 1000 Mbps The port LED fast flashes when the port is send...

Page 109: ... A management Ethernet port has one LINK LED and one ACT LED to show its link and data transmission status Table 32 Management Ethernet port LEDs description Led mark Status Description LINK Off The management Ethernet port is not connected Steady green The management Ethernet port is operating at 10 100 1000 Mbps ACT Off The management Ethernet port is not receiving or sending data Flashing yello...

Page 110: ...PoE module slot is empty Interface card status LED The SLOT1 LED shows the status of the interface card or the OAP card in the expansion interface card slot Table 35 Interface card status LED description LED mark Status Description SLOT1 Green The interface card or the OAP card is in position and operating correctly Flashing yellow 1 Hz The slot does not support the card model or the card has fail...

Page 111: ...nd use separate air aisles for their upper half and lower half Make sure that the two air aisles have good ventilation Figure 94 shows the airflow through the lower half of the chassis Cool air flows in from the left side of the chassis circulates through the lower half of the chassis and the power supplies and exhausts through the air vents in the fan tray panel and the power supply panels Figure...

Page 112: ...106 Figure 94 Airflow through the lower half of the chassis 1 Outlet air vents in the power supply panels 2 Outlet air vents in the fan tray panel 3 Front panel 4 Side inlet air vents 1 1 2 4 3 ...

Page 113: ... panel 3 Side inlet air vents 5800 48G 1 slot 5800 48G TAA 1 slot Figure 96 shows the airflow design for the 5800 48G 1 slot and 5800 48G TAA 1 slot switches Cool air flows in from the left side of the chassis circulates through the chassis and the interface card and exhausts out the right side of the chassis ...

Page 114: ...anel 5800 48G PoE 1 slot 5800 48G PoE TAA 1 slot Figure 97 shows the airflow design for the 5800 48G PoE 1 slot and 5800 48G PoE TAA 1 slot switches Cool air flows in from the left side of the chassis circulates through the chassis and the interface card and exhausts out the right side of the chassis 2 2 1 1 3 ...

Page 115: ...ws in through the air vents in the fan tray panel and the power supply panels circulates through the chassis and the power supplies and exhausts at the network port side as shown in Figure 98 When LSWM1FANSCB fan trays are used cool air flows in through the air vents in the network port side panel and the power supply panels circulates through the chassis and the power supplies and exhausts throug...

Page 116: ...110 Figure 98 Airflow through the chassis with LSWM1FANSC fan trays 1 Power supply air vents 2 Fan tray air vents 3 Network port side air vents 1 2 2 3 1 ...

Page 117: ...chassis and the power supplies use separate air aisles Make sure that both aisles are not blocked 5800 24G 5800 24G TAA Figure 100 shows the airflow design for the 5800 24G and 5800 24G TAA switches Cool air flows in from the left side of the chassis circulates through the chassis and the interface card and exhausts out the right side of the chassis 2 2 3 1 1 ...

Page 118: ...air vents 3 Front panel 5800 24G PoE 5800 24G PoE TAA Figure 101 shows the airflow design for the 5800 24G PoE and 5800 24G PoE TAA switches Cool air flows in from the left side of the chassis circulates through the chassis and the interface card and exhausts out the right side of the chassis ...

Page 119: ...t 5800 24G SFP TAA 1 slot Figure 102 shows the airflow through the 5800 24G SFP 1 slot 5800 24G SFP TAA 1 slot chassis and power supplies Cool air flows in from the two sides of the chassis circulates through the chassis and power supplies and exhausts through the air vents in the fan tray panel and the power supply panels 2 2 1 1 3 ...

Page 120: ...he same type LSWM1FANSC or LSWM1FANSCB When LSWM1FANSC fan trays are used cool air flows in through the air vents in the fan tray panel and the power supply panels circulates through the chassis and the power supplies and exhausts at the network port side as shown in Figure 103 When LSWM1FANSCB fan trays are used cool air flows in through the air vents in the network port side panel and the power ...

Page 121: ...115 Figure 103 Airflow through the chassis with LSWM1FANSC fan trays 1 Fan tray air vents 2 Power supply air vents 3 Network port side air vents 1 2 2 3 1 ...

Page 122: ... separate air aisles Make sure that both aisles are not blocked 5820X 24XG SFP 5820X 24XG SFP TAA Figure 105 shows the airflow through the 5820X 24XG SFP 5820X 24XG SFP TAA chassis and power supplies Cool air flows in from the two sides and front of the chassis circulates through the chassis and power supplies and exhausts through the air vents in the fan tray panel and the power supply panels ...

Page 123: ... SFP 2 slots 5820X 14XG SFP TAA 2 slots The 5820X 14XG SFP 2 slots and 5820X 14XG SFP TAA 2 slots switch chassis are 2U high and use separate air aisles for their upper half and lower half Make sure that the two air aisles have good ventilation Figure 106 shows the airflow through the lower half of the chassis Cool air flows in from the left side of the chassis circulates through the lower half of...

Page 124: ...through the upper half of the chassis including the OAP card and the interface card and exhausts through the outlet air vents in the fan tray panel Figure 106 Airflow through the lower half of the chassis 1 Outlet air vents in the power supply panels 2 Outlet air vents in the fan tray panel 3 Front panel 4 Side inlet air vents 2 3 4 1 ...

Page 125: ...119 Figure 107 Airflow through the upper half of the chassis 1 Outlet air vents in the fan tray panel 2 Front panel 3 Side inlet air vents ...

Page 126: ...nstallation tools 4 Installing the switch in a 19 inch rack 7 Installing removing a fan tray 21 Installing removing a PoE module 40 Installing removing a power supply 23 Installing removing an interface card 35 Installing removing an OAP card 37 Interface cards 91 IRF fabric setup flowchart 47 L LEDs 97 M Mounting the switch on a workbench 17 O OAP card failure 59 OAP cards 92 P Password loss 56 P...

Reviews: