background image

Section 3 - Operation

3.1  Power Requirements

Caution!  Be sure that the power supply is the same voltage as specified on the nameplate

With the chiller plugged in (before pressing the P

OWER

O

N

button), the display responds by showing

standby (....).  If there is no response, check that the circuit breaker on the rear of the chiller is in the
ON position. An extension cord is not recommended.

3.2  Temperature Setting and Adjustments

After setting up and filling the chiller:

1.

Press the P

OWER

O

N

button.  The LED display indicates (8888), the power up self test. When the

chiller is turned on, there is a 60 second time-out period.  During this time the controller is
performing a self-diagnostic and a balancing of pressure across the compressor inlet and outlet.
(a balanced system reduces the AC current required to start up the compressor and will result in
an extended compressor life.)  The pump is active during the start delay period.  When the time
out period reaches zero, the compressor starts and the chiller is then fully operational.

Upon completion of the self test, the actual fluid temperature is displayed.  Your desired
operating temperature can now be set.

2.

Press the S

ET

/M

ENU

button.  The degree lights flash indicating the temperature can be set or

changed.  Turn the S

ETTING

A

DJUSTMENT

knob to the desired setting.  This setting is accepted

after pressing the S

ET

/M

ENU

button or will be automatically accepted after a few seconds of

keypad inactivity.  The degree light stops flashing and the display shows the actual temperature.  

3.

The S

ET

T

EMPERATURE

may be checked at any time by pressing and releasing the S

ET

/M

ENU

button.  Allow sufficient time for the chiller to stabilize at the desired temperature. 

3.3  Selection of Celsius or Fahrenheit 

To change the readout to °C or °F:

1.

Press and hold the Set/Menu button until the display reads “UNITS”.

2.

Press Set/Menu again then turn the Setting Adjustment knob and select °C or °F.

3.

Press Set/Menu or the setting will be accepted after a few seconds.

9

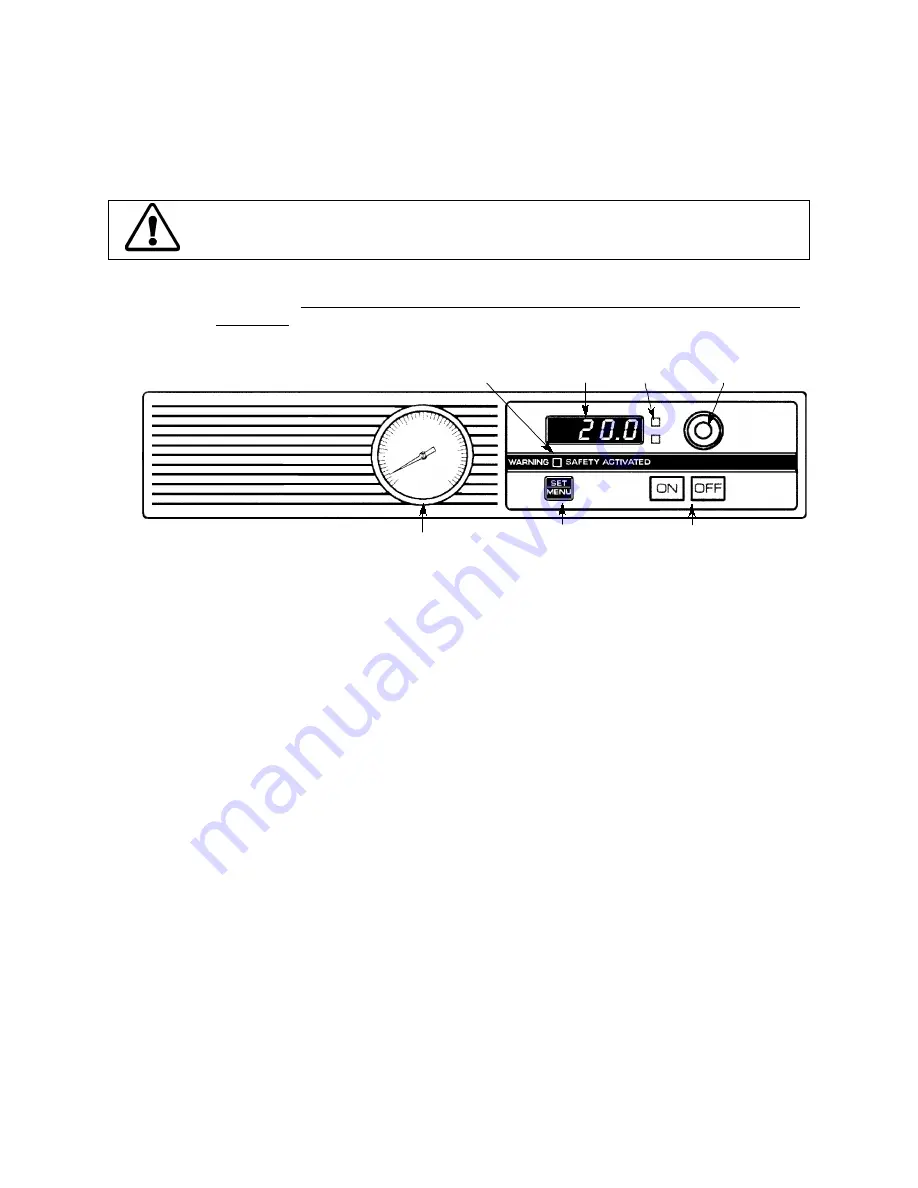
P

RESSURE

G

AUGE

(On Positive Displacement

Pump models only)

S

ET

/M

ENU

B

UTTON

(For models with

optional heater only)

LED

D

ISPLAY

°C 

OR

°F

D

ISPLAY

S

ETTING

A

DJUSTMENT

K

NOB

P

OWER

B

UTTONS

Front Face Plate 

Summary of Contents for 6105P

Page 1: ...ators Manual Refrigerated Recirculating Chillers Powerful Cooling Microprocessor Controller Digital Set Read with High Flow Centrifugal Pump Positive Displacement Pump or Turbine Pump 110 116 rev D ecn 1390 ...

Page 2: ...troller Default Settings Section 4 Diagram of Models Section 5 Maintenance 5 1 Standard Magnetic Drive Centrifugal Pump Motor 5 2 Positive Displacement High Pressure Pump Motor 5 3 Fluid Filter Included With High Pressure Pump 5 4 Refrigeration Air Vents Air Filter Section 6 Troubleshooting 6 1 Unit Disabled 6 2 No Pumping 6 3 Insufficient Pumping 6 4 No Cooling or Insufficient Cooling Section 7 S...

Page 3: ... sole obligation under this warranty is limited to the repair or replacement of a defective product and the manufacturer shall not in any event be liable for any incidental or consequential damages of any kind resulting from use or possession of this product Some states do not allow A limitations on how long an implied warranty lasts or B the exclusion or limitation of incidental or consequential ...

Page 4: ...rison of Pump Options Centrifugal Pump Capacity Positive Displacement Pump Capacity 1 2 HP 1 3 HP 1 4 HP 1 HP 3 4 HP General Specifications To All Chillers Temperature Setability 0 1 C Temperature Uniformity 0 5 C Readout Selectability C or F Pump Inlet Outlet 1 2 inch NPT ...

Page 5: ...ange 198V to 264V 198V to 264V 198V to 264V Over Voltage Category II 50Hz Cat No 080506 080516 080526 Additional Specifications for P Series 6000 Chillers with Positive Displacement Pump Model P Series 6205P 6305P 6505P Flow Rate 0 psi 1 gpm 3 8 lpm 1 gpm 3 8 lpm 1 gpm 3 8 lpm Pump Pressure Adjustable 20 to 100psi 20 to 100psi 20 to 100psi Shipping Weight 160 lbs 170 lbs 170 lbs Volts Hz Amps 120V...

Page 6: ...2A Volts Range 198V to 264V 198V to 264V 198V to 264V Over Voltage Category II 50Hz Cat No 080536 080546 080594 Additional Specifications for P Series 6000 Chillers with Positive Displacement Pump Model P Series 6705P 6105P 6155P Flow Rate 0 psi 4 gpm 15 2 lpm 4 gpm 15 2 lpm 4 gpm 15 2 lpm Pump Pressure Adjustable 20 to 100psi 20 to 100psi 20 to 100psi Shipping Weight 178 lbs 178 lbs 450 lbs Volts...

Page 7: ...ibility requirements CAUSTIC CORROSIVE OR FLAMMABLE FLUIDS MUST NEVER BE USED Do not use a flammable fluid as a fire hazard may result WARNING Operation below 15 C requires antifreeze in the circulating fluid 2 3 Pump Hoses and Couplings To maintain a safe workplace and to avoid leaks special care should be taken when choosing hoses and connectors for the chiller 1 Pressure ratings Hoses should be...

Page 8: ...he pump running the reservoir s fluid level will decrease as the closed system begins to fill Add a little fluid at a time until the level in the reservoir stops going down This means that your system is filled and the air has been purged from it Replace the reservoir cap and turn it clockwise to lock it Recheck the cap for tightness Note When chillers with the standard magnetic drive centrifugal ...

Page 9: ...chiller is then fully operational Upon completion of the self test the actual fluid temperature is displayed Your desired operating temperature can now be set 2 Press the SET MENU button The degree lights flash indicating the temperature can be set or changed Turn the SETTING ADJUSTMENT knob to the desired setting This setting is accepted after pressing the SET MENU button or will be automatically...

Page 10: ...erature setability Error Screens E tF Triac alternistor failure DEF Displayed when chiller is reset to factory default settings Optional Equipment Flow or Float Switch E nF No Flow E FL Low Level Fluid 3 6 Draining the Unit Press the Power Off button and unplug the chiller Remove drain plug and reservoir cap and allow unit to drain Syphon or use a small manual pump to remove all fluid from the res...

Page 11: ...GE DRAIN DRAIN PLUG INLET Fluid In OUTLET Fluid Out REAR ACCESS PANEL TOP COVER TO ACCESS RESERVOIR TOP COVER TO ACCESS RESERVOIR PROVISION FOR 15 OR 9 PIN FEMALE CONNECTOR CIRCUIT BREAKER IEC 320 CONNECTOR LINE VOLTAGE DRAIN AIR FILTER INLET Fluid In OUTLET Fluid Out REAR ACCESS PANEL TEMPERATURE PROBE PRESSURE REGULATOR 6705 6105 6205 6305 6505 AIR FILTER ...

Page 12: ...12 6155 ...

Page 13: ...le or foreign particles a filter is included with the high pressure pump models How often the filter requires maintenance depends on the environment and use of the chiller To access this filter remove the left side panel The water filter is located behind the side brace Grip the plastic sediment bowl firmly and turn counter clockwise to remove it Clean the stainless steel wire screen found inside ...

Page 14: ......

Reviews: