8-5
Troubleshooting
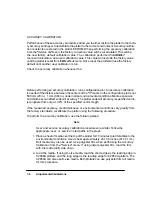
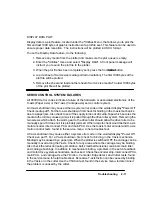
Table 8-1. Worded Error Messages (Continued)
Message
Error/Action
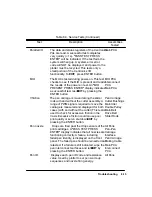
Media too small
Media loaded for accuracy calibration or pen alignment is too
small. Reload appropriate media.
Mispositioned
Reload roll
Roll is mispositioned. Unload roll media. Open the roll cover
and push the media roll all the way to the right so that it is
flush against the media stop on the roll core. Reload media
with the right edge no more than 0.2 inches (0.5 cm) from the
perforated line on the entry platen. Remove any ink deposits
on the drive roller. Ink deposits are reflective and can give
false indications for detecting media edges.
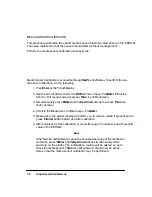
Mispositioned
Reload sheet
Sheet is mispositioned. Remove it and reload it with the right
edge no more than 0.2 inches (0.5 cm) from the perforated
line on the entry platen.
MIO data error
The modular interface is configured incorrectly. Press the
ENTER button to clear the message from the front panel
display. Recheck the MIO configuration settings.
MIO error
Comm. break
The flow of data from the computer to the plotter was
prematurely stopped (e.g. by switching OFF the computer
before all of the data was sent). Press the ENTER button to
clear the message from the front panel display.
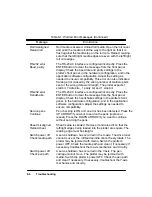
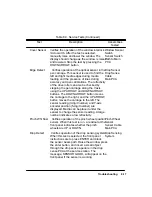
MIO error
Handshake
The modular interface is configured incorrectly. Press the
ENTER button to clear the message from the front panel
display. Check the handshake settings in the plotter’s front
panel, in the hardware configuration, and in the application
software configuration. Adjust the settings as needed to
ensure compatibility.
Out of memory
Data was lost
The current plot is too large for the plotter’s buffer.
Additional memory must be installed to plot drawing.
Pen (C, Y, M, K)
not loaded
Pen checking is ON and an error has been detected. Press the
UP ARROW if you want to load the pen. Press the DOWN
ARROW if you want to continue without loading the pen.
Remove media
Lower lever
An attempt to load media was made while the media load
lever at the right of the plotter was raised. Remove the media,
lower the lever, and reload media with the lever down.
Summary of Contents for 650c - DesignJet Color Inkjet Printer
Page 1: ...PrinterFAQ COM HP DesignJet650C User Guide ...
Page 126: ...7 10 Adjustments Calibrations Notes ...
Page 156: ...9 4 Product History Notes ...
Page 165: ...10 9 Parts and Diagrams Illustrated Parts Breakdown C2859A Electronics Enclosure C C2858 3 1 ...
Page 167: ...10 11 Parts and Diagrams Illustrated Parts Breakdown C2858A Electronics Enclosure C C2858 4 1 ...
Page 183: ...10 27 Parts and Diagrams Illustrated Parts Breakdown Paper Drive Assemblies C C2858 12 1 ...
Page 199: ......


