6-6
Removal and Replacement
MIO CARD REMOVAL
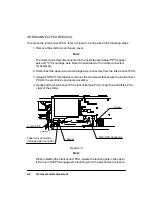
To install or remove and replace an MIO card, refer to Figure 6-2 and perform the following
steps:
1. If an MIO card is not already installed, use a small flat blade or Torx T10 screwdriver
to remove the two screws that attach the cover plate to the top back of the plotter.
Remove the cover plate.
2. If an MIO card is already installed, loosen the MIO card thumbscrews. Carefully
pull the MIO card straight up and remove the MIO card from the plotter.
3. To install an MIO card, insert the card into the MIO slot and push the card firmly in
until fully seated in the slot.
4. Tighten the MIO
MIO Slot
Figure 6-2.
(C)C2858-32
Summary of Contents for 650c - DesignJet Color Inkjet Printer
Page 1: ...PrinterFAQ COM HP DesignJet650C User Guide ...
Page 126: ...7 10 Adjustments Calibrations Notes ...
Page 156: ...9 4 Product History Notes ...
Page 165: ...10 9 Parts and Diagrams Illustrated Parts Breakdown C2859A Electronics Enclosure C C2858 3 1 ...
Page 167: ...10 11 Parts and Diagrams Illustrated Parts Breakdown C2858A Electronics Enclosure C C2858 4 1 ...
Page 183: ...10 27 Parts and Diagrams Illustrated Parts Breakdown Paper Drive Assemblies C C2858 12 1 ...
Page 199: ......


