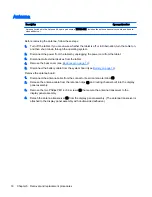
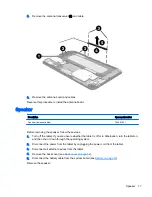
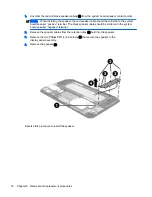
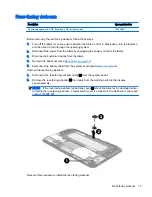
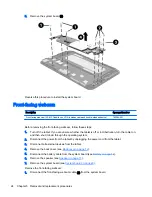
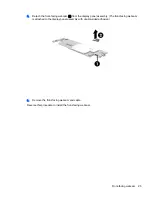
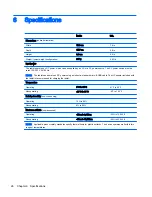
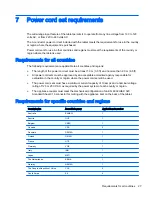
background image

5.

Remove the battery (5).

Reverse this procedure to install the battery.

Battery 15

Summary of Contents for 7 Plus G2

Page 1: ...HP 7 Plus G2 Tablet Maintenance and Service Guide IMPORTANT This document is intended for HP authorized service providers only ...

Page 2: ... or omissions contained herein First Edition September 2014 Document Part Number 786902 001 Product notice This guide describes features that are common to most models Some features may not be available on your tablet Software terms By installing copying downloading or otherwise using any software product preinstalled on this tablet you agree to be bound by the terms of the HP End User License Agr...

Page 3: ...w another hard surface such as an adjoining optional printer or a soft surface such as pillows or rugs or clothing to block airflow Also do not allow the AC adapter to contact the skin or a soft surface such as pillows or rugs or clothing during operation The device and the AC adapter comply with the user accessible surface temperature limits defined by the International Standard for Safety of Inf...

Page 4: ...iv Safety warning notice ...

Page 5: ...minary requirements 8 Tools required 8 Service considerations 8 Plastic parts 8 Cables and connectors 8 Grounding guidelines 9 Electrostatic discharge damage 9 Packaging and transporting guidelines 10 Workstation guidelines 10 5 Removal and replacement procedures 12 Tablet component replacement procedures 12 Back cover 12 Battery 14 Antenna 16 Speaker 17 Rear facing webcam 19 Microphone 20 Connect...

Page 6: ...7 Power cord set requirements 27 Requirements for all countries 27 Requirements for specific countries and regions 27 8 Recycling 29 Index 30 vi ...

Page 7: ...acing webcamera 0 3 MP fixed focus VGA front facing webcamera Sensor Accelerometer G sensor GPS Wireless networking WLAN 802 11 b g n Miracast compatible 3G data GSM 900 1800 or 850 1900 MHz WCDMA 900 2100 or 850 1900M Hz Bluetooth 4 0 WAPI External expansion Integrated micro SD Card Reader expandable to 64 GB Ports Audio headphone microphone combo jack Micro SD Card Reader Micro USB Power require...

Page 8: ...2 External component identification Item Component Item Component 1 Rear facing webcam 6 Power button 2 Chapter 2 External component identification ...

Page 9: ...ponent Item Component 2 Micro USB 2 0 port 7 Volume control buttons 2 3 Audio out headphone Audio in microphone jack 8 Micro SD Card Reader slot 4 Speaker 9 Micro SIM slot 5 Front facing webcam 10 Microphone 3 ...

Page 10: ...o to http partsurfer hp com select your country or region and then follow the on screen instructions Locating the product number and serial number The tablet product number 1 and serial number 2 are located on the tablet back cover This information may be needed when travelling internationally or when contacting support 4 Chapter 3 Illustrated parts catalog ...

Page 11: ...1 20 GHz dual core processor a graphics subsystem with UMA memory and 1 0 GB of system memory Equipped with a 16 GB eMMC hard drive 790593 001 Equipped with a 8 GB eMMC hard drive 790592 001 8 Connector board includes SD Card reader slot SIM slot and cable 790596 001 9 Microphone includes cable 790597 001 10 Antenna included in the Antenna Kit spare part number 790600 001 Includes the antenna tran...

Page 12: ...cs Kit 790599 001 Rubber Kit includes rear facing webcam rubber lens cover 790598 001 Screw Kit 790590 001 USB extension cable 791929 001 Sequential part number listing Spare part number Description 790586 001 Back cover includes antenna and power volume button actuator 790587 001 Battery 3100 mAh USB charging includes cable and double sided adhesive 790588 001 Cable Kit 790589 001 Display panel a...

Page 13: ...memory 1 0 GB of system memory and a 8 GB eMMC hard drive for use in Europe the Middle East and Africa 790616 001 HP 7 Plus G2 Tablet equipped with a 7 0 in 1024 600 AG IPS LED multi touch wide viewing angle 5 point capacitive auto rotate selectable tempered glass backlit TouchScreen display panel an Intel Z2520 1 20 GHz dual core processor a graphics subsystem with UMA memory 1 0 GB of system mem...

Page 14: ...lastic parts Use care when handling the plastic parts Apply pressure only at the points designated in the maintenance instructions Cables and connectors CAUTION When servicing the tablet be sure that cables are placed in their proper locations during the reassembly process Improper cable placement can damage the tablet Cables must be handled with extreme care to avoid damage Apply only the tension...

Page 15: ...e these precautions Keep components in their electrostatic safe containers until you are ready to install them Before touching an electronic component discharge static electricity by using the guidelines described in this section Avoid touching pins leads and circuitry Handle electronic components as little as possible If you remove a component place it in an electrostatic safe container The follo...

Page 16: ... proper materials are selected to avoid static charging When grounding is not possible use an ionizer to dissipate electric charges Workstation guidelines Follow these grounding workstation guidelines Cover the workstation with approved static shielding material Use a wrist strap connected to a properly grounded work surface and use properly grounded tools and equipment Use conductive field servic...

Page 17: ...m resistance between the operator and ground To be effective the conductive must be worn in contact with the skin The following grounding equipment is recommended to prevent electrostatic damage Antistatic tape Antistatic smocks aprons and sleeve protectors Conductive bins and other assembly or soldering aids Nonconductive foam Conductive tabletop workstations with ground cords of one megohm resis...

Page 18: ...display panel cable and TouchScreen cable 790589 001 Before disassembling the tablet follow these steps 1 Turn off the tablet If you are unsure whether the tablet is off or in Hibernation turn the tablet on and then shut it down through the operating system 2 Disconnect the power from the tablet by unplugging the power cord from the tablet 3 Disconnect all external devices from the tablet Remove t...

Page 19: ... and power button actuator 2 should become displaced during the removal of the back cover install the actuator into the openings in the back cover as indicated in the following illustration The actuators are included in the back cover spare part kit Back cover 13 ...

Page 20: ...afety issues use only the battery provided with the tablet a replacement battery provided by HP or a compatible battery purchased from HP CAUTION Removing a battery that is the sole power source for the tablet can cause loss of information To prevent loss of information save your work or shut down the tablet through Windows before removing the battery Remove the battery 1 Disconnect the battery ca...

Page 21: ...5 Remove the battery 5 Reverse this procedure to install the battery Battery 15 ...

Page 22: ...devices from the tablet 4 Remove the back cover see Back cover on page 12 5 Disconnect the battery cable from the system board see Battery on page 14 Remove the antenna board 1 Disconnect the antenna cable from the connector board antenna terminal 1 2 Release the antenna cable from the retention clips 2 and routing channel built into the display panel assembly 3 Remove the two Phillips PM1 4 3 6 s...

Page 23: ... steps 1 Turn off the tablet If you are unsure whether the tablet is off or in Hibernation turn the tablet on and then shut it down through the operating system 2 Disconnect the power from the tablet by unplugging the power cord from the tablet 3 Disconnect all external devices from the tablet 4 Remove the back cover see Back cover on page 12 5 Disconnect the battery cable from the system board se...

Page 24: ...itive terminal The black speaker cable should be soldered to the system board speaker negative terminal 2 Release the speaker cables from the retention clips 2 built into the speaker 3 Remove the two Phillips PM1 4 3 6 screws 3 that secure the speaker to the display panel assembly 4 Remove the speaker 4 Reverse this procedure to install the speaker 18 Chapter 5 Removal and replacement procedures ...

Page 25: ...external devices from the tablet 4 Remove the back cover see Back cover on page 12 5 Disconnect the battery cable from the system board see Battery on page 14 Remove the rear facing webcam 1 Disconnect the rear facing webcam cable 1 from the system board 2 Remove the rear facing webcam 2 and cable from the molding built into the display panel assembly NOTE If the rear facing webcam rubber lens cov...

Page 26: ...ove the back cover see Back cover on page 12 5 Disconnect the battery cable from the system board see Battery on page 14 Remove the microphone 1 Unsolder the red and black microphone cables 1 from the system board microphone contact points NOTE When installing the microphone the red microphone cable should be soldered to the system board microphone positive terminal The black microphone cable shou...

Page 27: ...ing the power cord from the tablet 3 Disconnect all external devices from the tablet 4 Remove the back cover see Back cover on page 12 5 Disconnect the battery cable from the system board see Battery on page 14 Remove the connector board 1 Disconnect the antenna cable from the connector board antenna terminal 1 2 Release the microphone 2 from the molding built into display panel assembly 3 Disconn...

Page 28: ... UMA memory and 1 0 GB of system memory Equipped with a 16 GB eMMC hard drive 790593 001 Equipped with a 8 GB eMMC hard drive 790592 001 Before removing the system board follow these steps 1 Turn off the tablet If you are unsure whether the tablet is off or in Hibernation turn the tablet on and then shut it down through the operating system 2 Disconnect the power from the tablet by unplugging the ...

Page 29: ... be unsoldered see Microphone on page 20 3 TouchScreen cable ZIF connector on system board 4 XRay cable ZIF connector on system board 5 Power volume button board cable ZIF connector on system board 2 Remove the three Phillips PM1 4 3 6 screws 1 that secure the system board to the display panel assembly 3 Remove the three Phillips PM1 4 2 2 broad head screws 2 that secure the audio jack light pipe ...

Page 30: ...rn the tablet on and then shut it down through the operating system 2 Disconnect the power from the tablet by unplugging the power cord from the tablet 3 Disconnect all external devices from the tablet 4 Remove the back cover see Back cover on page 12 5 Disconnect the battery cable from the system board see Battery on page 14 6 Remove the speaker see Speaker on page 17 7 Remove the system board se...

Page 31: ...he display panel assembly The front facing webcam is attached to the display panel assembly with double sided adhesive 3 Remove the front facing webcam and cable Reverse this procedure to install the front facing webcam Front facing webcam 25 ...

Page 32: ... industry standard micro B USB cable The HP adapter included with the tablet is recommended for charging the tablet Temperature Operating 5 C to 35 C 41 F to 95 F Nonoperating 20 C to 60 C 4 F to 140 F Relative humidity non condensing Operating 10 to 90 Nonoperating 5 to 95 Maximum altitude unpressurized Operating 15 m to 3 048 m 50 ft to 10 000 ft Nonoperating 15 m to 12 192 m 50 ft to 40 000 ft ...

Page 33: ...ust be approved by an acceptable accredited agency responsible for evaluation in the country or region where the power cord set will be used The power cord sets must have a minimum current capacity of 10 amps and a nominal voltage rating of 125 or 250 V AC as required by the power system of each country or region The appliance coupler must meet the mechanical configuration of an EN 60 320 IEC 320 ...

Page 34: ... and wall plug must bear a T mark and registration number in accordance with the Japanese Dentori Law The flexible cord must be Type VCT or VCTF 3 conductor 1 00 mm conductor size The wall plug must be a two pole grounding type with a Japanese Industrial Standard C8303 7 A 125 V configuration 4 The flexible cord must be Type RVV 3 conductor 0 75 mm conductor size Power cord set fittings appliance ...

Page 35: ...e battery in general household waste Follow the local laws and regulations in your area for battery disposal HP encourages customers to recycle used electronic hardware HP original print cartridges and rechargeable batteries For more information about recycling programs see the HP Web site at http www hp com recycle 29 ...

Page 36: ...ack 3 J jacks audio in 3 audio out 3 headphone 3 microphone 3 M mass storage device product description 1 memory module product description 1 microphone location 3 product description 1 removal 20 spare part number 5 7 20 microphone jack 3 model name 1 O operating system product description 1 P packaging guidelines 10 plastic parts service considerations 8 Plastics Kit spare part number 6 7 ports ...

Page 37: ...5 6 22 T tablet major components 5 spare part numbers 6 7 specifications 26 tools required 8 transporting guidelines 10 U USB 2 0 port 3 USB extension cable spare part number 6 7 V video product description 1 volume control buttons 3 W webcam location 2 3 removal 19 24 spare part numbers 5 6 7 19 24 wireless networking product description 1 workstation guidelines 10 Index 31 ...

Reviews: